Run the Workflow
What this chapter covers
Once the knowledge base is ready, you start generating A-SPICE work products from the Workflow tab. This chapter explains how to read the V-model view, how to set the run conditions in the Run panel, what you see while the 11 stages from SYS.1 to SYS.5 run one after another, what the screen looks like when the run has finished, and how to open the generated documents in the Documents tab.
- Audience: users who have built the knowledge base and are about to start their first generation run
- Prerequisites: a workspace where the previous chapter's knowledge base build (Source Ingest) is finished, and a green dot (connected) as the AI status in the header
A run needs a Claude connection and is billed. If AI is not connected, the Run panel shows Running the workflow requires a Claude connection · Connect → and Start run is disabled. Every stage calls Claude while it runs, and the app gives no upfront estimate of duration or cost anywhere.
The V-model view
- Click the ① Workflow tab at the top of the project screen.
- The V-model appears in the middle of the screen. Each node is an A-SPICE process (SYS.1 … SYS.5, SWE.1 … SWE.6), and the abbreviation under the node name (StRS, SyRS …) is the work product that stage produces. The stage that will actually run first carries the Start badge.
- Click ② Run at the top right to open the Run panel, where you set the run conditions.
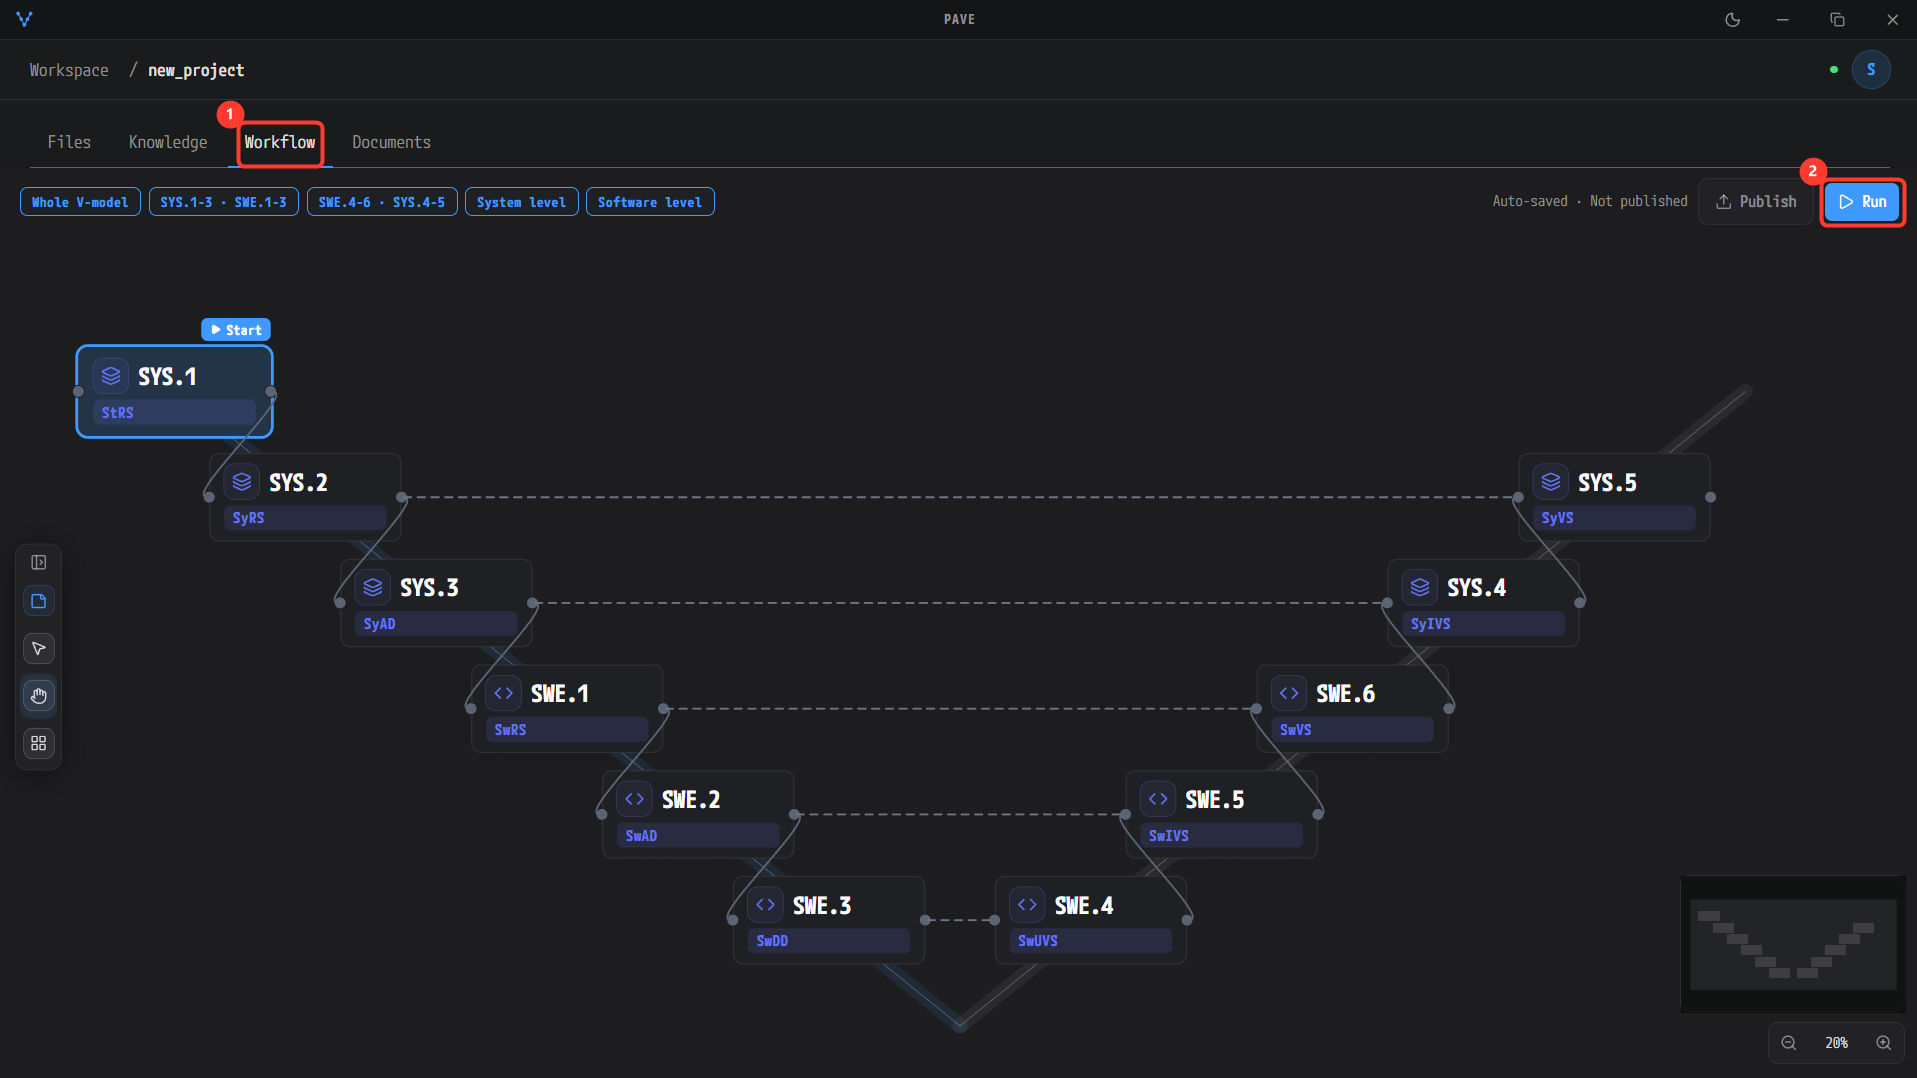
Opening the ① Workflow tab shows the V-model. SYS.1 at the top left carries the Start badge, so the run begins there. ② Run opens the Run panel on the right.
The 11 stages of the V-model and their work products:
| Stage | Abbreviation | Work product |
|---|---|---|
| SYS.1 | StRS | Stakeholder Requirements |
| SYS.2 | SyRS | System Requirements Specification |
| SYS.3 | SyAD | System Architecture |
| SWE.1 | SwRS | SW Requirements Specification |
| SWE.2 | SwAD | SW Architecture Document |
| SWE.3 | SwDD | SW Detailed Design Document |
| SWE.4 | SwUVS | SW Unit Verification Measure Specification |
| SWE.5 | SwIVS | SW Integration and Component Verification Measure Specification |
| SWE.6 | SwVS | SW Verification Measure Specification |
| SYS.4 | SyIVS | System Integration Verification Measure Specification |
| SYS.5 | SyVS | System Verification Measure Specification |
The chips along the top (Whole V-model, SYS.1-3 · SWE.1-3, SWE.4-6 · SYS.4-5, System level, Software level) only move the camera to that region; they do not choose which stages run. The Publish button at the top right does nothing in the current version, and Auto-saved · Not published is a fixed string unrelated to any state.
Set the run conditions in the Run panel
- In ① SYSTEM NAME, type the name of the system the documents describe. It becomes the title and the file name of the generated documents. Once you type it, a path of the form
Outputs/SyRS_<name>_<language>.mdis previewed underneath. - MODEL is the Claude model and effort used per stage (shown like Claude opus · medium). Models are opus / sonnet / haiku, efforts are low / medium / high, and the default is opus · medium for every generator stage.
- In ② OUTPUT, choose the language of the work products: English (en) or Korean (ko), default English. The choice becomes the
_en/_kosuffix of the file name. - Leave AUDIT at its default On. Off skips the verification passes, which is faster and cheaper, but the result carries a not release-eligible warning.
- Review the stages to run in ③ RUN PLAN. In this example all 11 stages are on and the summary reads 11 run · 0 skipped. Each row has a toggle to switch a stage off.
- Click ④ Start run. The button changes to In progress and, when the run finishes, to Done.
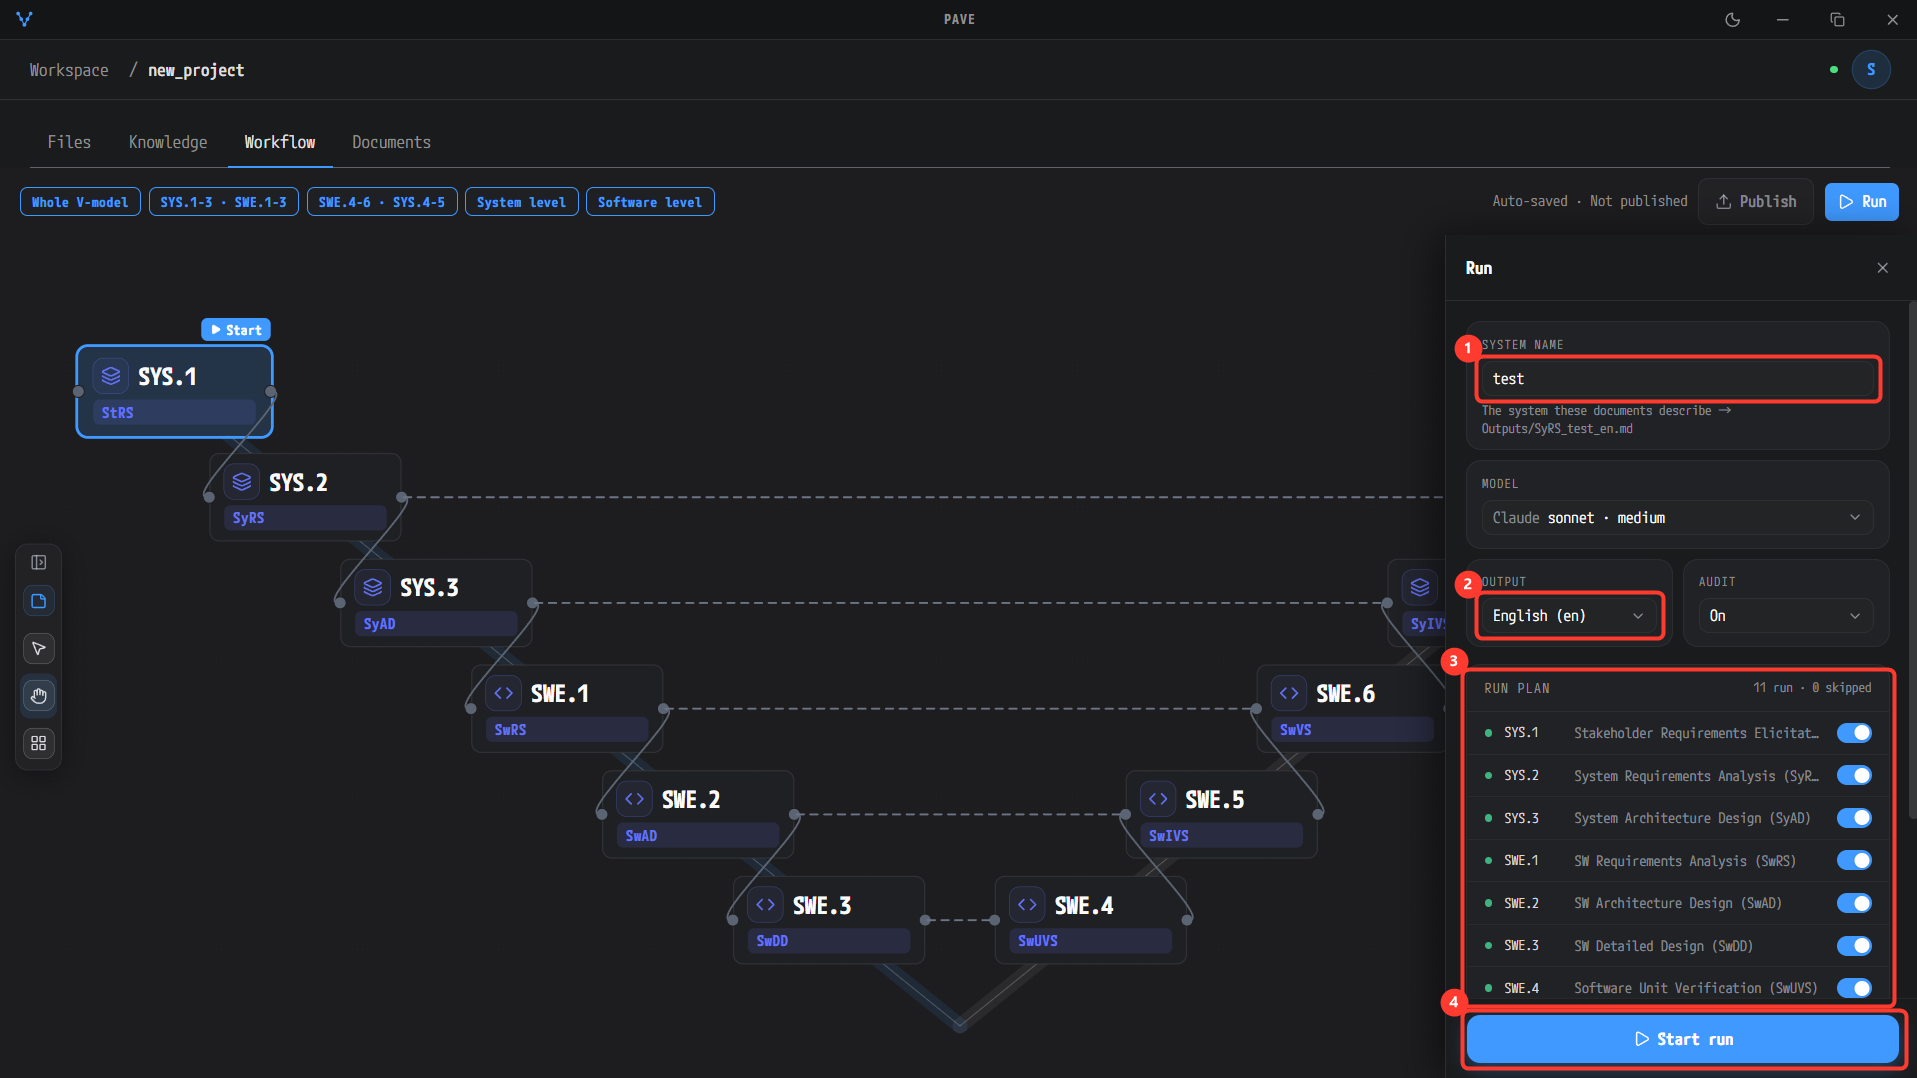
Typing test in ① SYSTEM NAME previews Outputs/SyRS_test_en.md underneath. In this screenshot MODEL has been changed to Claude sonnet · medium. ② OUTPUT is English (en), AUDIT is On, and ③ RUN PLAN reads 11 run · 0 skipped with all 11 stages on. ④ Start run starts the run.
Follow the progress
- When the run starts, a ① Running badge appears above the first stage, SYS.1, and a ② progress banner appears at the top of the screen. The banner shows the stage name (StRS), the progress line (for example
plan 0/3 · dispositions 1/3), the model and effort, and the Open / Pause / Stop buttons.
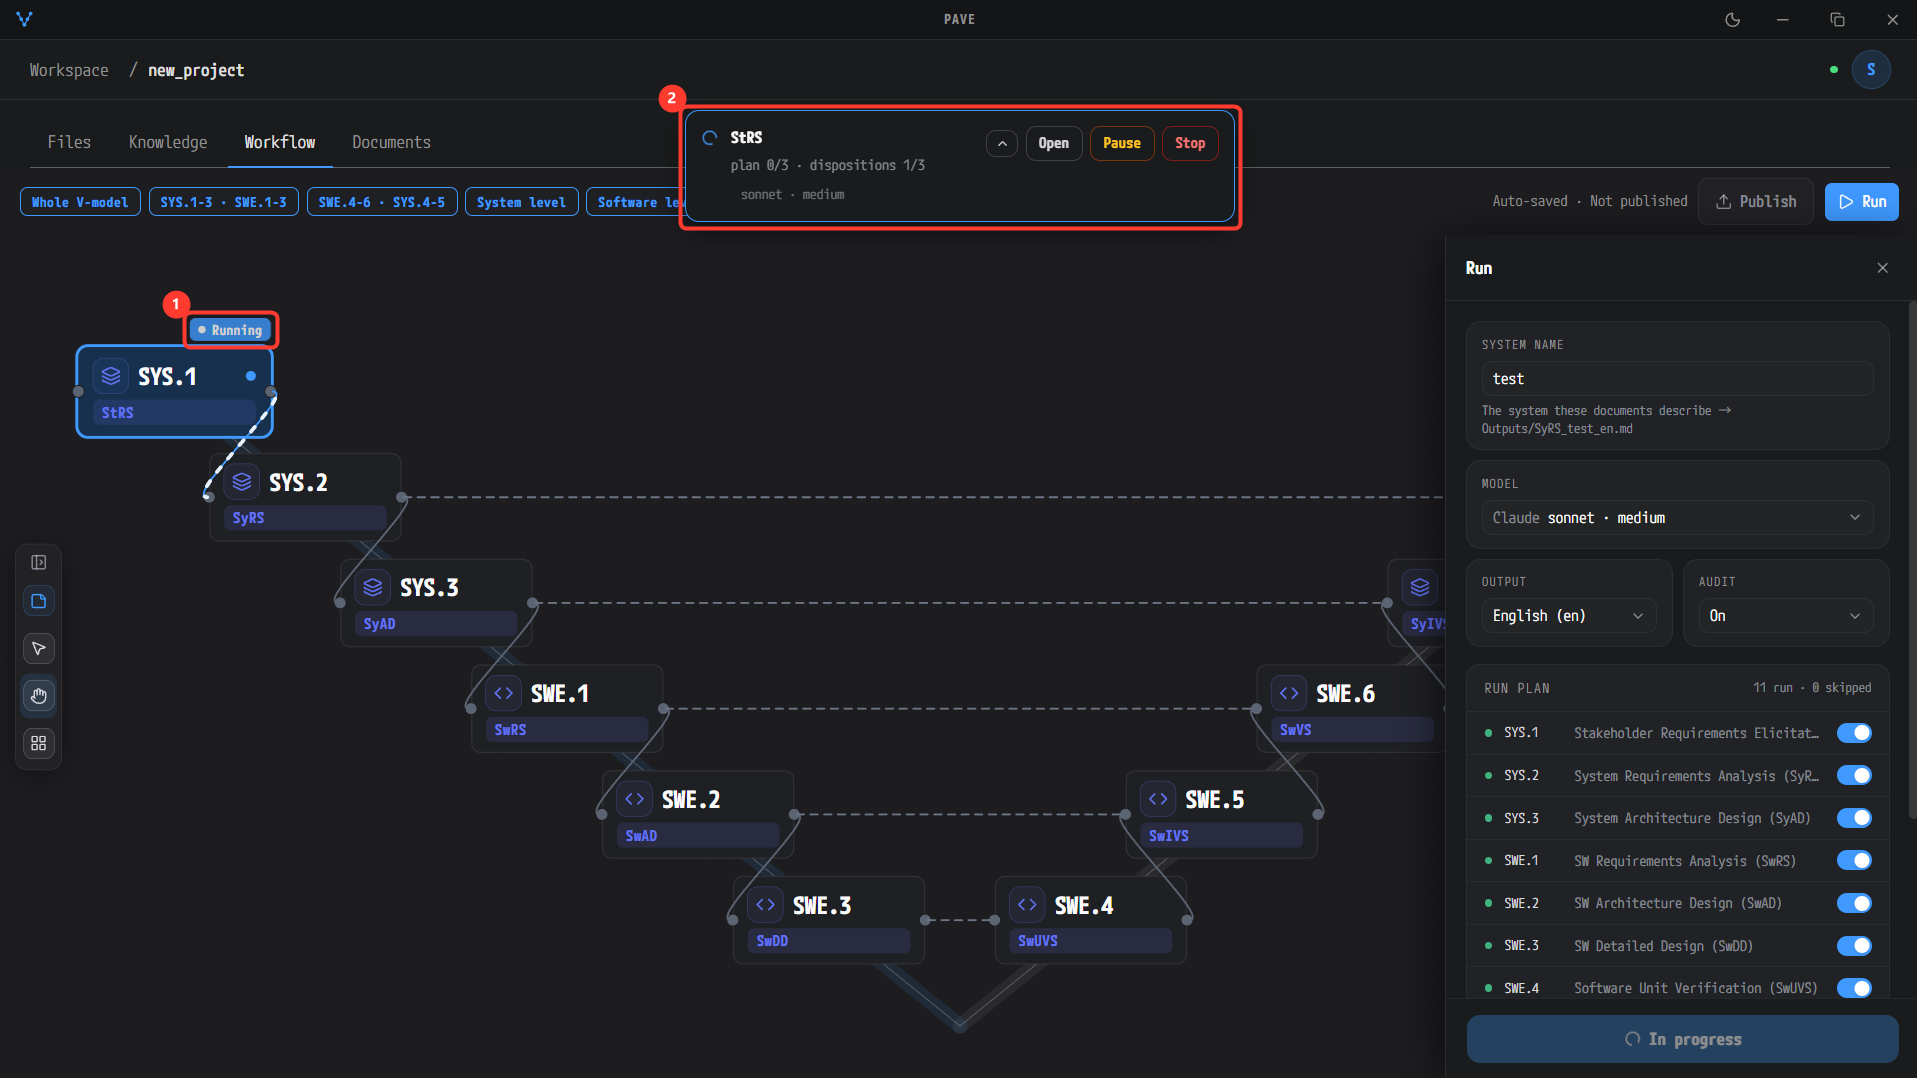
① The SYS.1 node carries the Running badge and ② the progress banner shows StRS, plan 0/3 · dispositions 1/3 and sonnet · medium. The button in the Run panel has changed to In progress.
- The progress line has the form
<phase> <current>/<total> · <note>. The phases are the ones the engines emit — plan, materialize/analyze, fill, validate, audit, repair, write — soStRS plan 0/3 · dispositions 1/3means the plan phase is on disposition 1 of 3. - When SYS.1 finishes, its node shows a ① completion check and the ② Running badge moves to SYS.2. The stage name in the banner changes to SyRS.
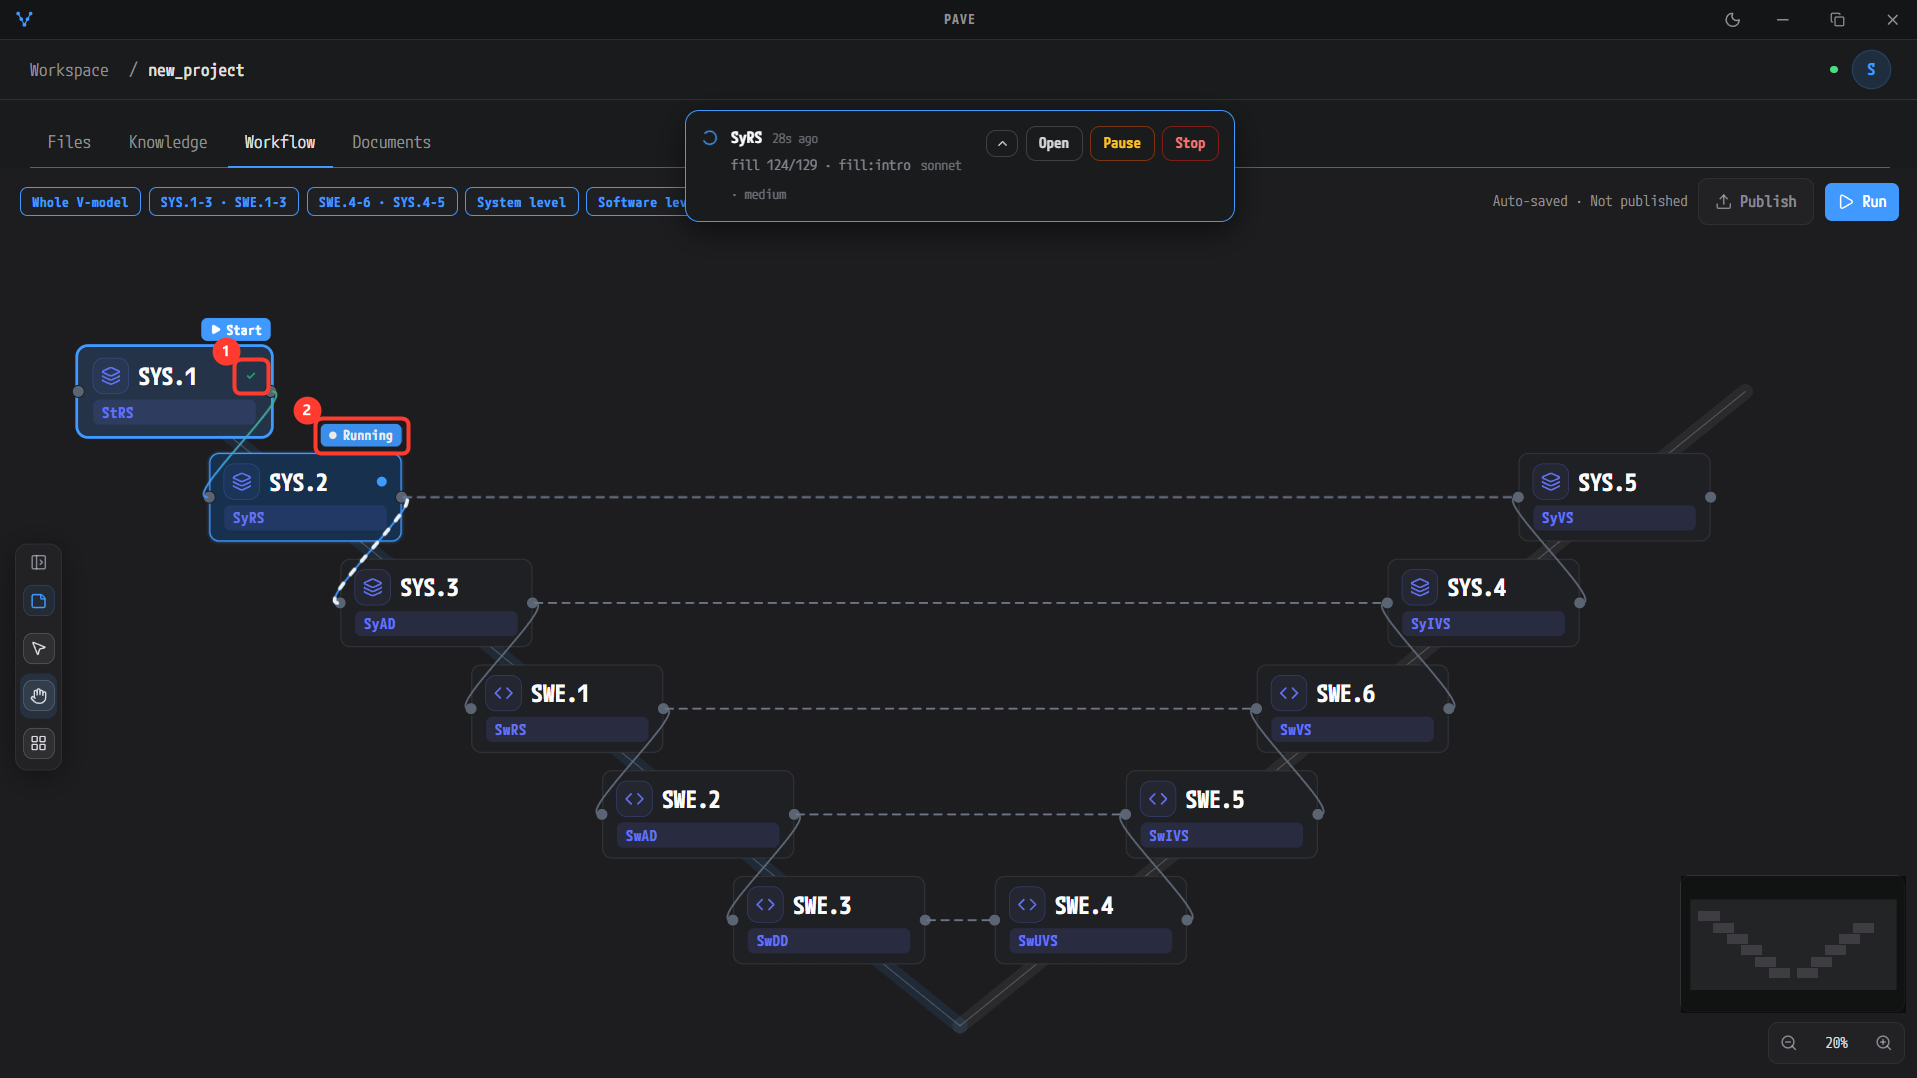
① The completion check on SYS.1 and ② the Running badge on SYS.2. The banner shows SyRS fill 124/129 · fill:intro — slot 124 of 129 of the SyRS document (the intro) is being filled.
Pause and Stop. Pause in the banner stops after the in-flight call completes (the result is recorded as
paused); Stop stops the same way but is recorded ascanceled. A multi-stage run halts at the paused or stopped stage and the remaining stages are not run. A workflow run does not resume after you quit and reopen the app — click Start run again to restart it (unlike Ingest, which can resume after a restart).
The stages one by one
After SYS.2, the Running badge moves on in the same way through SYS.3 → SWE.1 → SWE.2 → SWE.3 → SWE.4 → SWE.5 → SWE.6 → SYS.4 → SYS.5, and each finished stage keeps its completion check. The screenshots below show each stage while it is running. The progress line and its numbers differ from run to run, so treat them as examples.
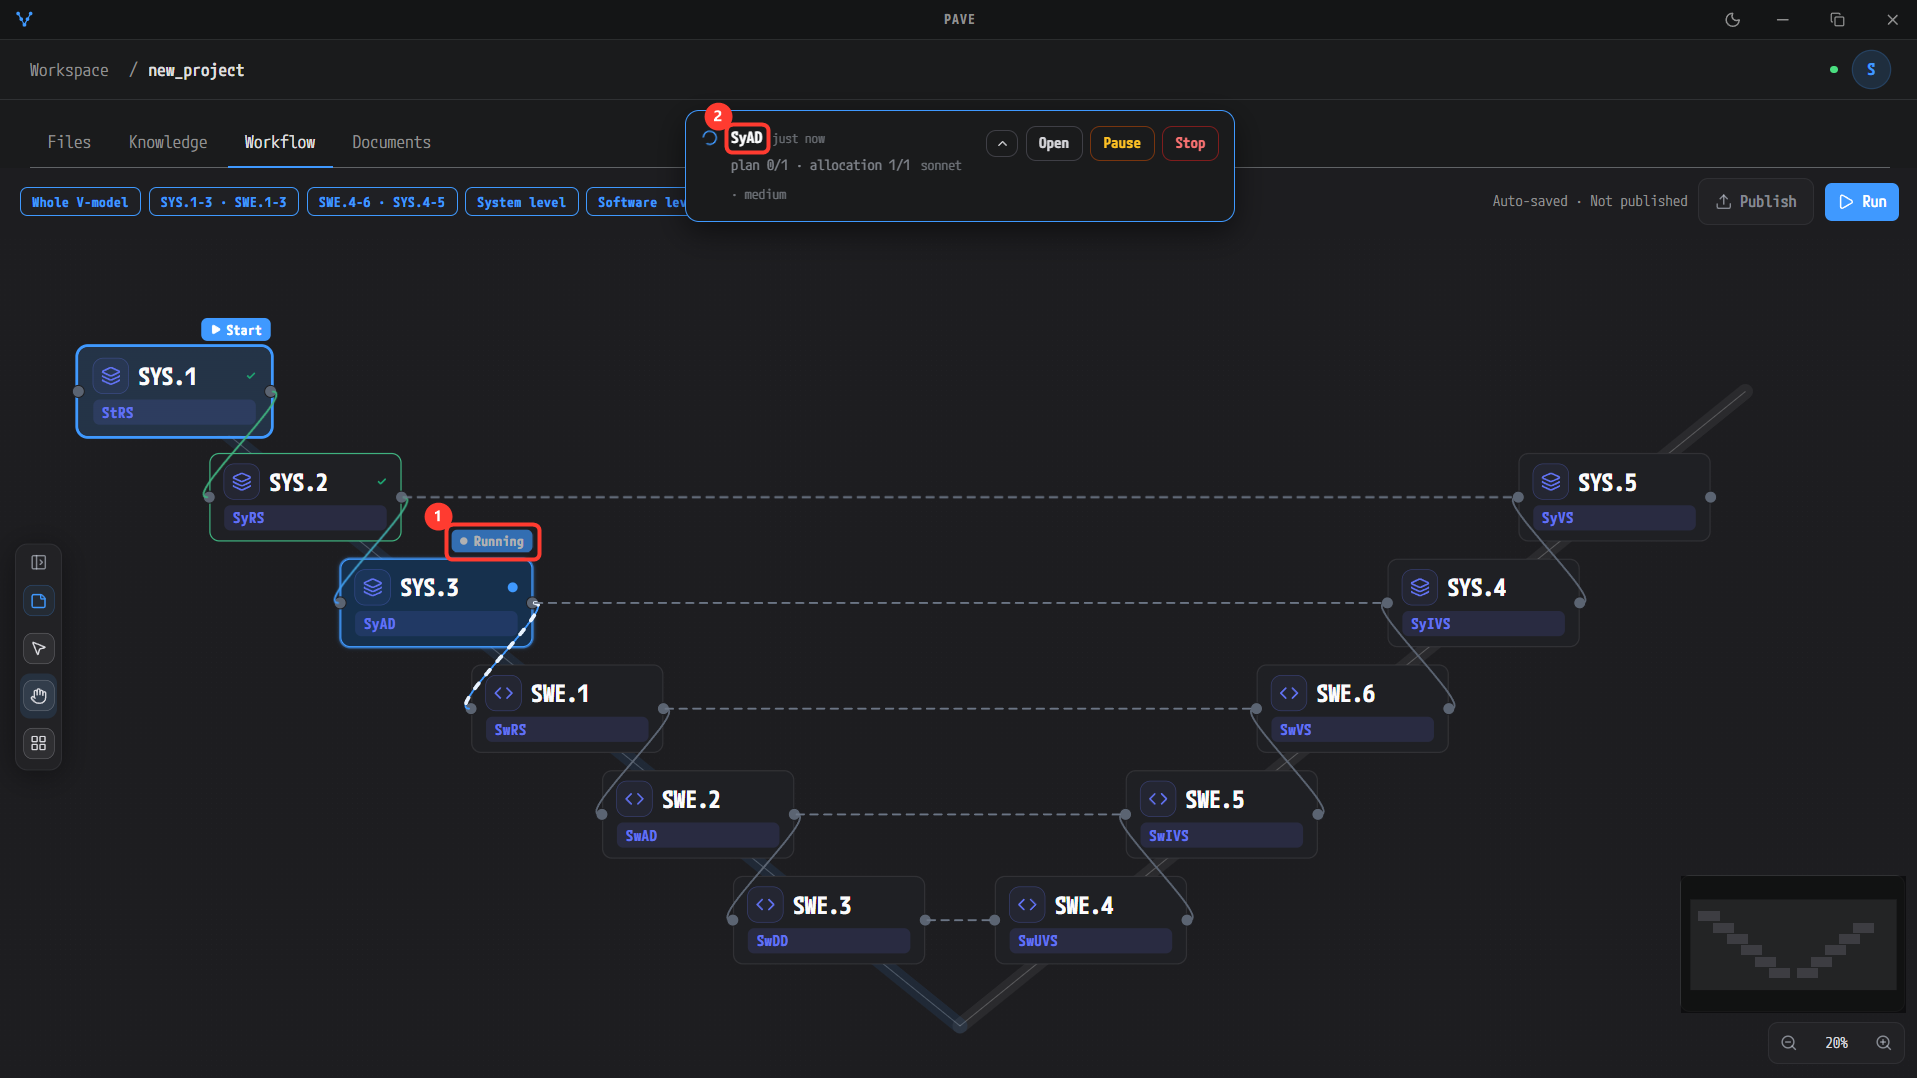
① The Running badge on the SYS.3 node and ② the stage name SyAD in the banner. SYS.1 and SYS.2 keep their completion checks.
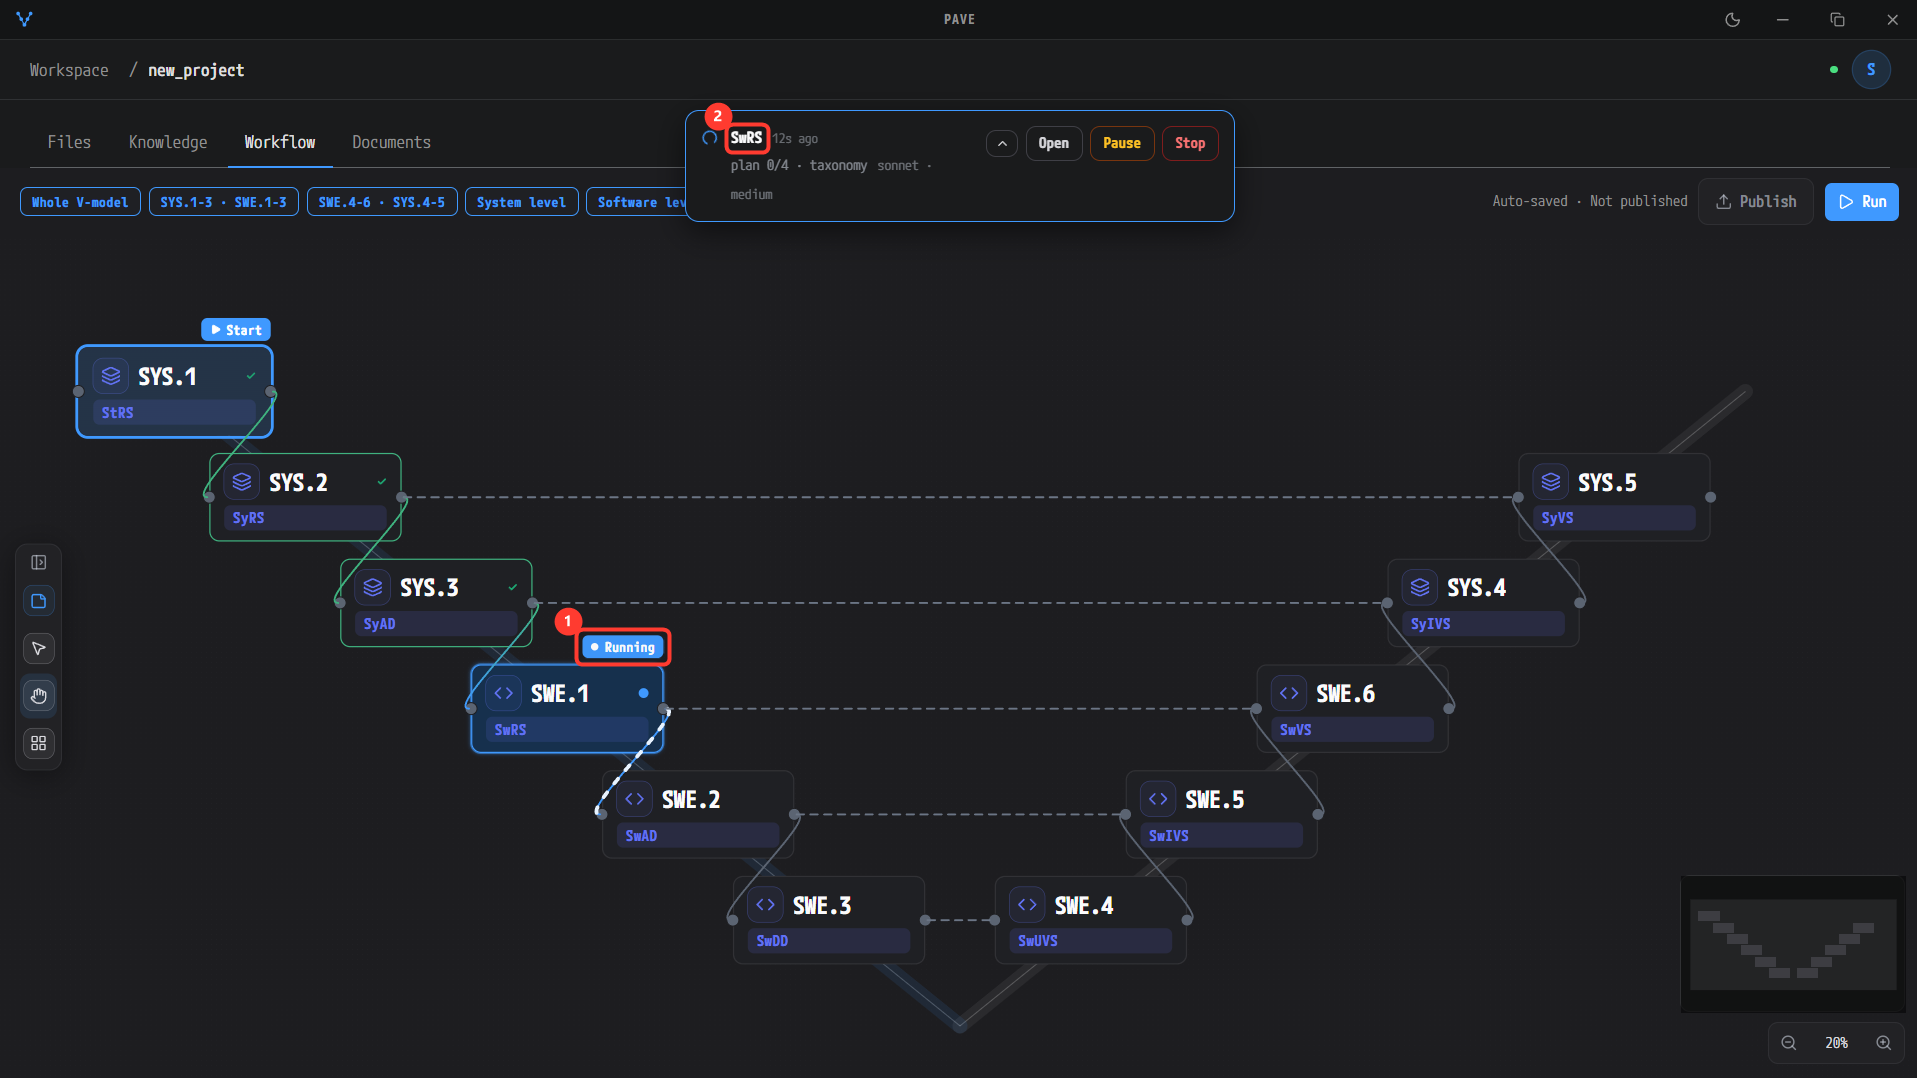
① The Running badge on SWE.1 and ② SwRS in the banner. The software stages (SWE.1 … SWE.6) start here.
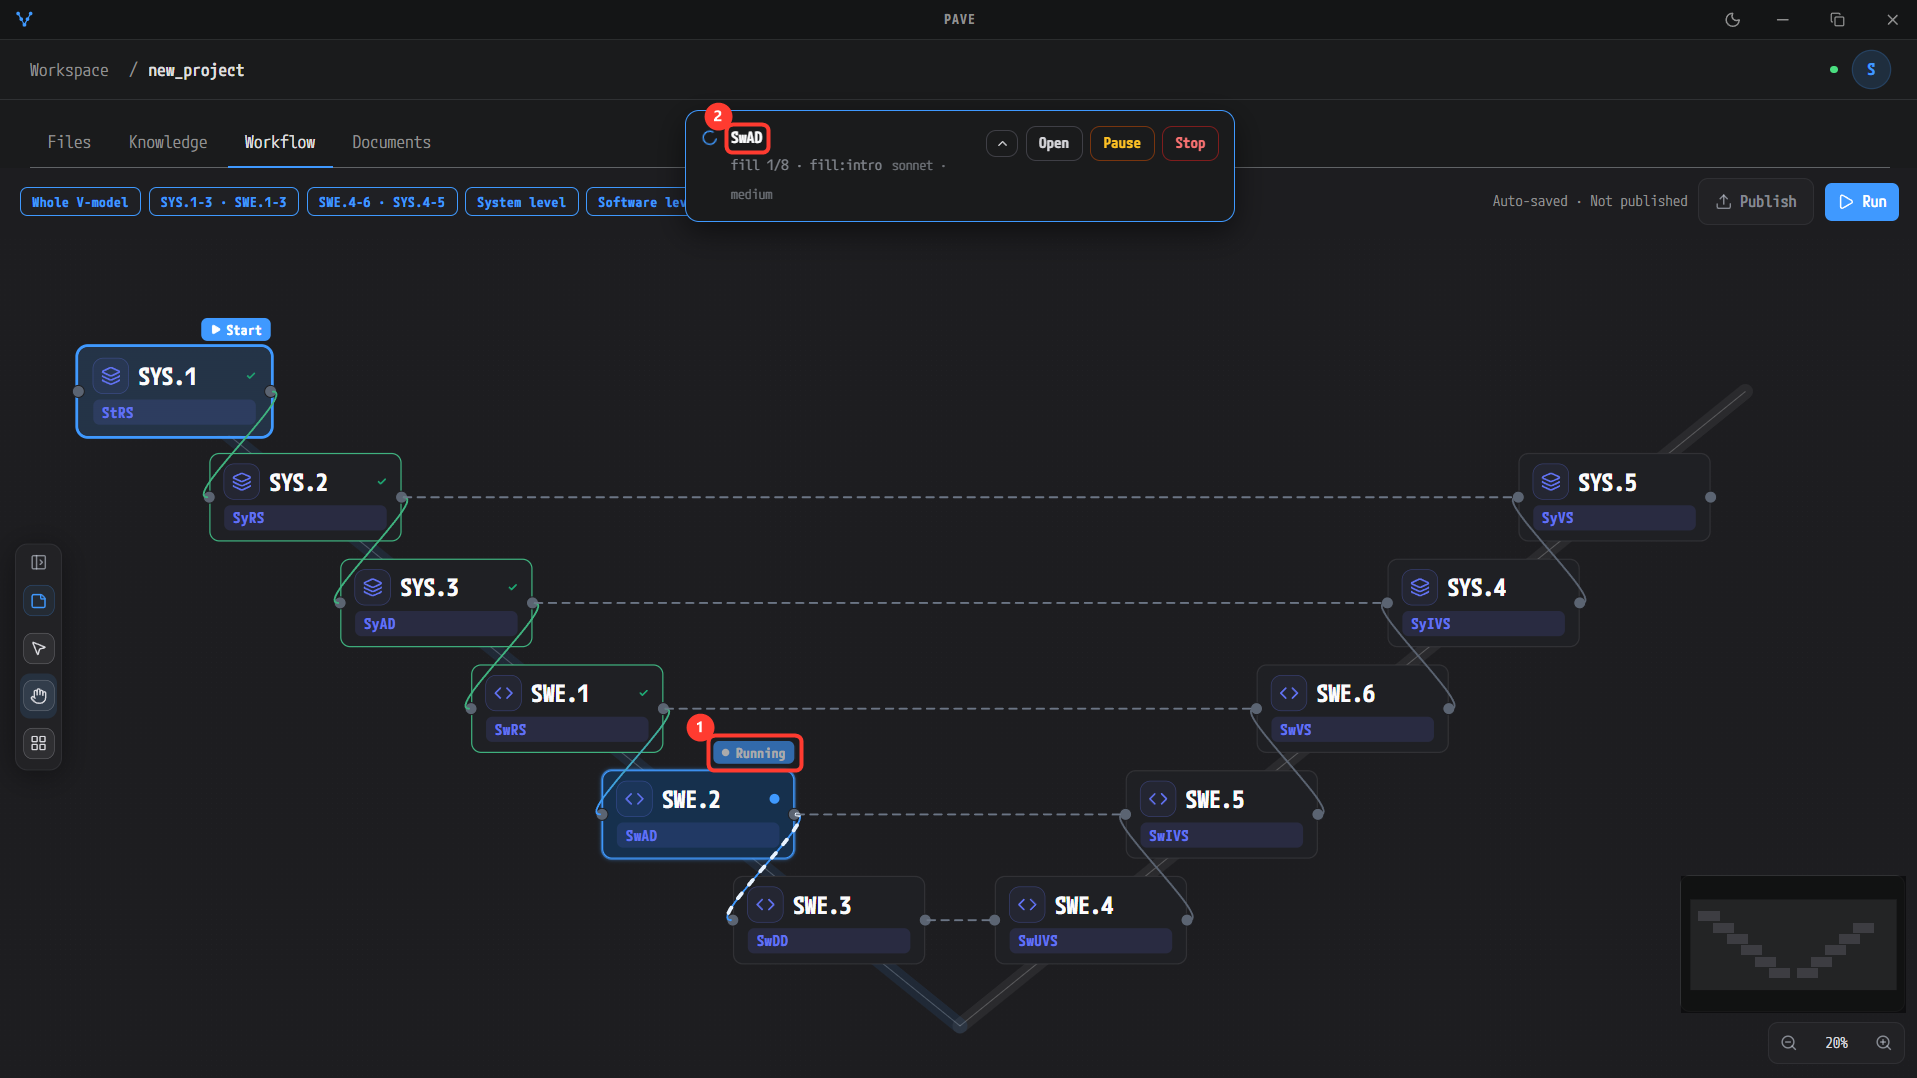
① The Running badge on SWE.2 and ② SwAD in the banner. The banner's fill 1/8 · fill:intro means the fill phase is writing the first of 8 slots, the intro (example).
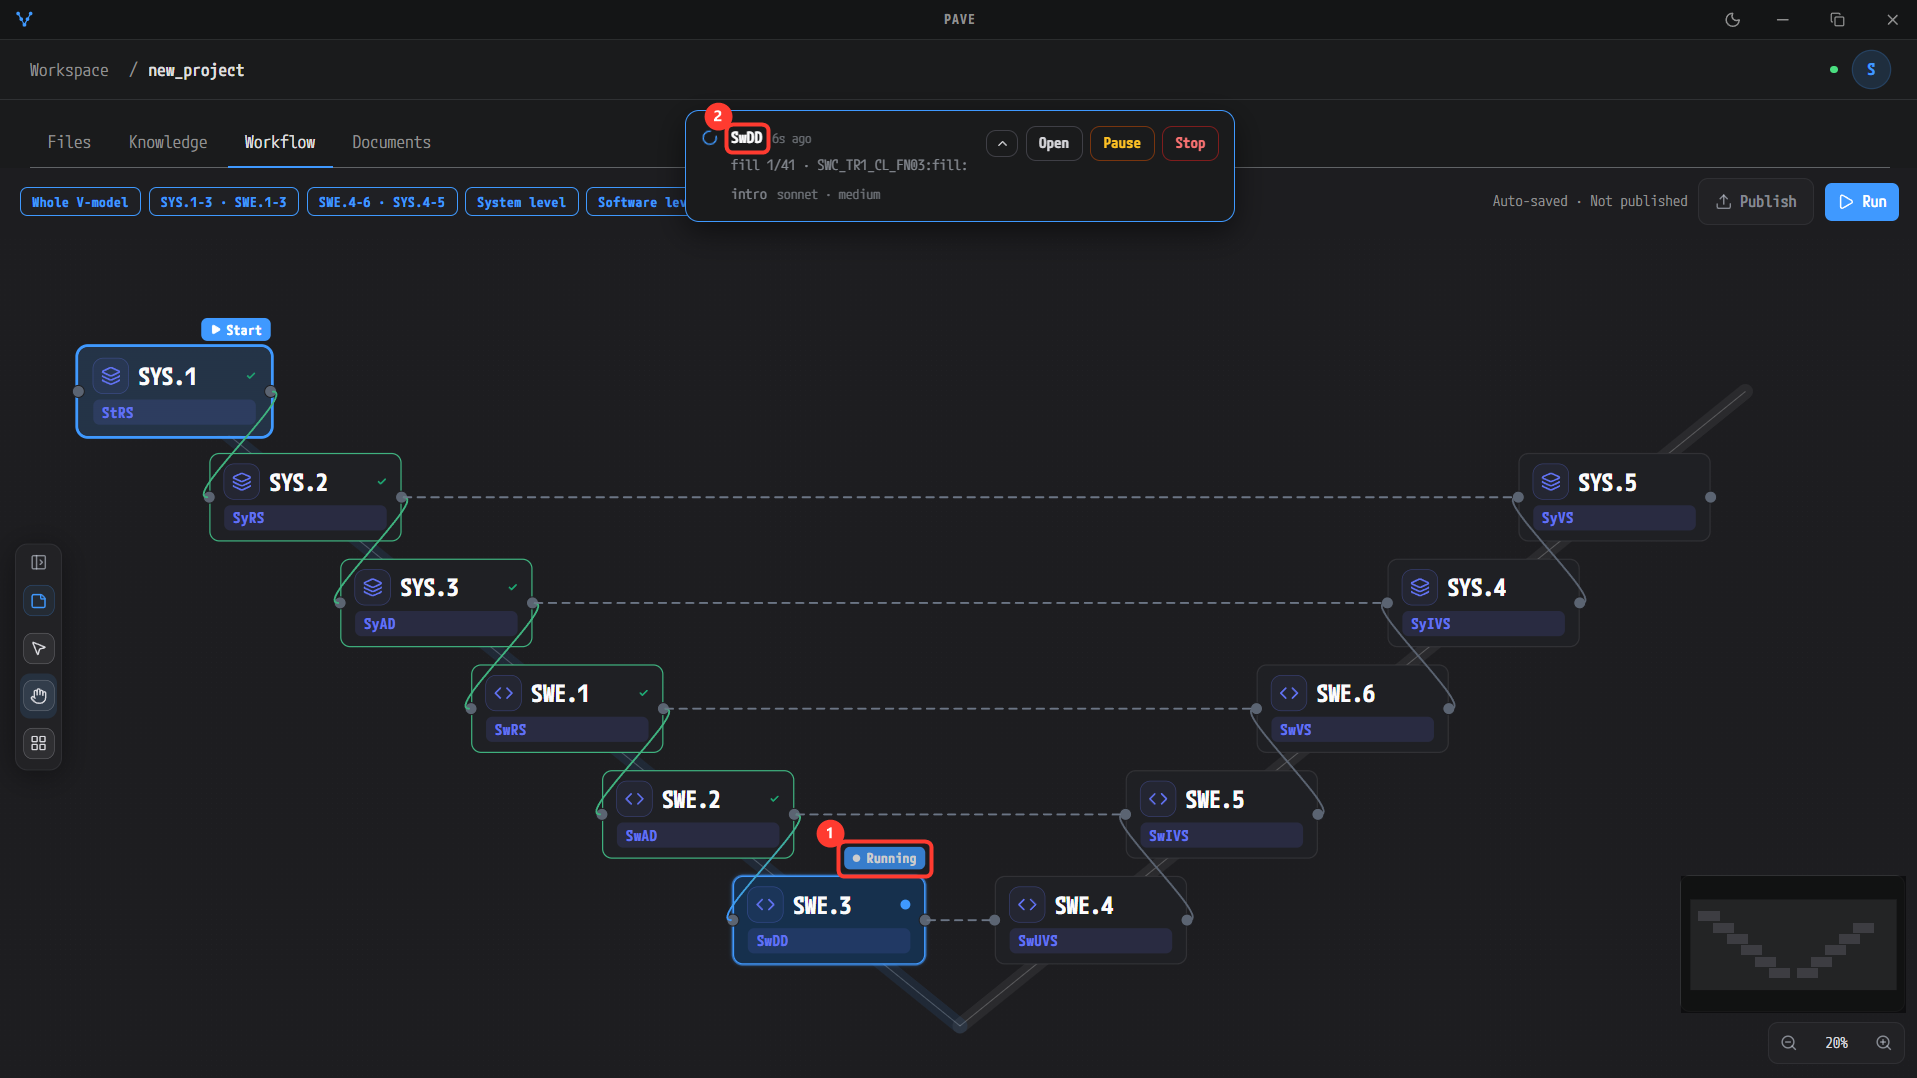
① The Running badge on SWE.3 and ② SwDD in the banner. This is the bottom of the descending arm of the V-model.
The Documents tab is filled once SWE.3 finishes. The generated document site is built automatically when SW Detailed Design (SWE.3) finishes. If you open the Documents tab before that, it shows No documents generated yet. They are built automatically when SW Detailed Design (SWE.3) finishes — until then the raw markdown is readable on the Files tab., and the work products produced so far can be read as Markdown on the Files tab.
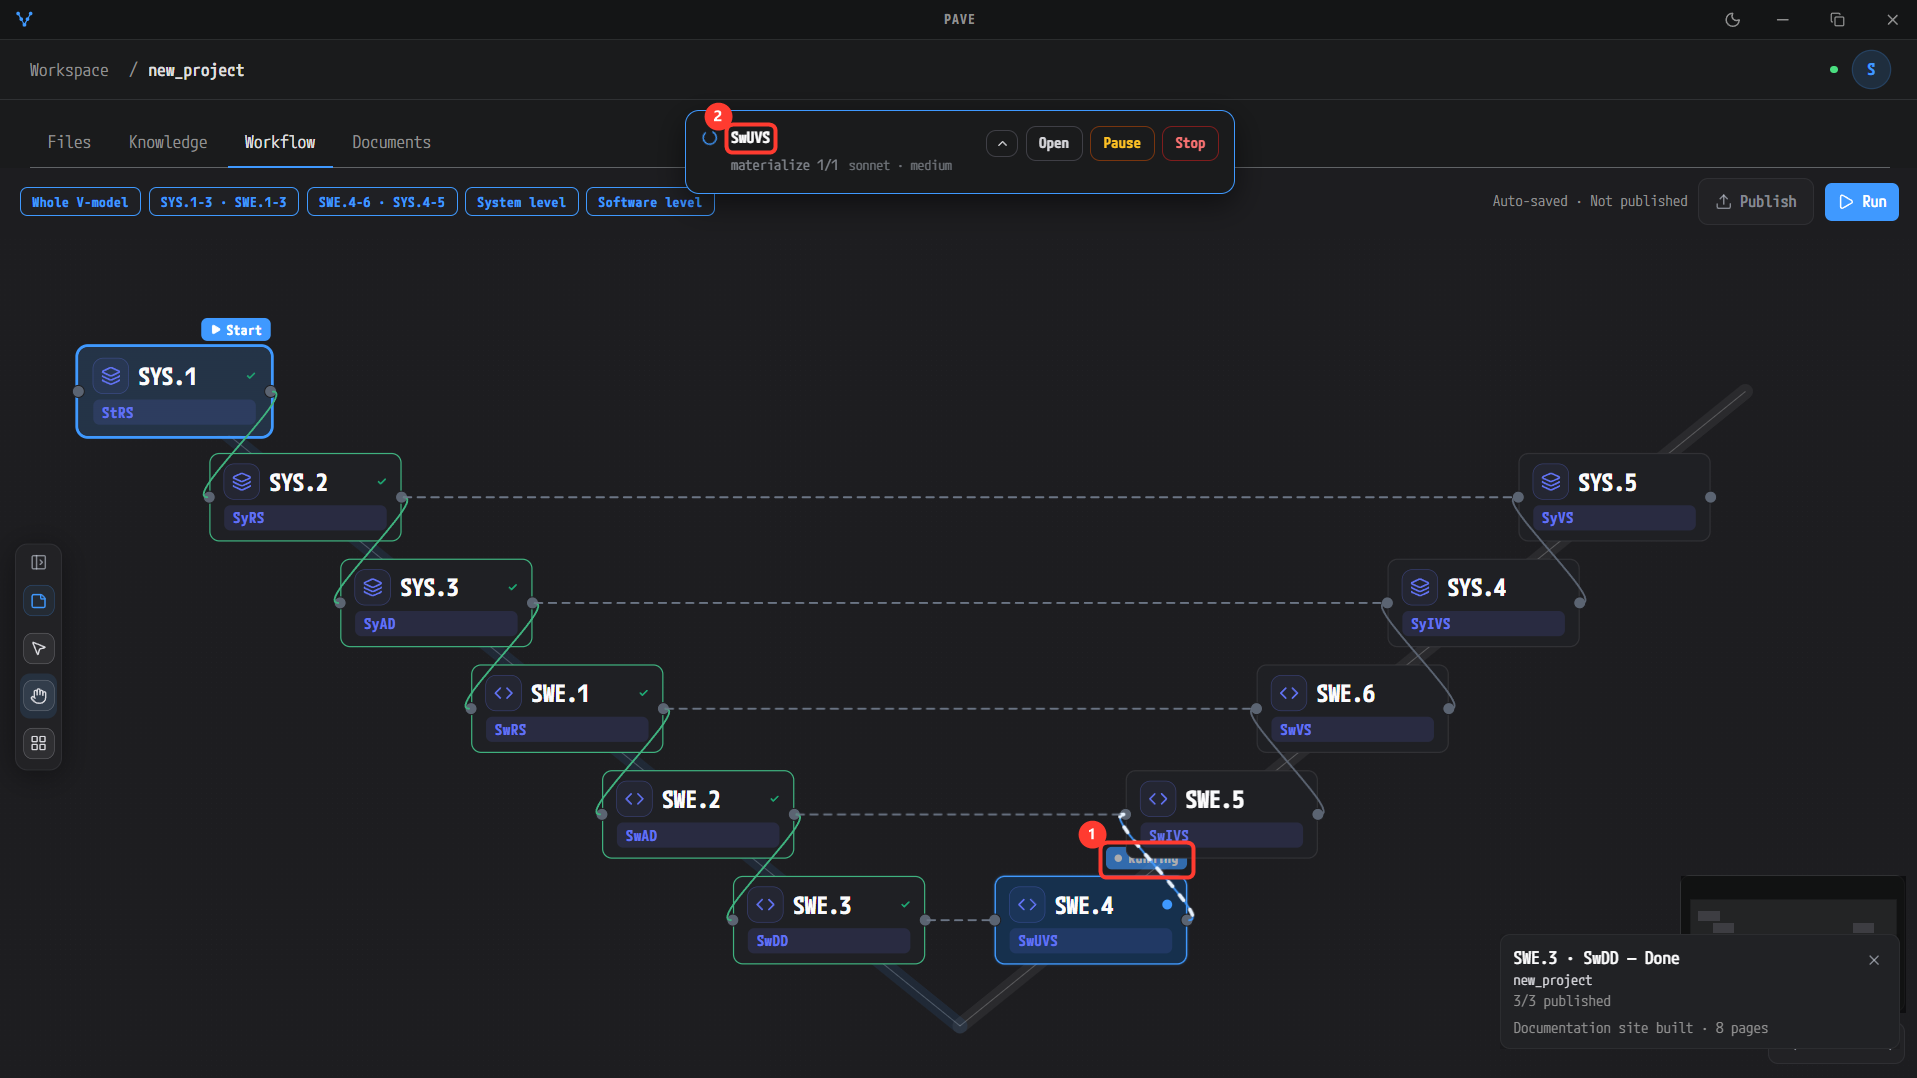
① The Running badge on SWE.4 and ② SwUVS in the banner. On the right arm of the V-model the badge is partly hidden behind the node above it. At the bottom right is the completion notification of the previous stage, SWE.3.
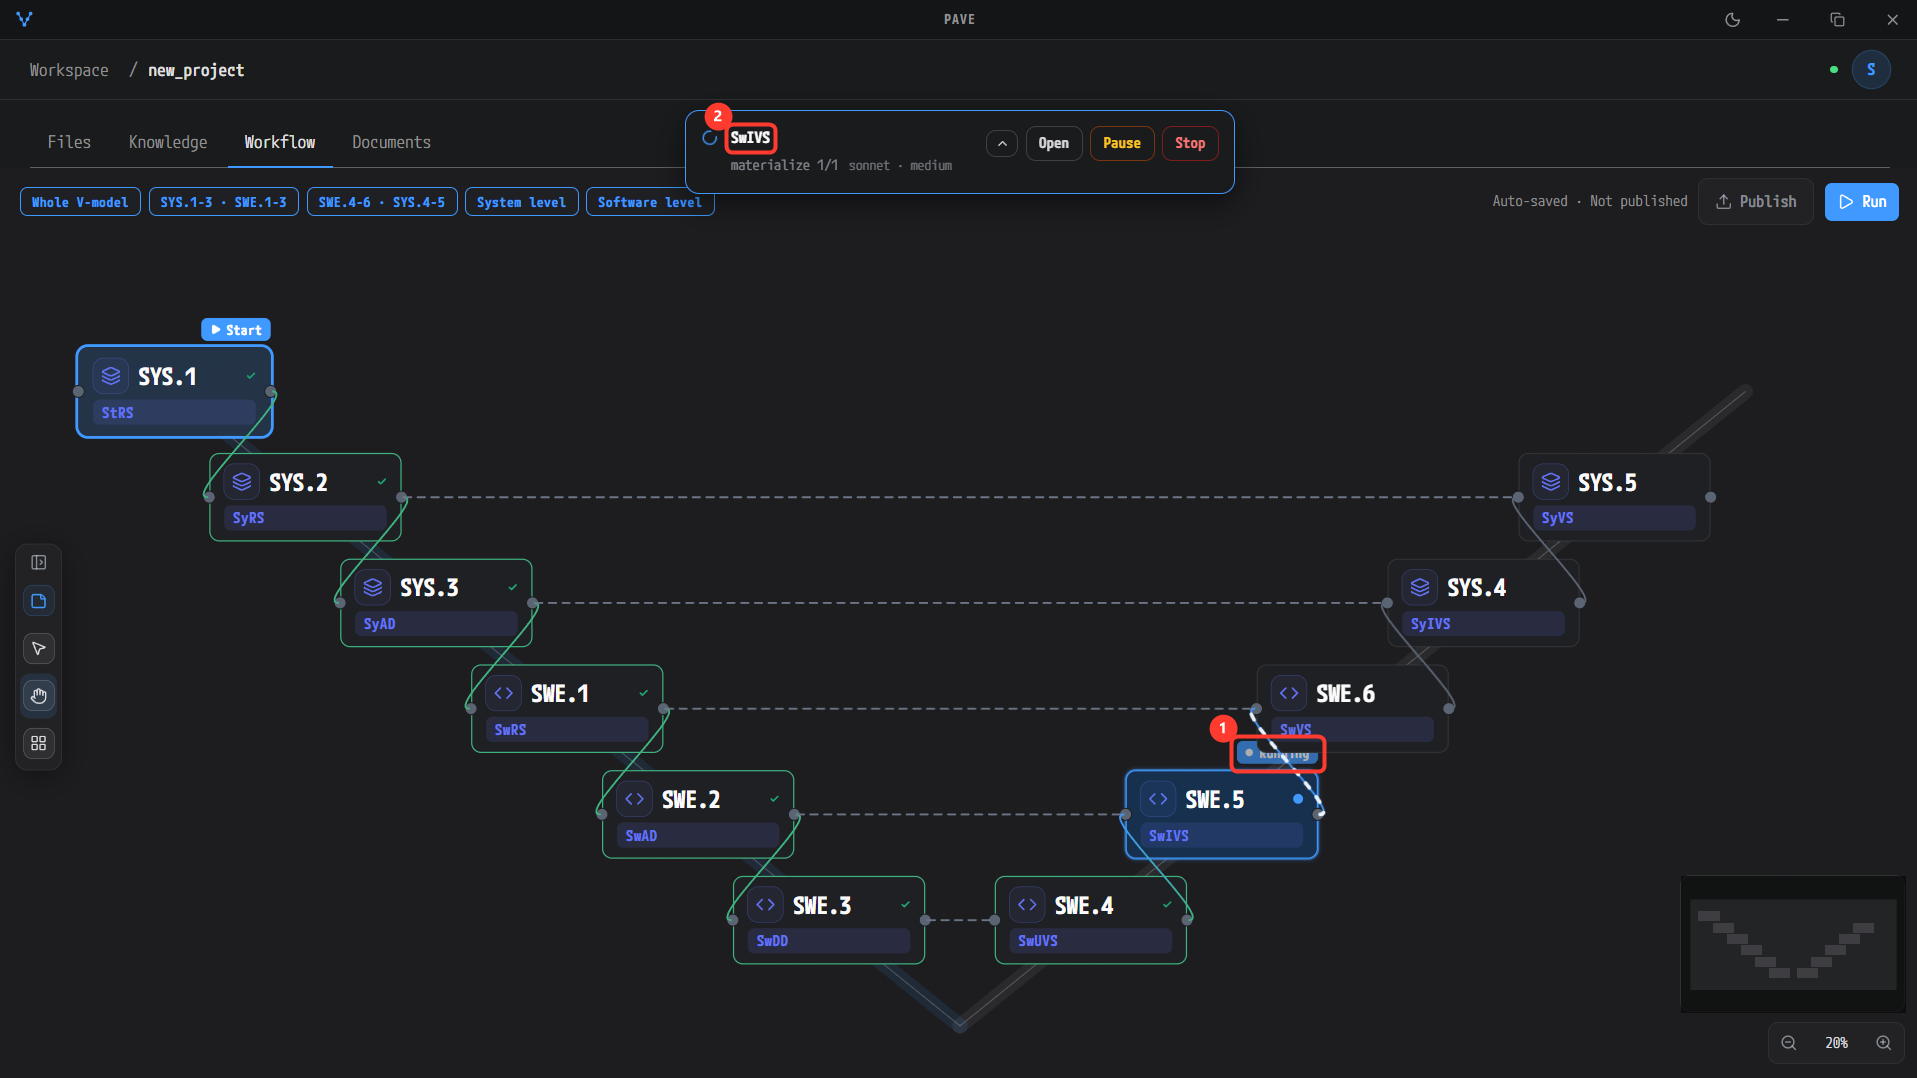
① The Running badge on SWE.5 and ② SwIVS in the banner.
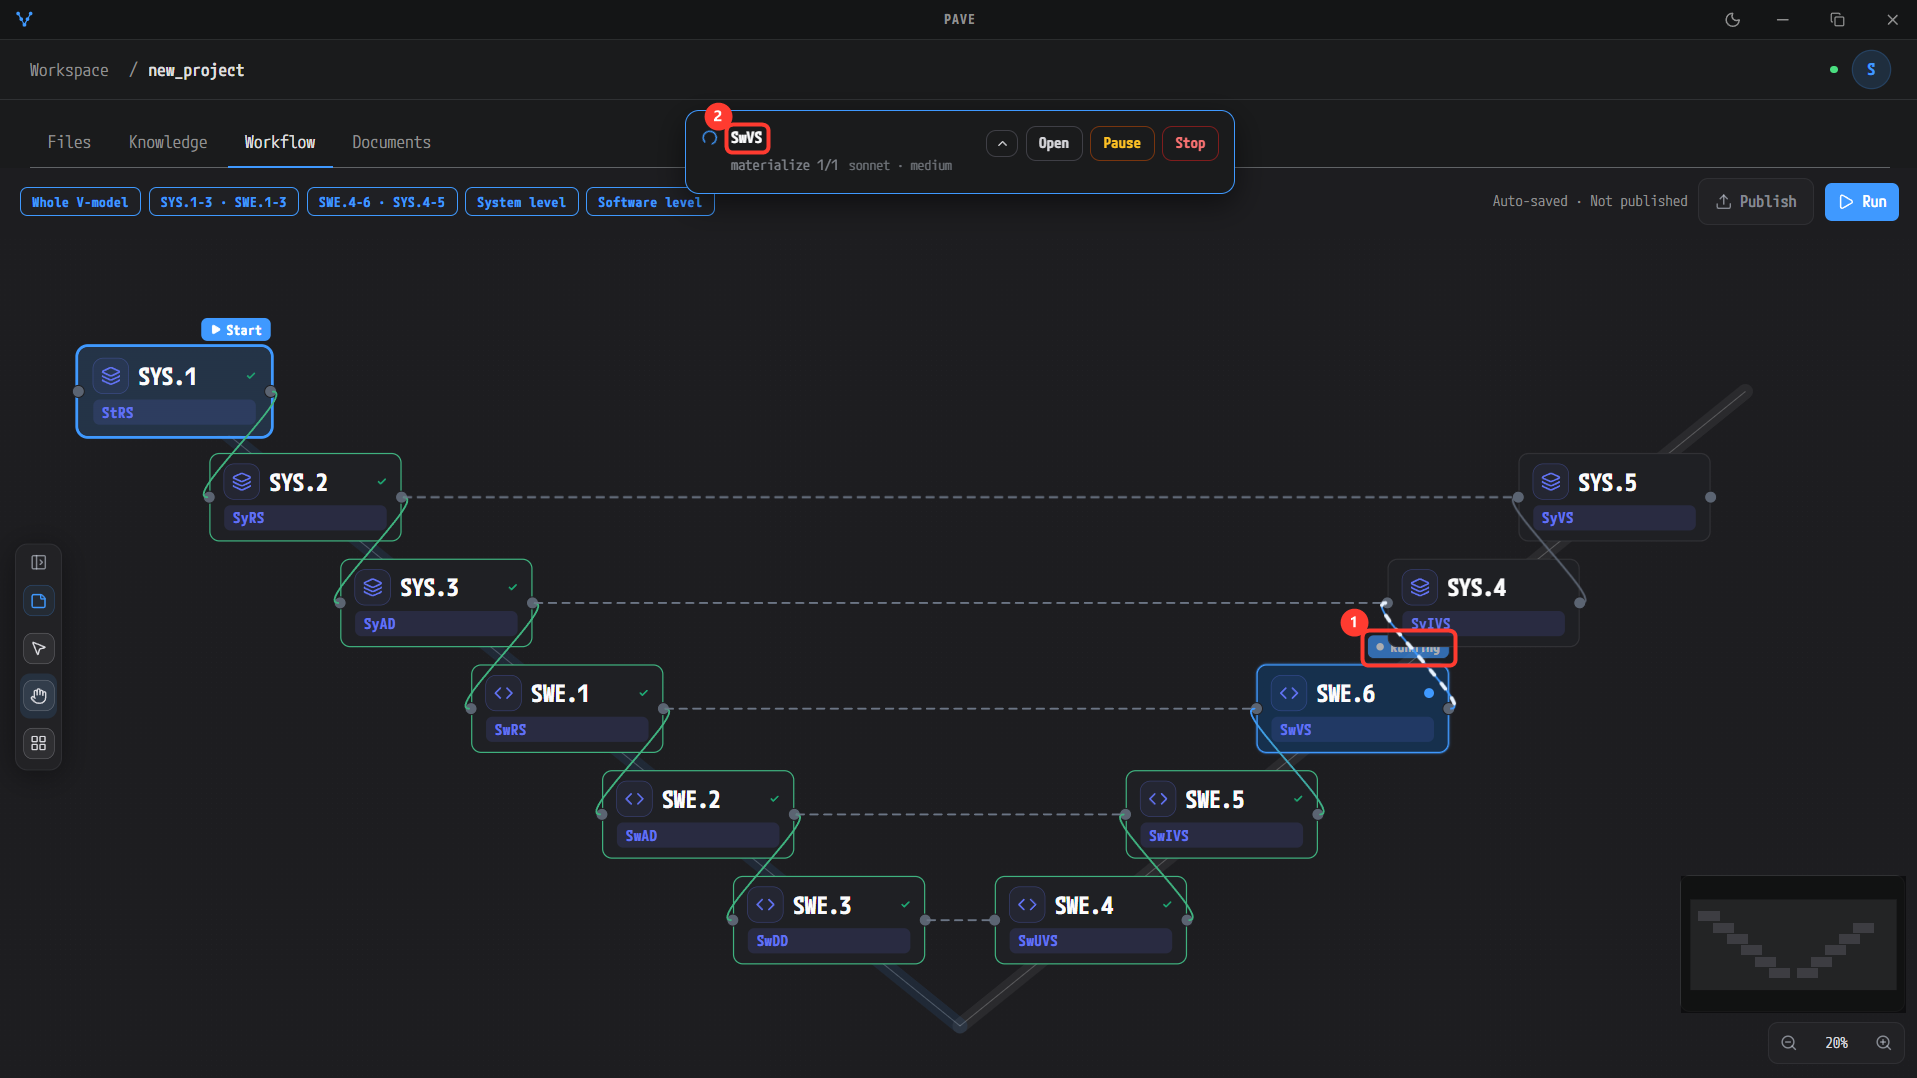
① The Running badge on SWE.6 and ② SwVS in the banner.
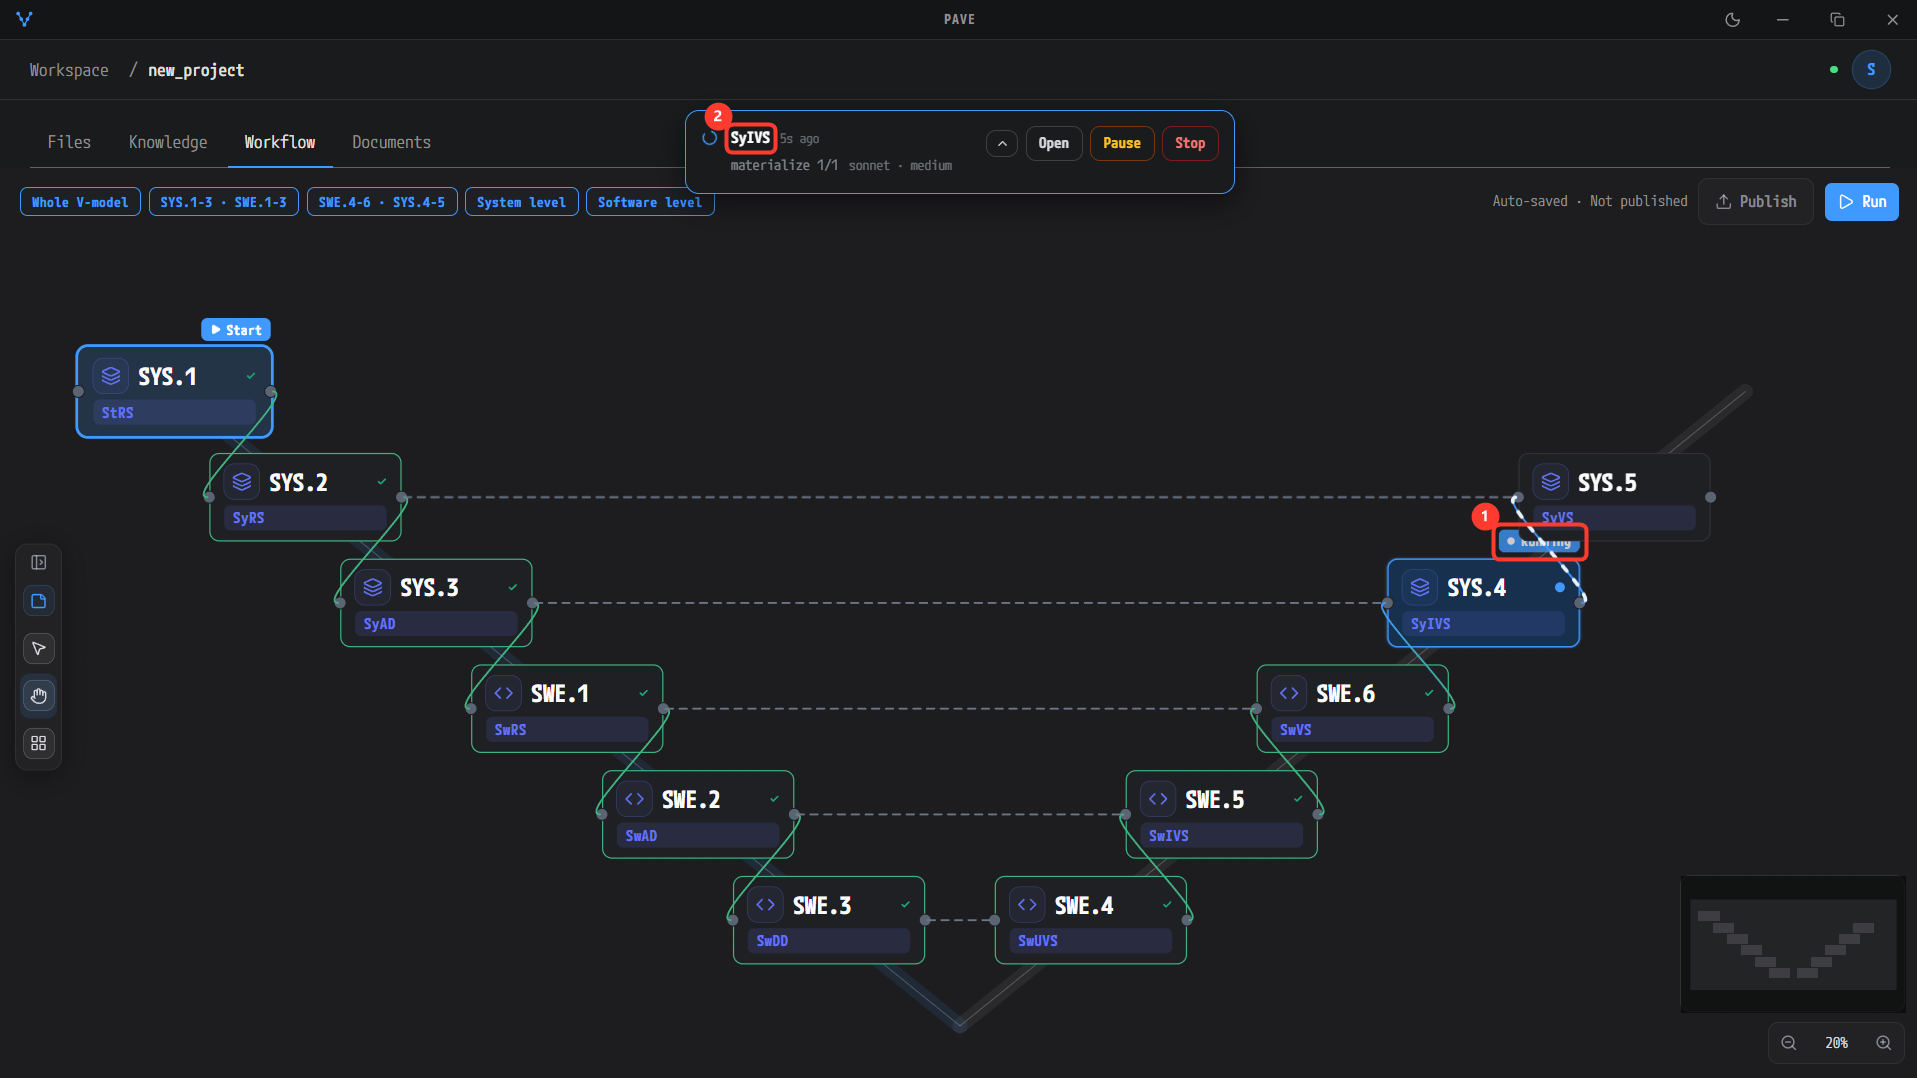
① The Running badge on SYS.4 and ② SyIVS in the banner. The run is back at the system stages.
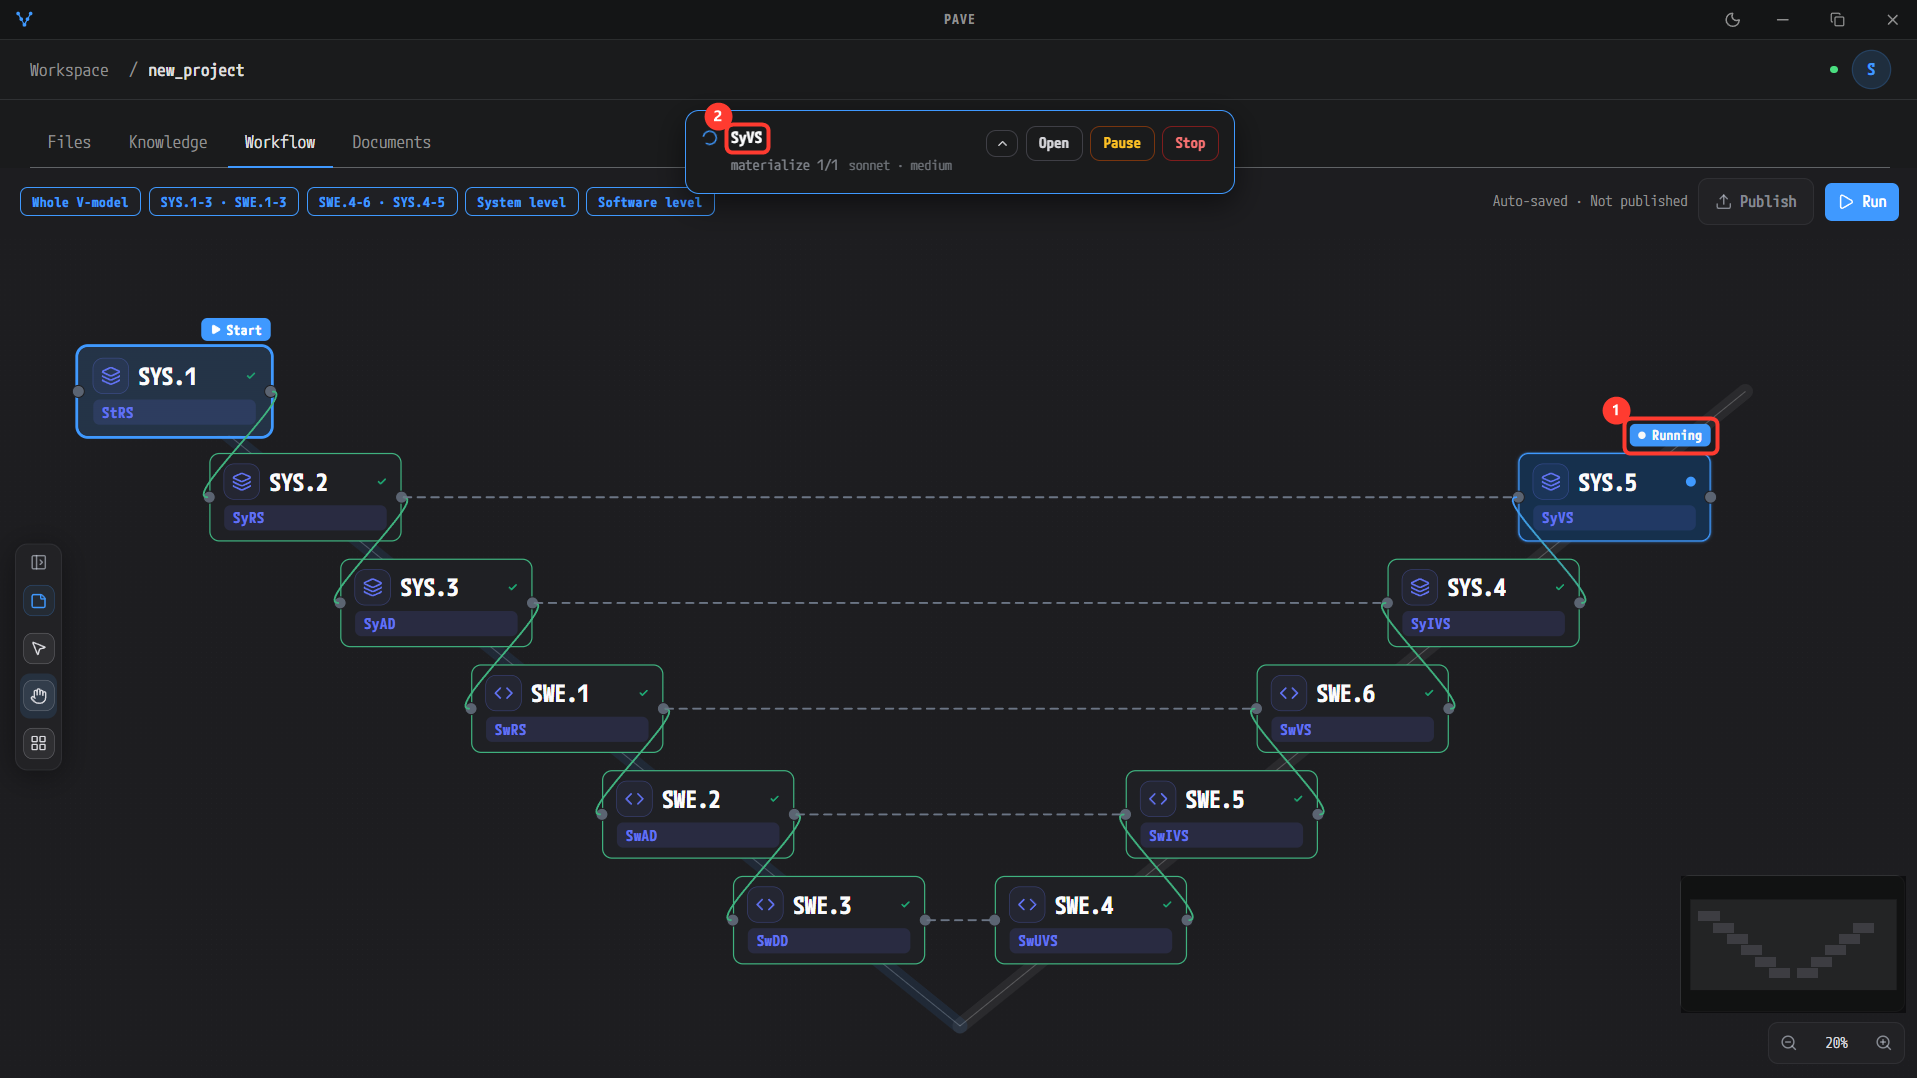
① The Running badge on SYS.5 and ② SyVS in the banner. This is the last stage; the other 10 nodes all carry completion checks.
When the run has finished
- When the last stage, SYS.5, finishes, the Running badge and the progress banner disappear and all 11 nodes show a completion check. The button in the Run panel changes to Done.
- The work product of each stage is in the workspace under
Outputs/<abbreviation>_<system name>_<language>.md(for example, the SYS.2 work product isOutputs/SyRS_test_en.md). You can open them from the folder tree on the Files tab.
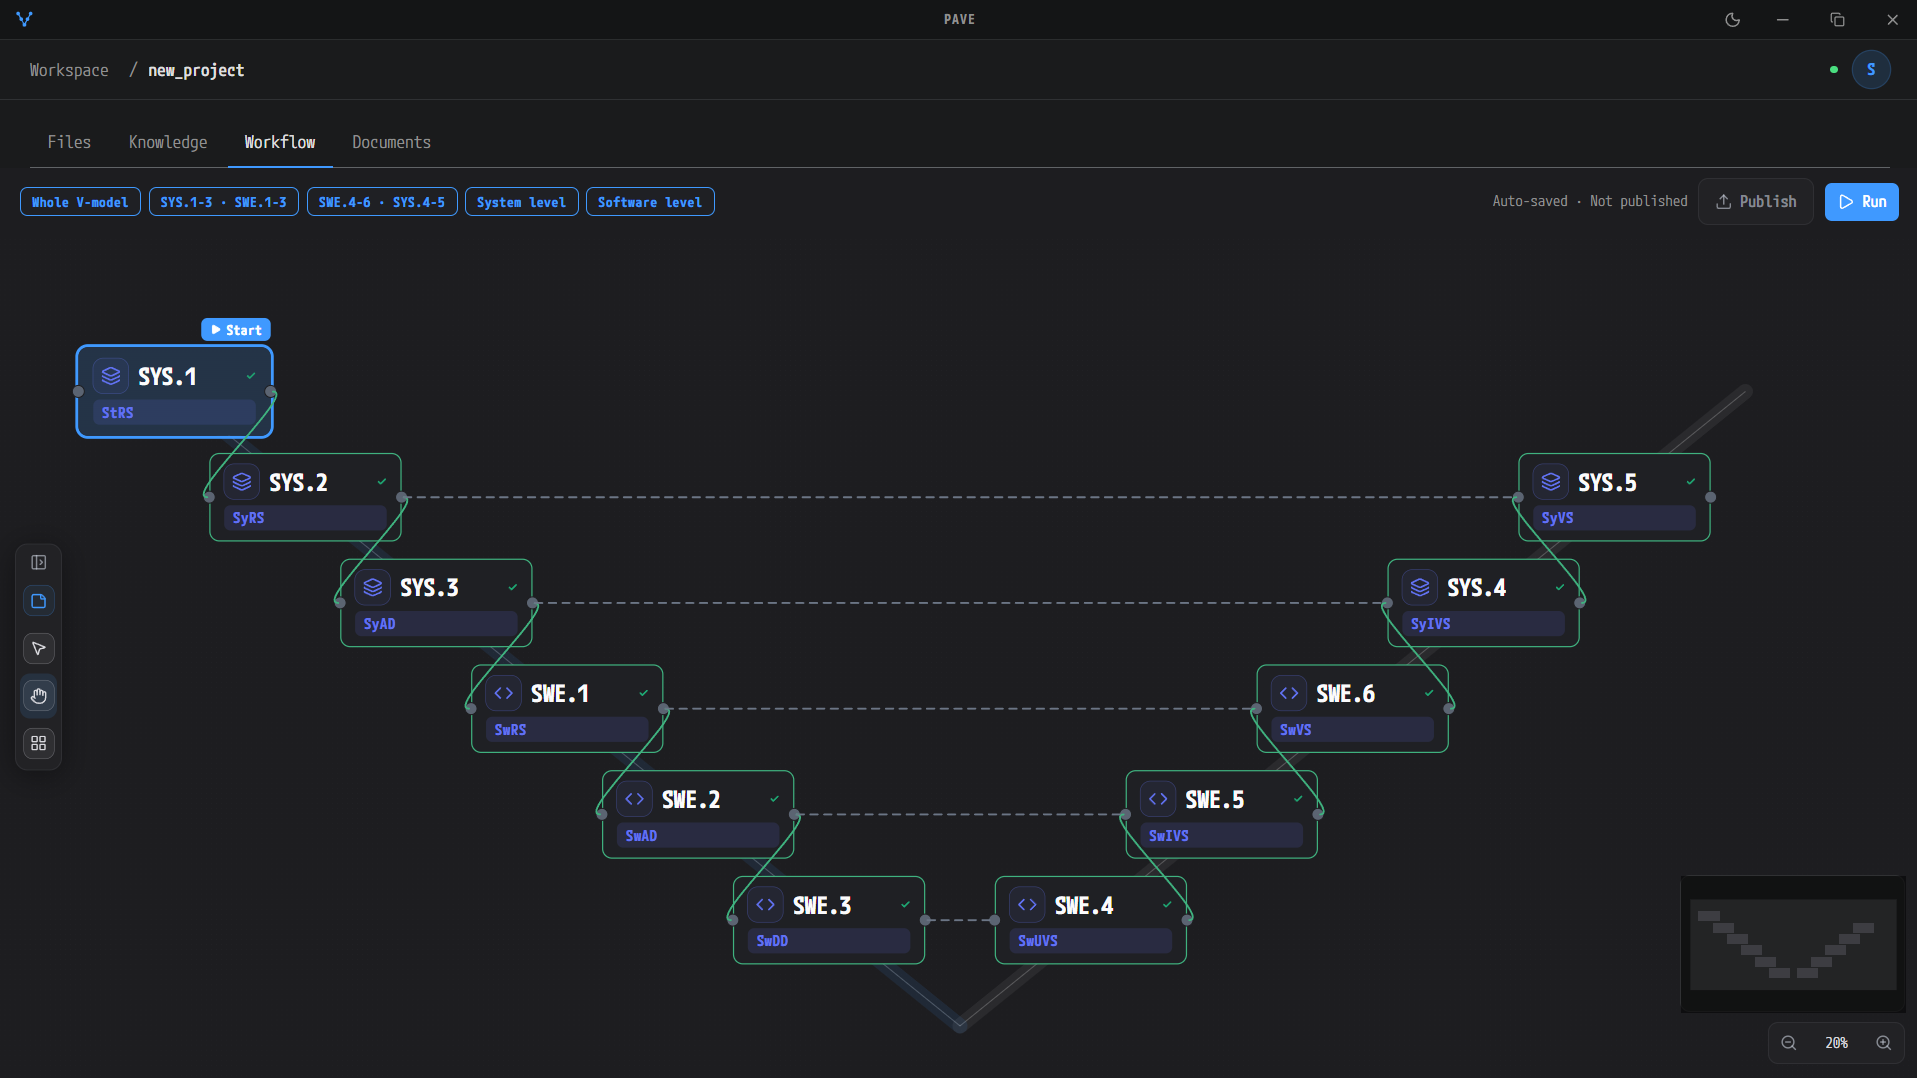
All 11 nodes show a completion check, and there is no Running badge or banner any more. The Start badge on SYS.1 at the top left marks the first stage of the run plan, so it stays.
View the generated documents in the Documents tab
- Click the ① Documents tab. It shows the generated document site built in the workspace at
Outputs/DocSite/site/index.htmlas it is. It does not re-render the Markdown, so the sidebar, the per-page table of contents, search and cross-document links all work inside that site. - Pick a document from the ② list in the left sidebar.
- The tab does not watch for file changes by itself. If it was already open before SWE.3 finished, click Check again to reload.
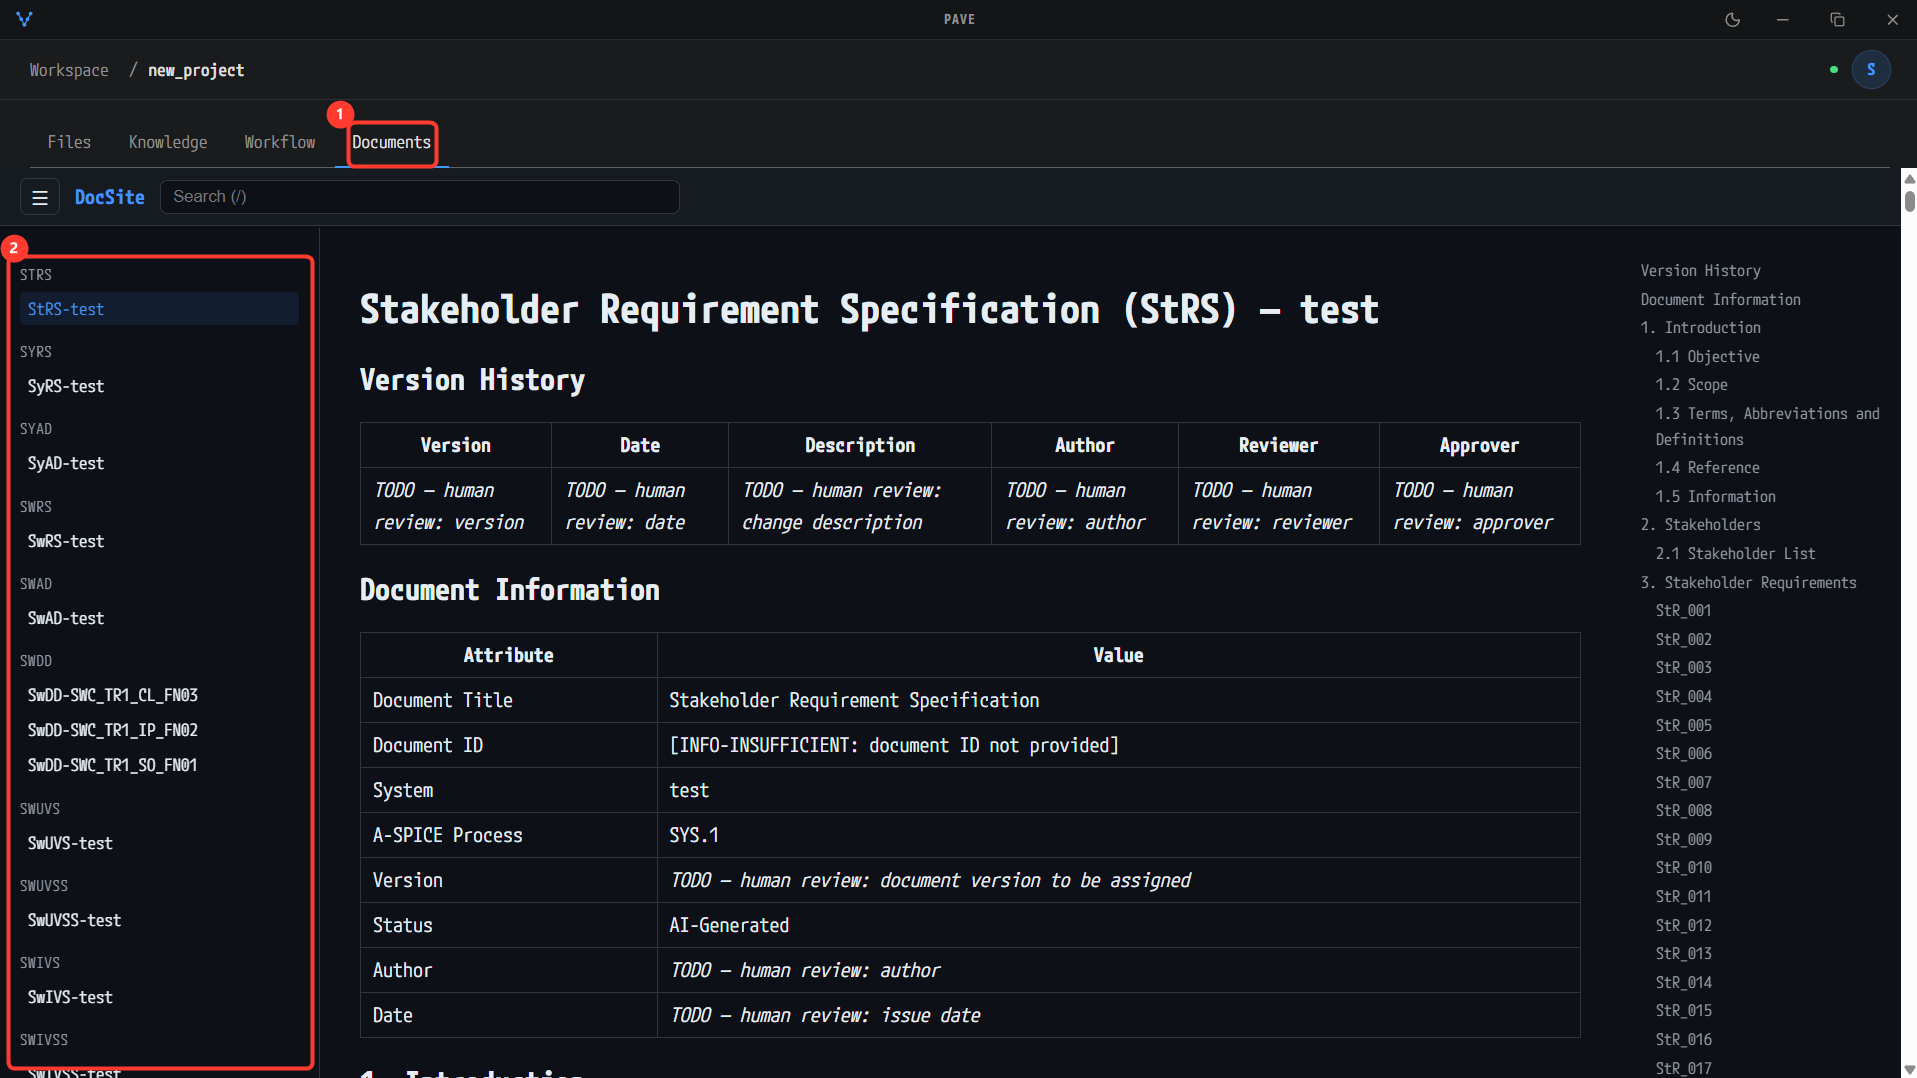
Opening the ① Documents tab shows the generated document site (DocSite). ② The left sidebar lists the documents by stage (StRS-test, SyRS-test …), the first document, StRS, is open in the middle, and its table of contents is on the right. Search (/) at the top is the site's search box.
There is no docx or PDF export. The current version has no function to export the generated documents to another format. The files remain in the workspace as Markdown under
Outputs/and as HTML underOutputs/DocSite/site/.
Next steps
Any character in the system name that goes into the work product file names, other than letters, digits, ., _ and -, is replaced with _. This is the end of the PAVE first-run guide.