Remote Development (SSH, Dev Container, WSL)
What This Chapter Covers
This chapter explains how to open a folder that is not on your local machine as a workspace and work directly with the files, terminals, language servers, and build tools that live there. Three targets are supported: an SSH remote server, a Dev Container (Docker), and a WSL distribution.
Opening a remote folder does not change anything about how a project is structured or how model files are formatted — both are the same as on a local machine. This chapter is for developers who want to edit and build code on a target board or in a Linux build environment. The prerequisites differ per method: SSH needs a reachable server, Dev Container needs Docker installed and running locally, and WSL needs Windows with a Linux distribution installed. For how to use the code editor, the build commands, and the terminal themselves, see 16. Code Editing, Build, Terminal and Documents.
17.1 Entry Points
Start a remote connection from the remote indicator in the status bar or from the command palette.
17.1.1 The Remote Indicator
The leftmost item in the status bar is a >< indicator. Its appearance changes with the
connection state.
| State | Display | Color |
|---|---|---|
| Not connected | Icon only. Tooltip Open a Remote Window | Default |
| SSH connecting or reconnecting | Connecting... | Orange |
| SSH connected | SSH: <host label> | Green background |
| SSH error | Connection Error | Red |
| Container connected | Container: <container name> | Green background |
| WSL connected | WSL: <distro name> | Green background |
Click the indicator and a menu drops down from the top of the window. Its header reads
Select an option to open a Remote Window. Press Esc or click outside to close it.
17.1.2 The Menu While Not Connected
When you click the indicator while no connection is active, the following items appear.
| Item | Badge on the right | Action |
|---|---|---|
| Connect to SSH Host... | Remote-SSH | Opens the SSH quick connect input (17.2.1) |
| Open Folder in Container... | Dev Containers | Builds a container from the devcontainer.json of a local folder and enters it |
| Add Dev Container Configuration Files... | Dev Containers | Creates a devcontainer.json in a folder |
| Attach to Running Container... | Dev Containers | Connects to a container that is already running |
| Connect to WSL | Remote-WSL | Connects to the default distribution, or to the first one in the list if there is no default |
| Connect to WSL using Distro... | None | Lets you pick the distribution to connect to |
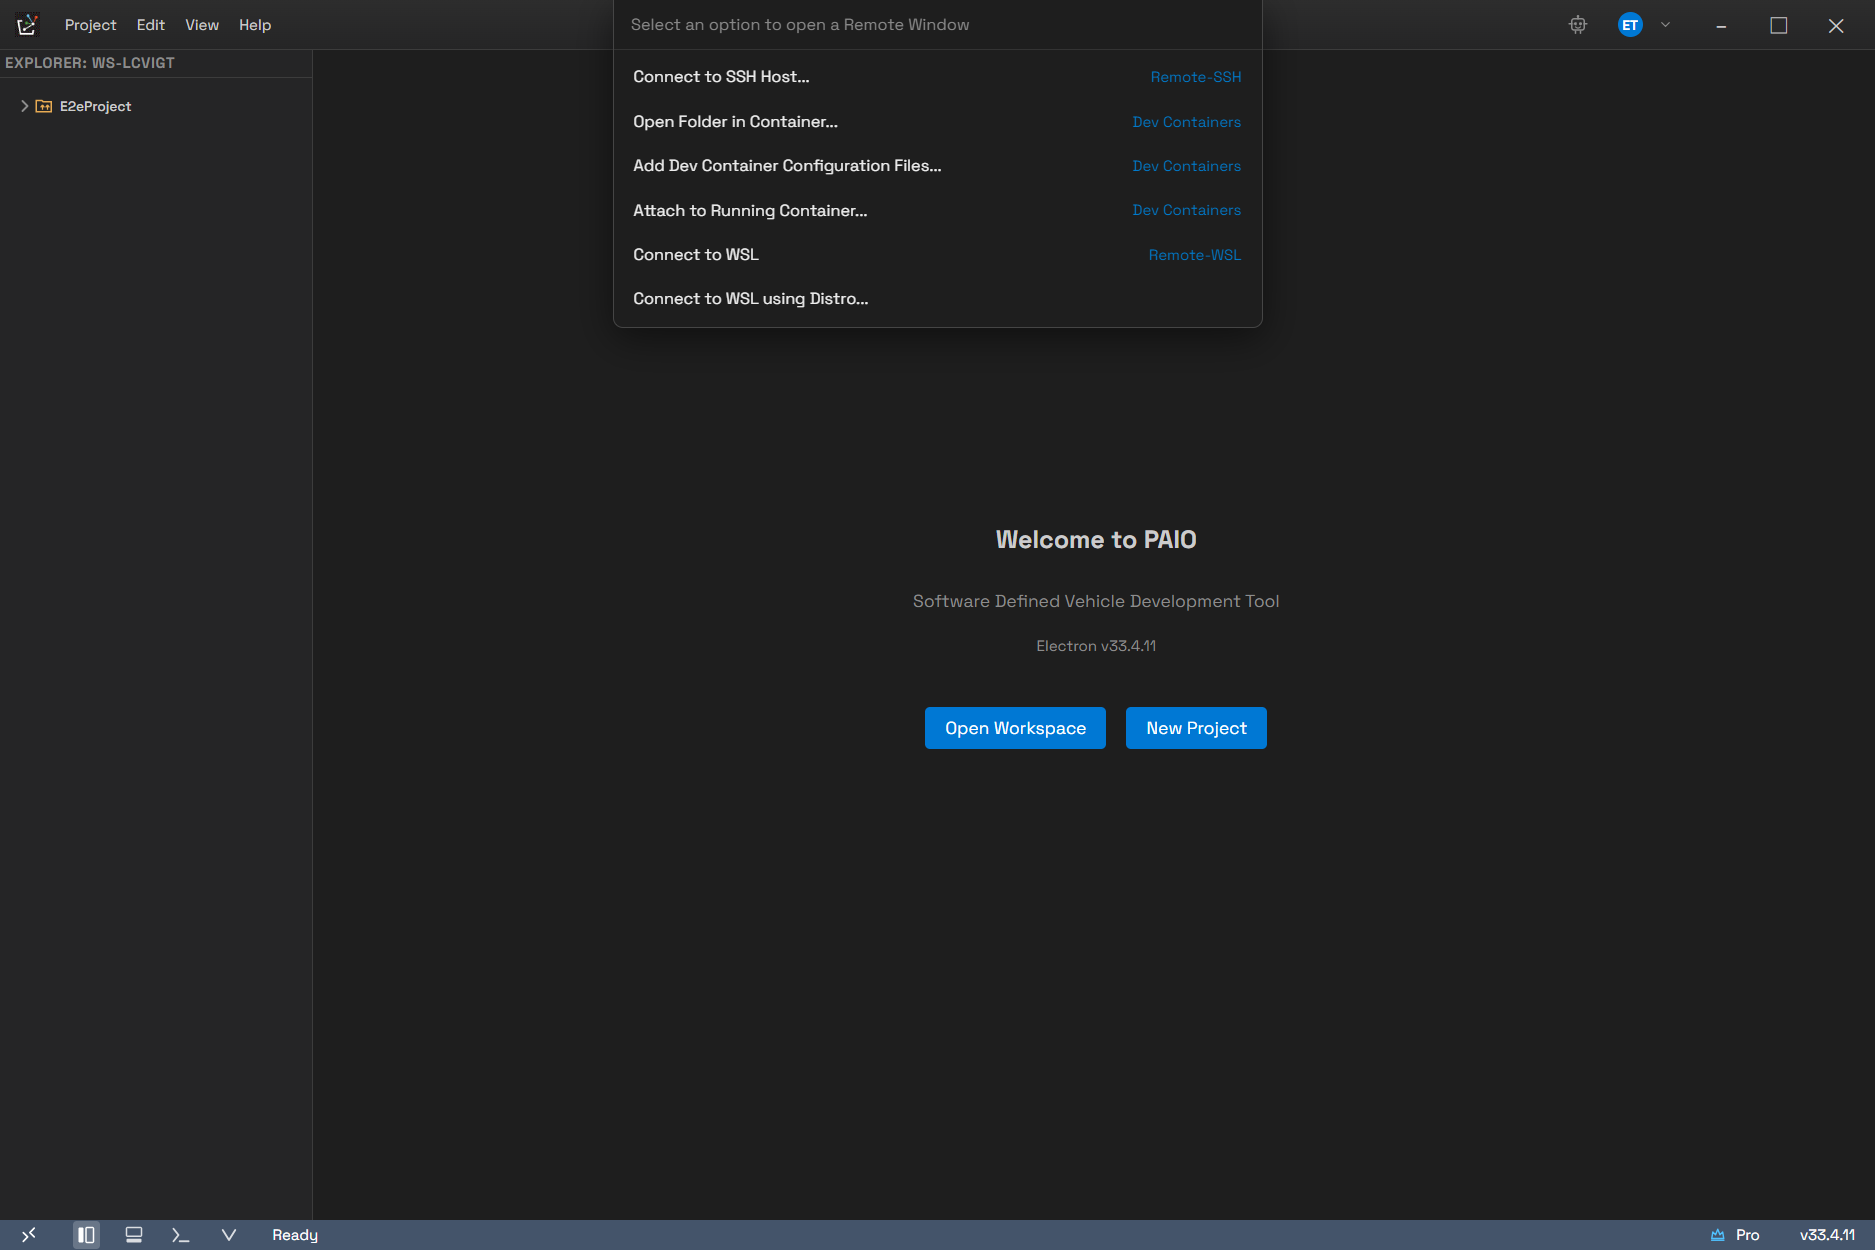
Clicking the >< indicator at the far left of the status bar drops this menu down from the top of the window. The header reads Select an option to open a Remote Window, and the badge on the right tells you which feature each item belongs to (Remote-SSH, Dev Containers, or Remote-WSL). Only Connect to WSL using Distro... at the bottom has no badge.
17.1.3 The Menu While Connected
The items depend on the kind of connection.
| Connection kind | Menu items |
|---|---|
| SSH | Connect to SSH Host... / Open Remote Folder... / Close Remote Connection |
| WSL | Open WSL Folder... / Connect to WSL using Distro... / Close Remote Connection |
| Container | Open Folder in Container... / Open Workspace in this Container... / Attach to Running Container... / (Rebuild Container) / (Reopen Folder Locally) / Close Remote Connection |
Rebuild Container and Reopen Folder Locally appear only when you entered through Open Folder in Container.... A container connected through Attach to Running Container... has no known local folder of origin, so neither action applies.
17.1.4 The Command Palette
The command palette carries SSH and WSL items only. There are no Dev Container items, so you must use the status bar indicator menu for those.
| Category | Items |
|---|---|
Remote-SSH | Connect to SSH Host... / Open Remote Folder... / Disconnect from SSH Host / Add New SSH Host... |
WSL | New WSL Terminal / Open WSL Folder... / Connect to WSL... |
New WSL Terminal does not merely open a terminal, despite its name, so take care. It behaves exactly like Connect to WSL...: it opens the distribution picker and then connects to the distribution you pick and reloads the window. If you are already connected to WSL and only need one more terminal, use the
New Terminalbutton in the terminal panel.
Disconnect from SSH Host does more than drop the connection — it also clears the stored remote workspace. The next launch does not reconnect automatically.
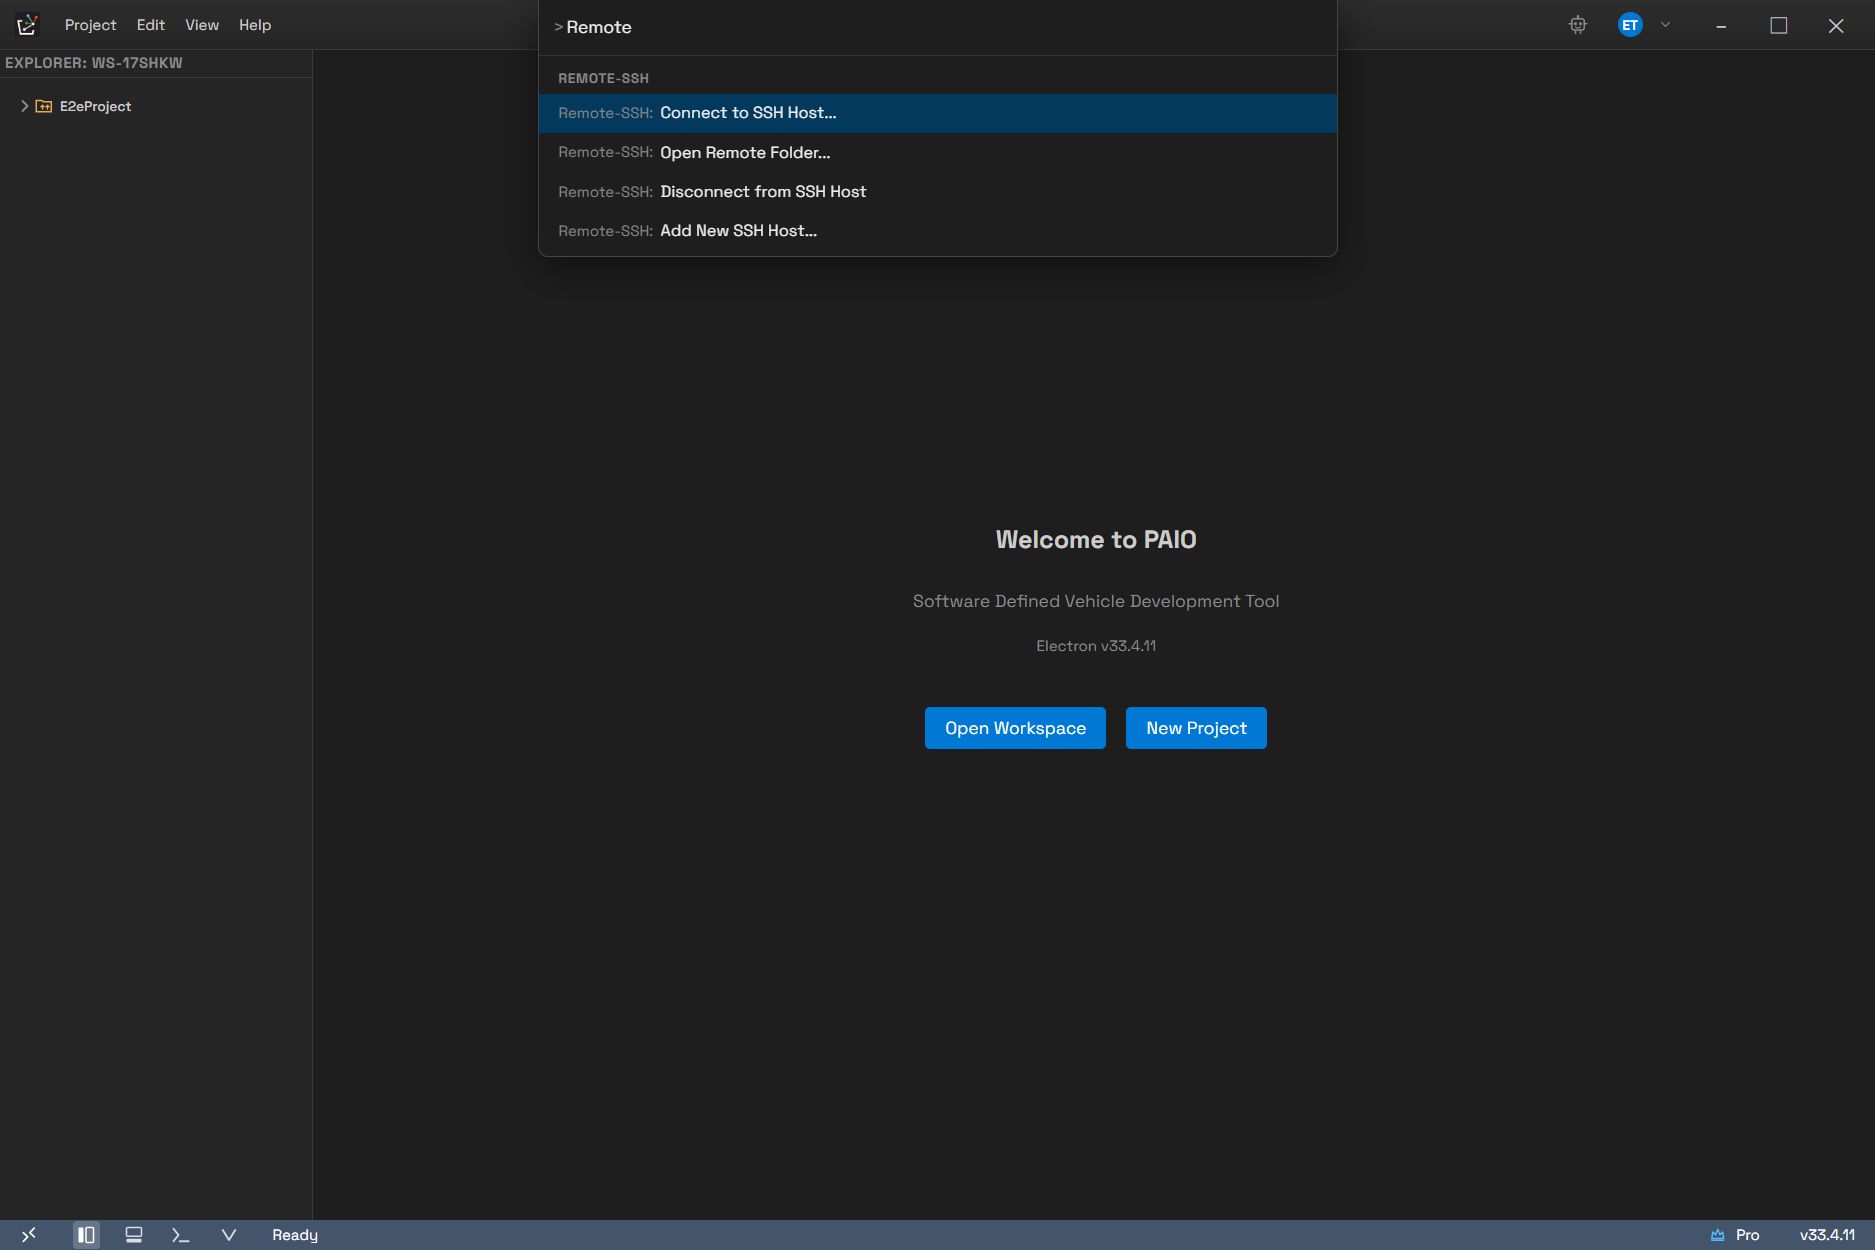
Press Ctrl+Shift+P to open the command palette, then type Remote. Four items are grouped under the REMOTE-SSH category and, as the table above shows, the Dev Container items are not here. For those, use the status bar indicator menu.
17.2 SSH
17.2.1 Quick Connect
Selecting Connect to SSH Host... opens an input at the top of the window. It does not open the host manager directly.
- Type the connection details into the field and press
Enter. The hint readsEnter SSH connection command (e.g. user@hostname, ssh user@host -p 2222). The formsuser@host,user@host:2222, andssh user@host -p 2222are all parsed. If the form does not match, anInvalid Formatdialog showsUse: user@hostname or user@hostname:port. - You can also pick from the list below instead of typing. Saved hosts are listed under
Saved Hostswith theirlabelanduser@host:port. - Selecting + Add New SSH Host... or Configure SSH Hosts... at the bottom of the list opens the host manager (17.2.2).
- On a successful connection the window reloads, and if no workspace is open the remote folder
browser opens automatically. The connection is live once
SSH: <label>appears in the status bar.
When you connect by typing the details, they are saved automatically under a user@host label
and appear in the list from then on. They are not stored in a PAIO-specific file but in
your own ~/.ssh/config, and the entry is registered so that stored keys and ssh-agent
are tried first (17.2.4).
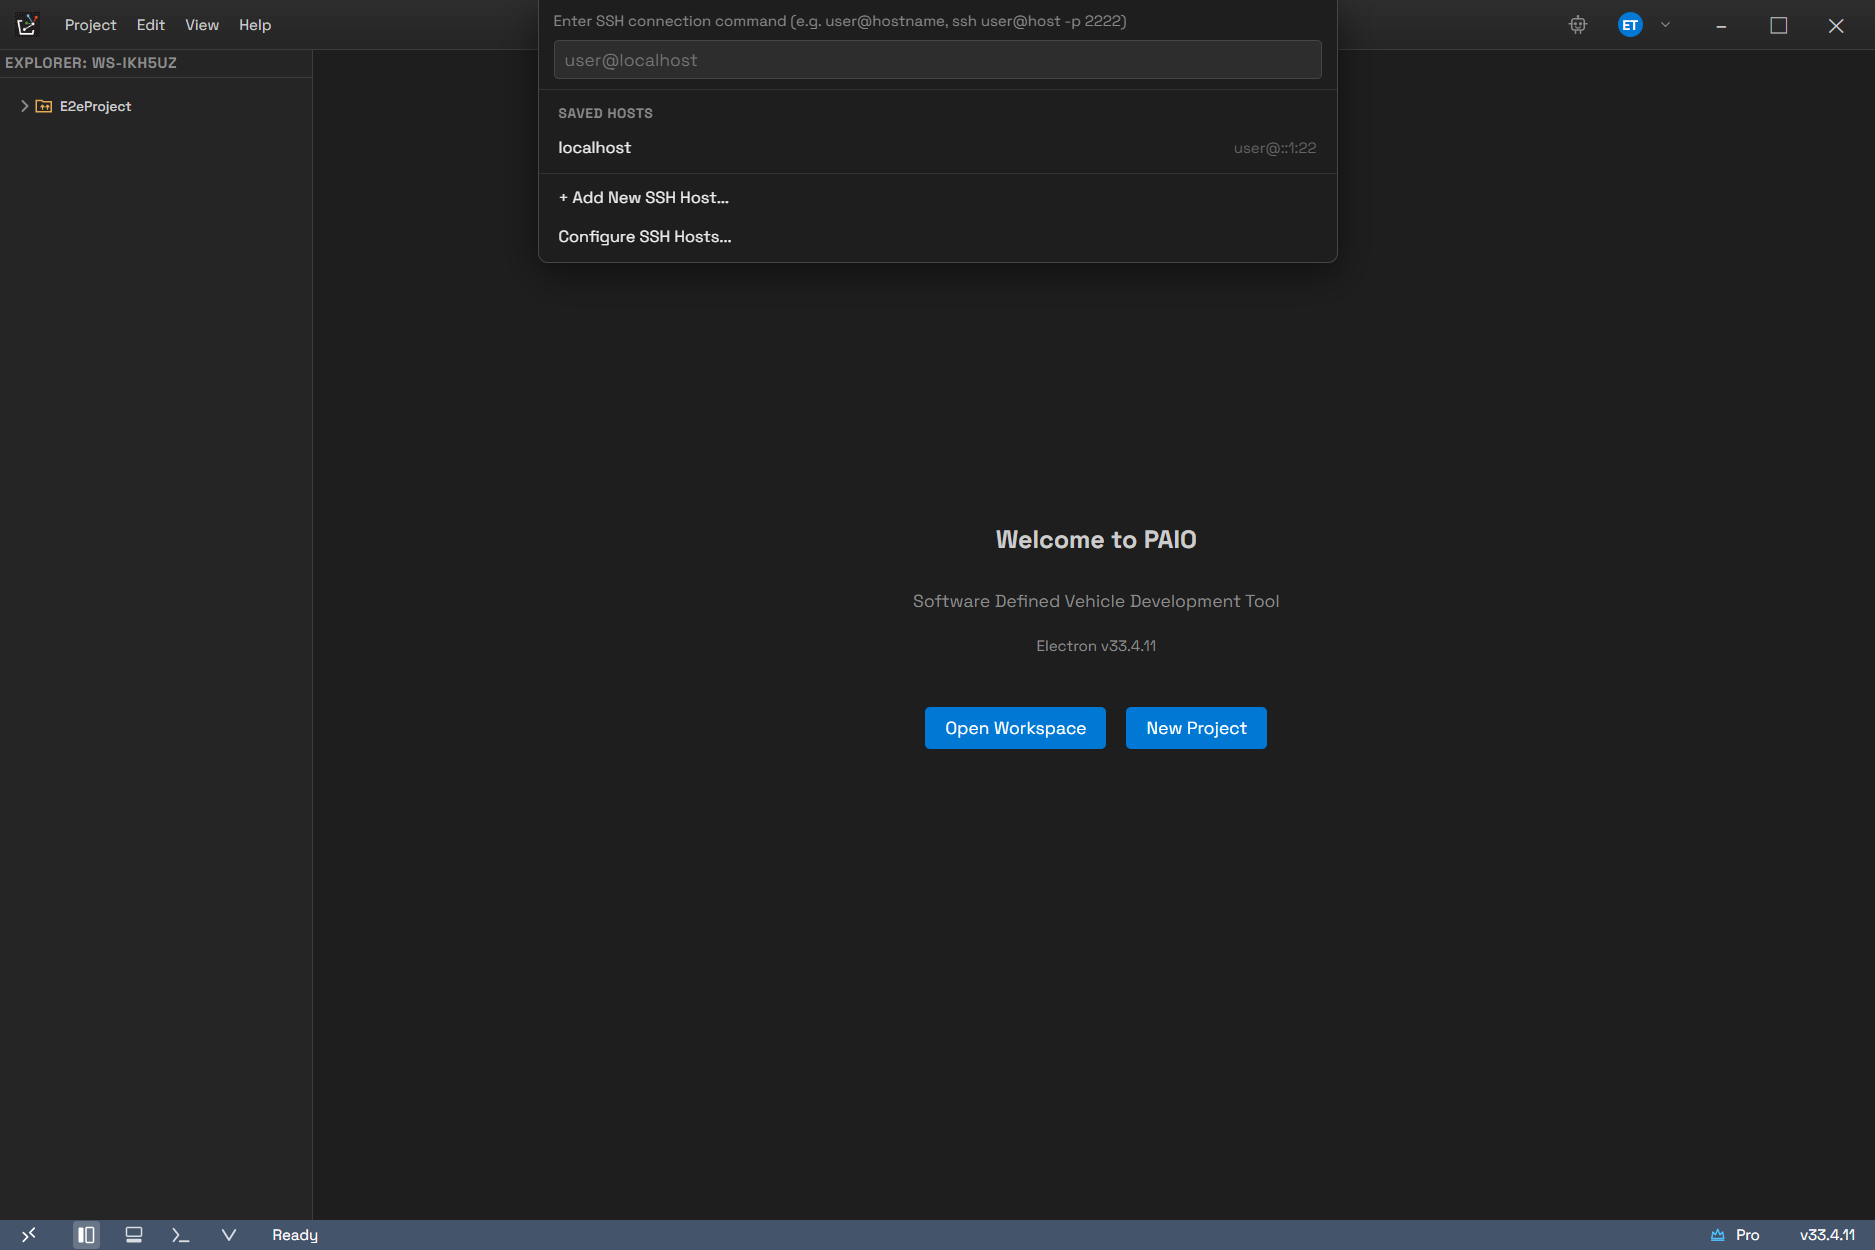
Choosing Connect to SSH Host... opens this input first, not the host manager. The Saved Hosts list follows below the field, and under it sit + Add New SSH Host... and Configure SSH Hosts.... Either one takes you to the host manager.
17.2.2 The SSH Host Manager
This is the dialog titled SSH Remote Hosts. Its elements behave as follows.
| Element | Action |
|---|---|
| Reload Config | Re-reads ~/.ssh/config |
| + Add Host | Opens the form for a new host |
| Connect on a host | Connects to that host |
| Pencil icon | Edit |
✕ icon | Deletes the host, after a Delete this SSH host configuration? confirmation |
| Disconnect (at the bottom) | Appears only while a connection is active |
When no hosts are saved, No saved hosts. and Add a new host or import from SSH config.
appear. While connecting, Connecting to <user>@<host>... is shown; on failure,
Connection failed: <reason> appears together with a Back to Host List button.
The host list has exactly one source: ~/.ssh/config. The list is rebuilt by re-reading
that file every time it is shown, and adding, editing, or deleting a host edits the Host
block in that file directly. Editing the file by hand therefore takes effect without any
separate import step, and conversely, deleting a host in PAIO removes its block from the file.
Blocks that contain a wildcard, such as Host *, do not appear in the list.
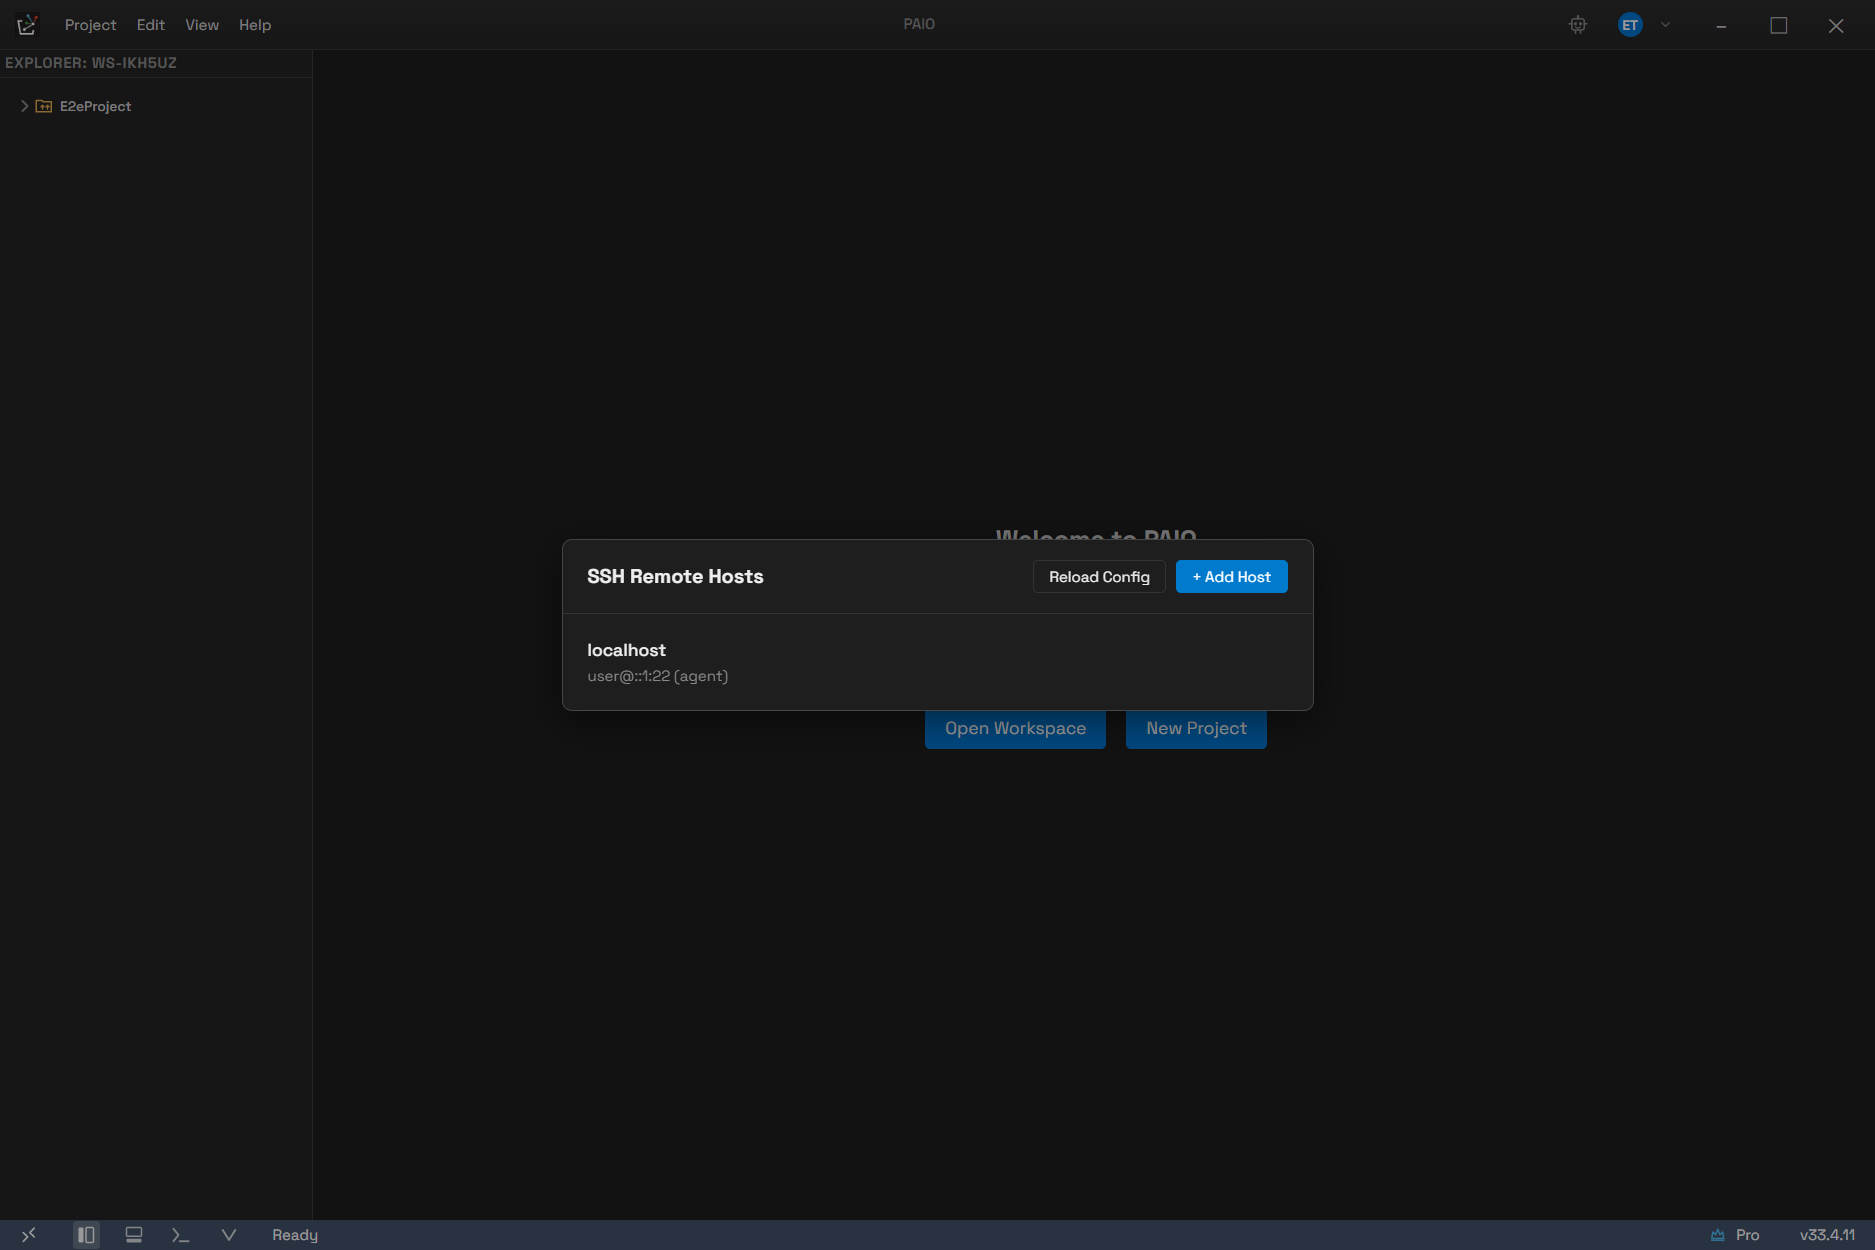
The dialog titled SSH Remote Hosts. Reload Config and + Add Host sit in the header, and below them the hosts read from ~/.ssh/config are listed with their label and user@host:port. The value in parentheses at the end is the authentication method, re-derived from the file contents.
17.2.3 Host Fields
These are the fields you fill in when adding or editing a host.
| Field | Default / placeholder | Description |
|---|---|---|
| Label | Empty (My Server) | Display name. Leave it empty and it becomes user@host |
| Host | Empty (192.168.1.100 or hostname) | IP address or hostname. Required |
| Port | 22 | 1 to 65535 |
| Username | Empty (ubuntu) | Account name. Required |
| Authentication | Private Key | Private Key / Password / SSH Agent |
| Private Key Path | Empty (~/.ssh/id_rsa) | Appears only when Private Key is selected |
| Remote Workspace Path (optional) | Empty (/home/user/workspace) | Even if you fill it in, nothing reads it (see the note below) |
If Host or Username is empty, a Host is required or Username is required warning
appears and nothing is saved. The save button reads Save when creating and Update when
editing, with Cancel to its left.
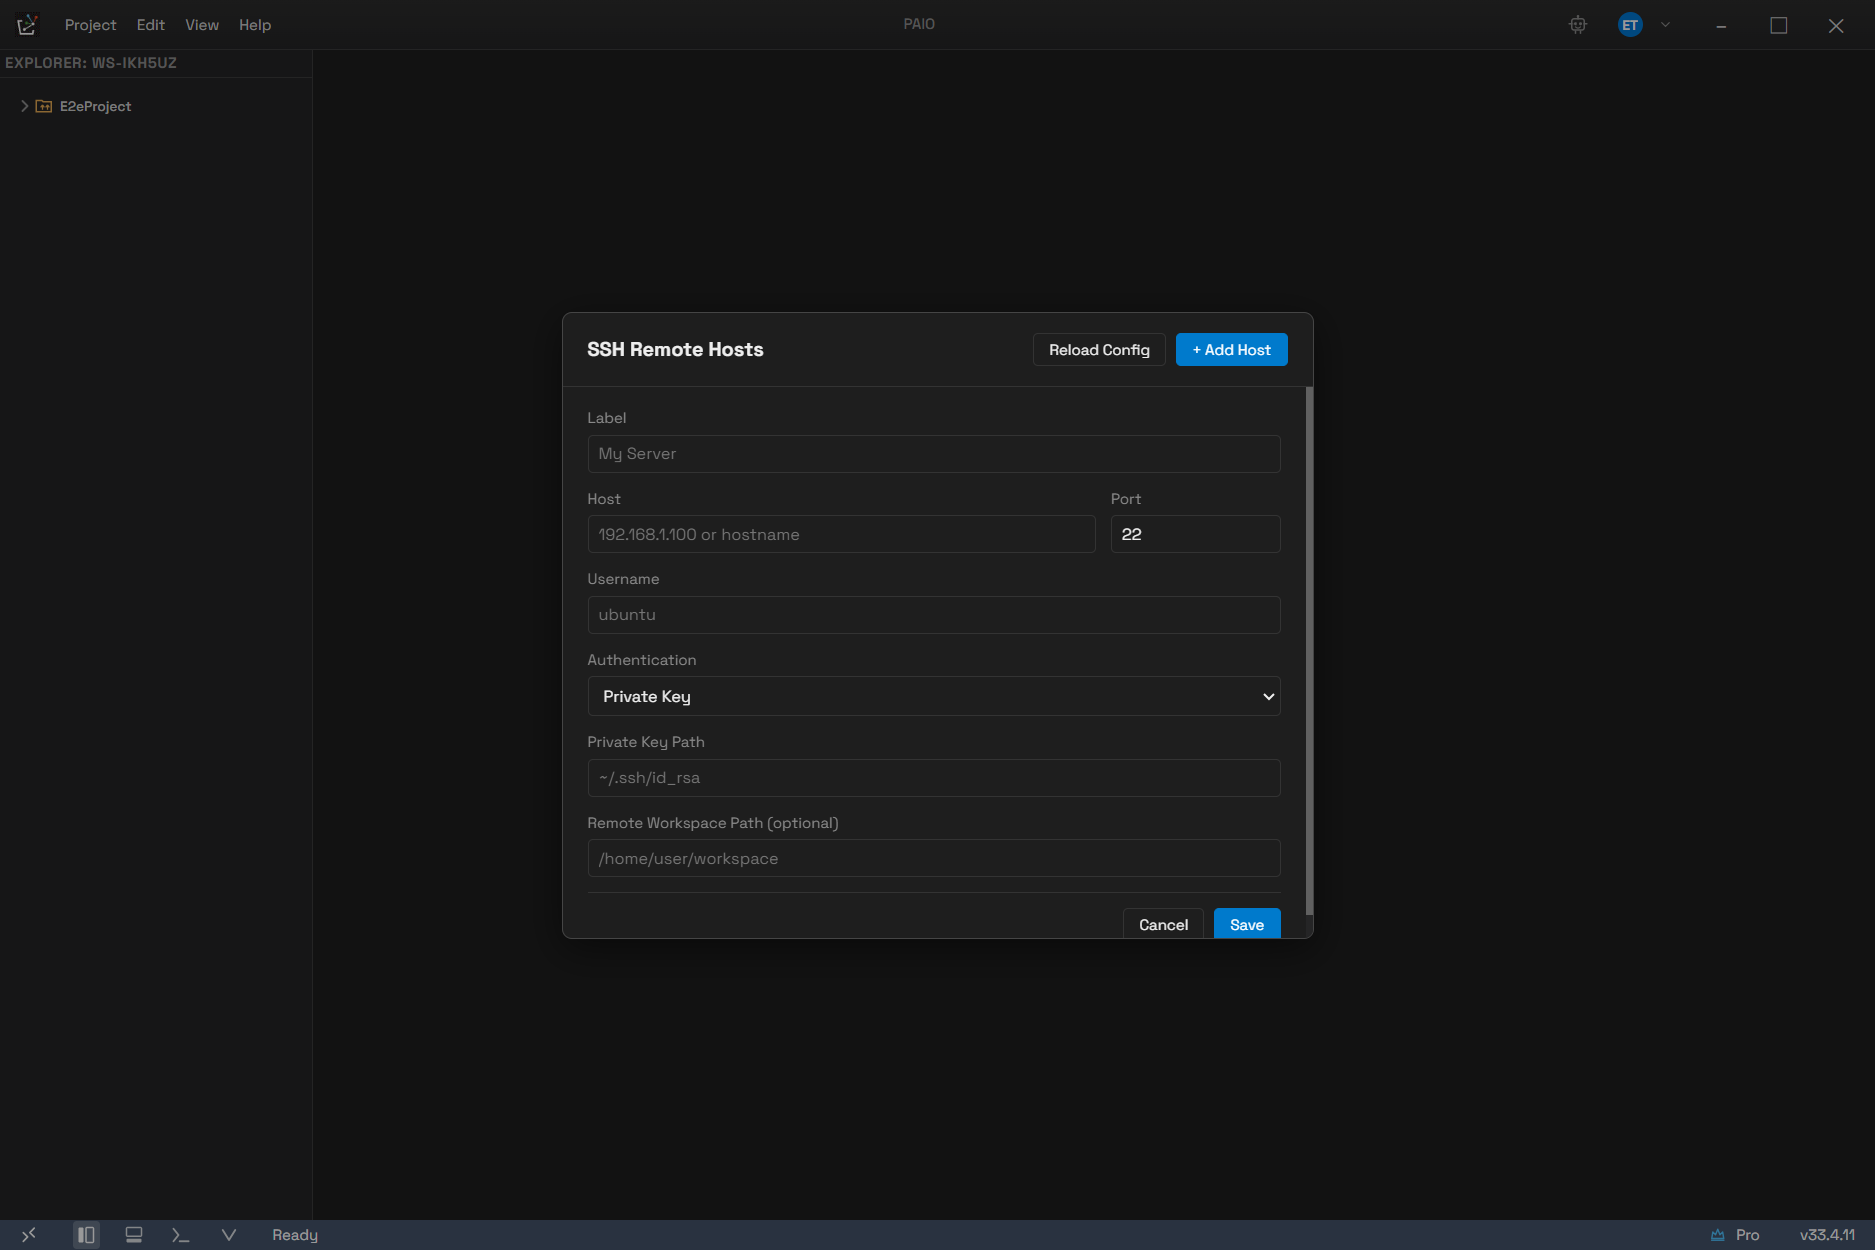
The screen after clicking + Add Host. The seven fields from the table above appear with their placeholders. Authentication is Private Key, so Private Key Path is shown alongside it, and because this is a new host the button reads Save.
Saving writes a
Hostblock in~/.ssh/config, so only what that file can express survives.Label,Host,Username,Port, andPrivate Key Pathare recorded asHost,HostName,User,Port, andIdentityFilerespectively (HostNameis omitted when the label and the host are the same, andPortis omitted when the port is 22). The Authentication choice and the Remote Workspace Path, by contrast, are not recorded. When the list is re-read, Authentication is derived again from the file contents (SSH AgentifForwardAgent yesis present,Private Keyif anIdentityFileis present, andSSH Agentif neither is). In other words, saving withPasswordselected does not preserve that choice through the next refresh of the list.
Remote Workspace Pathis not only unsaved — nothing reads it either. The folder to open after connecting is always chosen in the remote folder browser (17.5).
17.2.4 The Order Authentication Is Attempted
Connecting through quick connect or by clicking an entry in the list follows this order.
- PAIO connects first with no credentials. At this stage the keys in
~/.sshand ssh-agent are tried automatically. - If that fails, PAIO asks for a password. The prompt reads
<user>@<host>'s password:. - If the password also fails,
Failed to connect: <reason>appears.
Clicking Connect in the host manager takes a different path: it follows the stored
Authentication value. With Password it prompts Enter password for <user>@<host>:, and
with Private Key it prompts
Enter passphrase for <key path> (leave empty if none):. Leave it empty if the key has no
passphrase.
17.2.5 Host Key Verification
PAIO records host key fingerprints in its own store. It neither reads nor writes OpenSSH's
~/.ssh/known_hosts, so even a server you have already reached from a terminal is treated as
a new host by PAIO.
- A host seen for the first time is accepted without any confirmation, and its fingerprint is recorded. The first connection is never blocked.
- If the fingerprint changes on a later connection, PAIO refuses the connection and
shows a
Host Key Changeddialog. That means either a man-in-the-middle attack or a reinstalled server. Selecting Trust new key clears the stored fingerprint and connects once more; selecting Cancel lets the attempt fail.
17.2.6 Keep-Alive and Automatic Reconnection
- PAIO sends a keep-alive every 10 seconds and treats the connection as lost after three consecutive missed responses.
- When the connection drops, PAIO reconnects automatically up to three times. The wait grows
1 second → 2 seconds → 4 seconds and never exceeds 10 seconds. Meanwhile the indicator reads
Connecting.... - After all three attempts fail, the state becomes
Connection lost after max reconnect attempts. - On a successful reconnection, any open code editor restarts the remote language server automatically.
- If reconnecting to the stored remote workspace fails when you restart the app, a
Could not establish connection to '<host>'dialog appears, offering Retry or Open Folder....
17.2.7 Connection Failure Messages
When a connection fails, PAIO rewrites the cause into one of the messages below. Anything that does not match is shown as the original text.
| Cause | Message |
|---|---|
| Authentication failure | Authentication failed — check your SSH key, password, or that ssh-agent is running. |
| Connection refused | Connection refused — check the host address/port and that the SSH server (sshd) is running. |
| Timeout | Connection timed out — check your network, the host address, and any firewall. |
| Host not found | Host not found — check the hostname/address. |
| Host unreachable | Host unreachable — check the network and that the host is online. |
| Handshake failure | SSH handshake failed — the server may use an incompatible key exchange. (original text) |
17.3 Dev Container (Docker)
17.3.1 Prerequisites
Docker must be installed and running locally. If it is not, a toast appears in the lower right corner and the action stops. The messages per state are as follows.
| State | Message |
|---|---|
| Docker not installed | Docker is not installed. Install Docker Desktop to use Dev Containers. |
| Daemon not ready yet | Docker Desktop is starting or not responding. Wait a moment and try again. |
Container creation is performed by @devcontainers/cli, which ships with the app. You do not
need to install it separately.
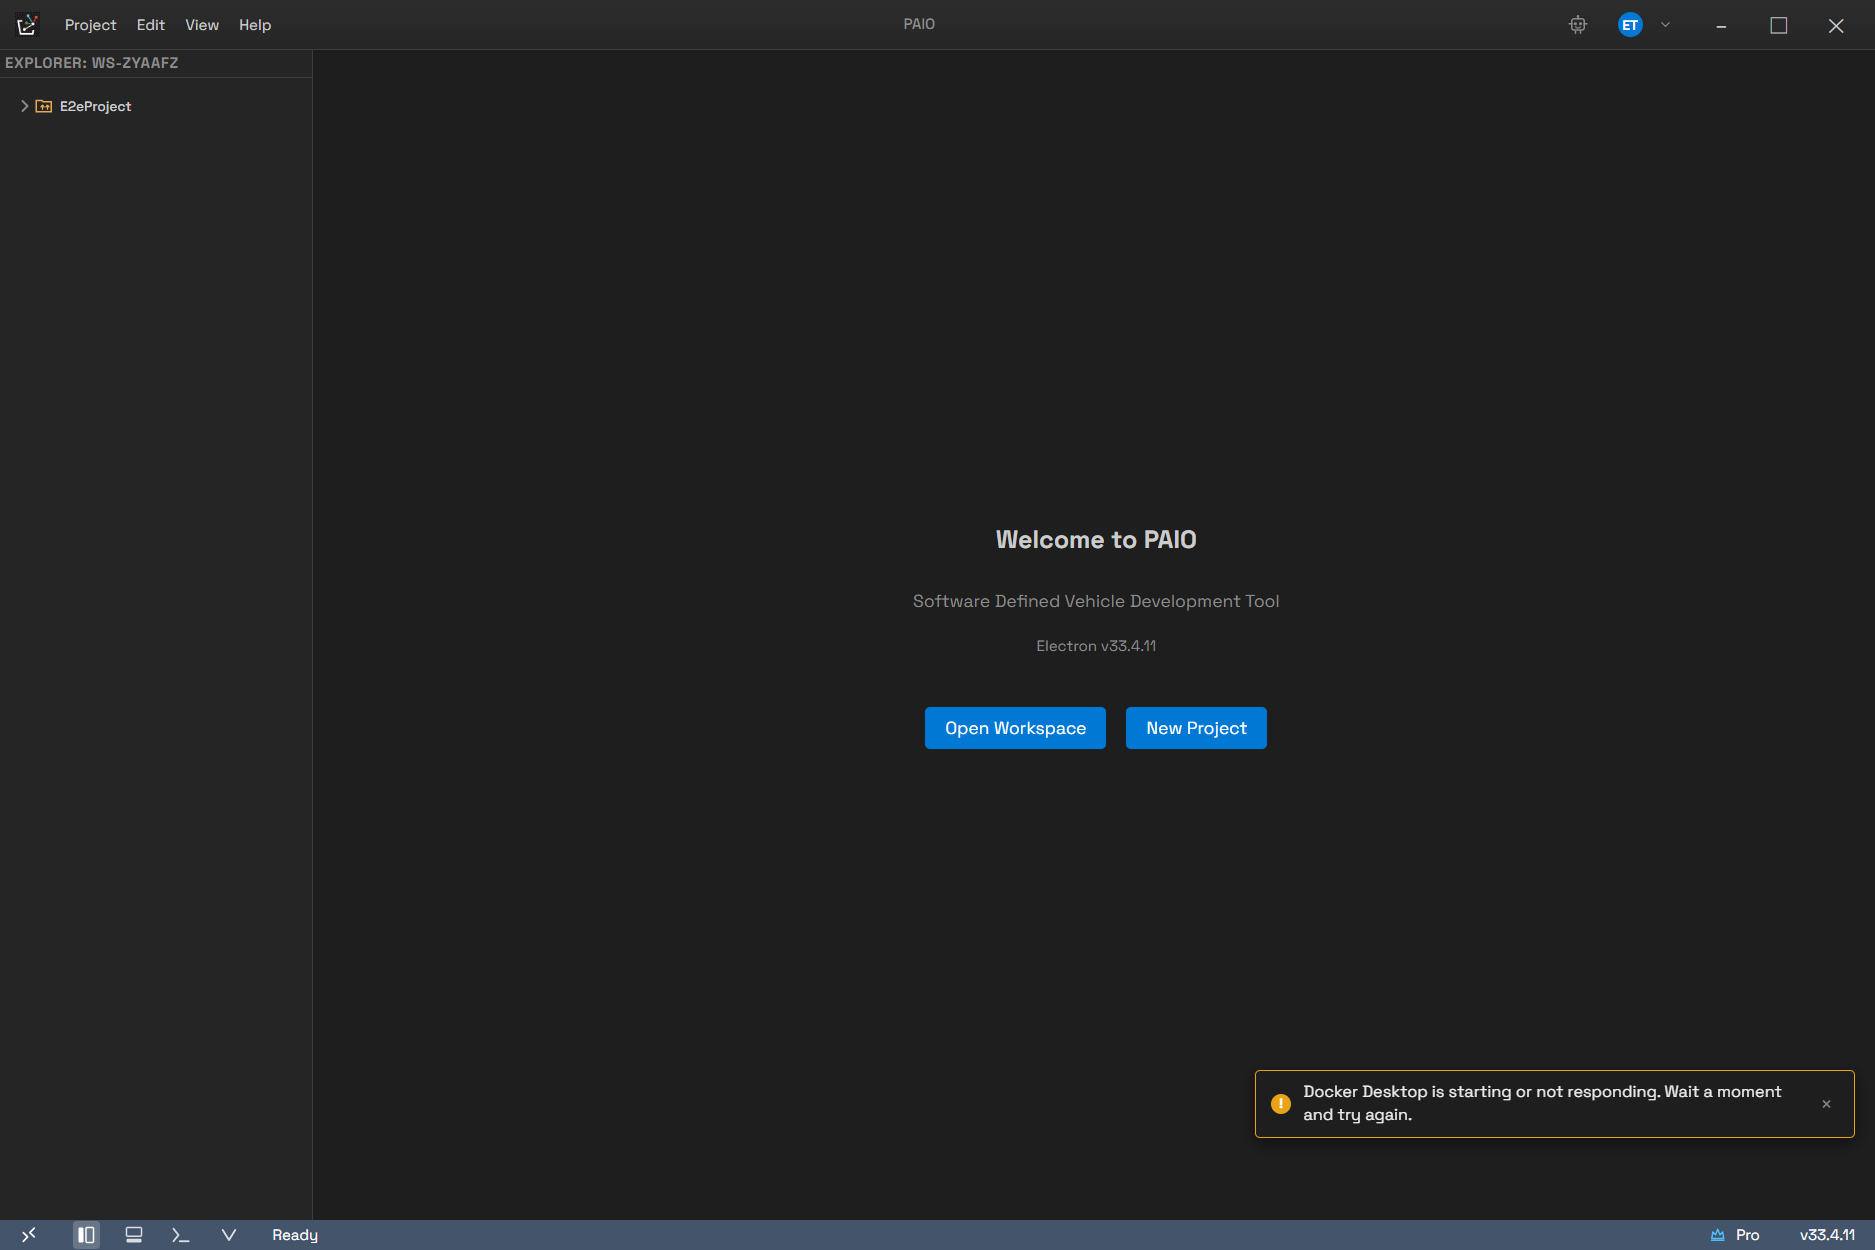
Choosing Open Folder in Container... with Docker installed but the daemon not running. The second message from the table above appears in the lower right corner and the action stops there. It is not a modal dialog, so you can continue with other work without closing it.
17.3.2 Open Folder in Container
- Select Open Folder in Container....
- Pick a local folder in the folder dialog (
Select Folder to Open in Container). - PAIO looks for a configuration file in that folder. It checks two locations:
<folder>/.devcontainer/devcontainer.jsonand<folder>/.devcontainer.json. If neither exists, aNo Dev Container Configurationdialog showsThis folder doesn't have a .devcontainer/devcontainer.json file. Create one first (or pick another folder).and the action stops. - A
Select a devcontainer.json filepicker opens so you can confirm the file that was found. Cancelling here stops the process. This step is skipped when you arrive through the automatic prompt (17.3.7). - A progress toast appears in the lower right corner and the container is built (17.3.3).
- On completion PAIO connects to the container and reloads the window. The workspace is the
folder reported by
devcontainer, or/workspaces/<folder name>if that is unknown. One terminal also opens automatically inside the container. - The connection succeeded once
Container: <container name>appears in the status bar.
17.3.3 The Progress Toast
Progress is shown in a toast in the lower right corner that does not cover the window. Because it is not a modal dialog, you can keep working while it runs. The titles per stage are as follows.
| Stage | Title shown |
|---|---|
| Start | Setting up dev container |
| Pulling the base image | Pulling base image |
| Building the image | Building image |
| Installing features | Installing features |
| Starting the container | Starting container |
| Running postCreateCommand | Running postCreateCommand |
| Wrapping up | Finalizing |
| Done | Container ready |
| Failed | Dev container failed |
| Cancelled | Cancelled |
- Clicking Show log expands the last 50 lines of the log and the button becomes Hide log.
- Clicking Cancel changes the button to
Cancelling...and stops the work in progress. - On success the toast shows
Container readybriefly and then disappears on its own. - On failure the log expands automatically and is replaced by the full build log, and the
Cancel button becomes Close. A
Dev Container Faileddialog then shows the cause.
17.3.4 Attach to Running Container
- Select Attach to Running Container....
- Pick a container from the
Select a running container to attachlist. Each entry shows the name, the state, and the image. Only running containers appear; if there are none, aNo running containers found!toast appears. - Once connected, the window reloads and the folder browser for the container opens. One terminal also opens automatically.
17.3.5 Add Dev Container Configuration Files
This wizard creates a new .devcontainer/devcontainer.json.
- Select Add Dev Container Configuration Files.... If the current workspace is remote (a
UNC path or
docker://), aLocal Folder Requireddialog showsAdding a Dev Container configuration only works on local folders. Reopen Folder Locally first.and the action stops. - Pick a template from the
Add Dev Container Configuration Files — select a template (C/C++ / Rust)list.
| Template | Description (as shown) | What it creates |
|---|---|---|
| C/C++ | Ubuntu 22.04 + gcc / g++ / clang / cmake / gdb / lldb (apt install) | Named C/C++ Dev Container, with a postCreateCommand that installs build-essential gcc g++ clang cmake gdb lldb pkg-config |
| Rust | Ubuntu 22.04 + rustup / cargo / rustc (devcontainer feature) | Named Rust Dev Container, with the ghcr.io/devcontainers/features/rust:1 feature |
| C/C++ + Rust | Ubuntu 22.04 + both of the above (paio recommended — for SDV/automotive work) | Named C/C++/Rust Dev Container, including both of the above |
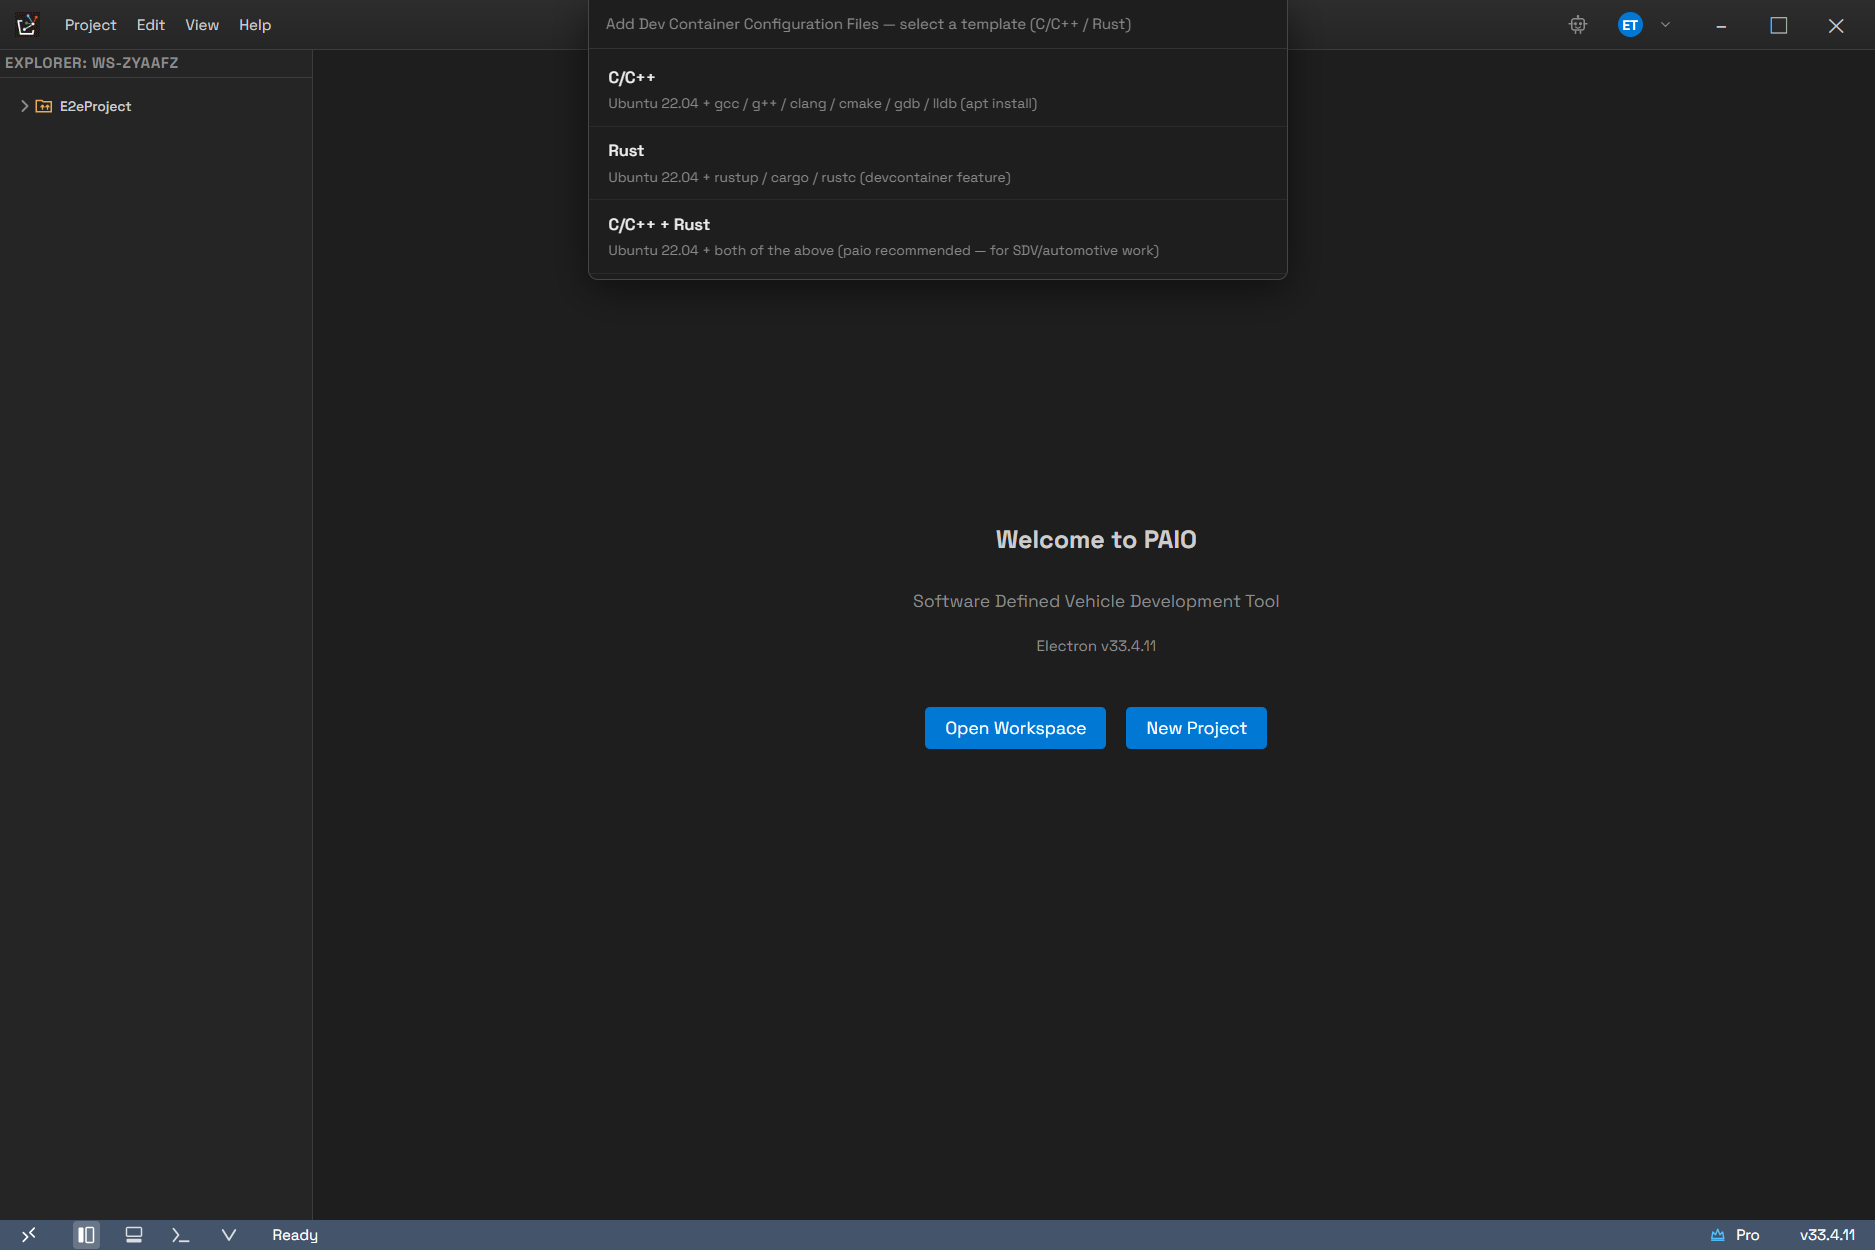
The template list from step 2. The three entries from the table above each appear with their description, and choosing a folder comes in the next step. The header still reads (C/C++ / Rust) even though there are three templates.
- If a workspace is open, the file is created in that folder; otherwise it goes into the folder you pick in the folder dialog.
- If the file already exists, an
Overwrite Existing Configuration?confirmation appears. Select Overwrite to replace it. - Once the file is written, a prompt asking whether to reopen the folder in a container appears in the lower right corner right away (17.3.7).
All three templates use mcr.microsoft.com/devcontainers/base:ubuntu-22.04 as the base image
and vscode as the container user. PAIO is an IDE for the SDV and automotive domain, so it
offers C/C++ and Rust templates only.
17.3.6 Rebuild Container
This action applies changes you made to devcontainer.json. It appears in the menu only when
you entered through Open Folder in Container....
- Selecting Rebuild Container shows a confirmation dialog. It explains that the existing container is removed and rebuilt, and that any change outside the bind-mounted workspace folder — manually installed packages, for example — is lost. Click Rebuild to proceed.
- The existing connection is torn down. The language server, the terminals, and the file watcher go down with it.
- The progress toast appears. It looks the same as during the first build; only the title
differs, starting with
Rebuilding <name>. - On completion PAIO connects to the new container and re-enters the workspace. On failure a
Rebuild Faileddialog appears.
Running the action while the menu item is not available shows a Cannot Rebuild notice. A
container connected with Attach does not track a devcontainer.json, so you have to rebuild it
directly with the docker CLI.
17.3.7 Reopen Folder Locally and the Automatic Prompt
Reopen Folder Locally drops the container connection and reopens the original local folder. This item, too, appears only when you entered through Open Folder in Container....
Separately, opening a local folder that contains a .devcontainer as a workspace shows a
prompt automatically in the lower right corner.
This folder contains a Dev Container configuration.
Reopen in container "<name>"?
The buttons in the prompt behave as follows.
| Button | Action |
|---|---|
| Reopen in Container | Enters the container creation process. The automatic prompt is not shown again for this folder |
| Don't show again | Stops asking for this folder |
| Dismiss | Closes the prompt this time only |
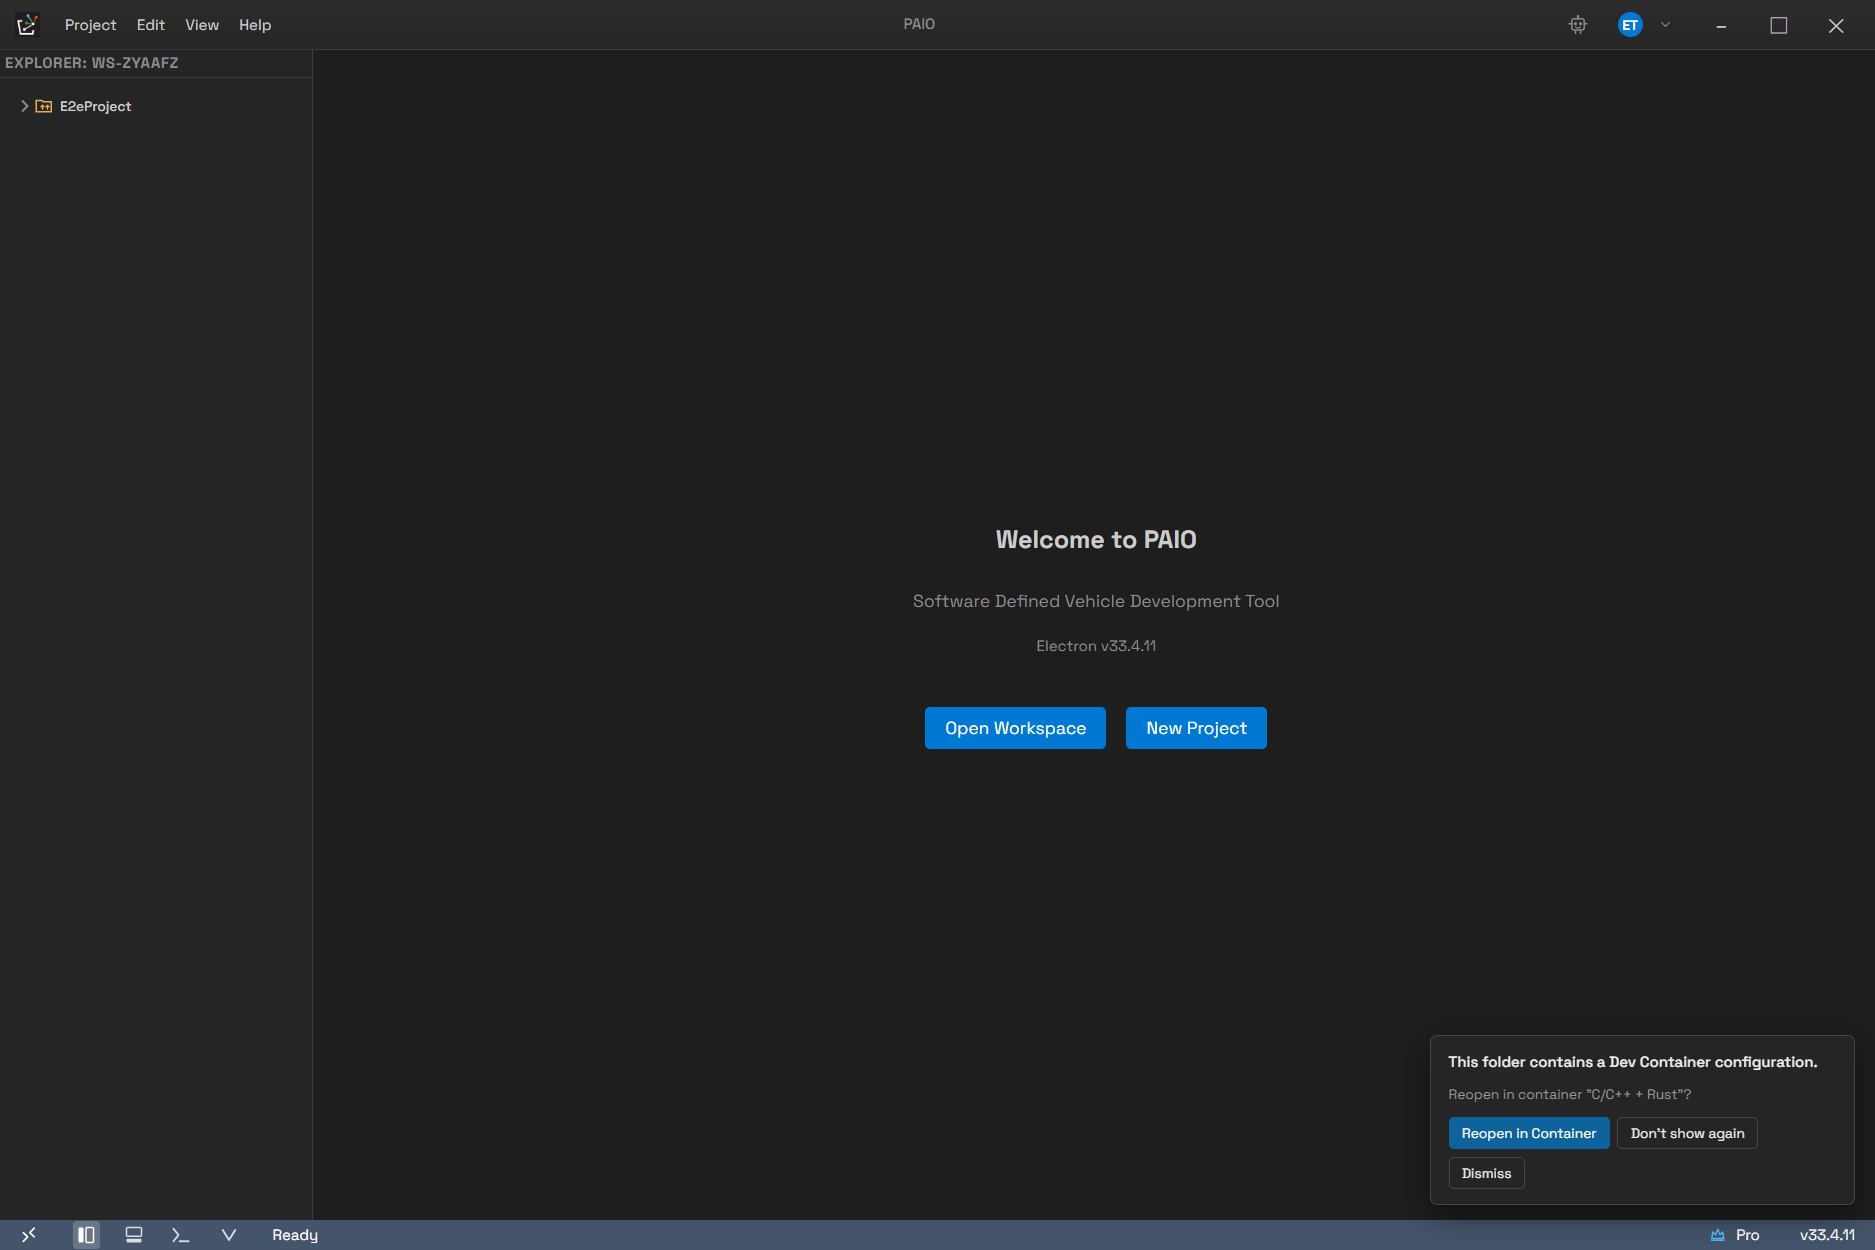
The automatic prompt shown in the lower right corner. The quotes on the second line hold the name from devcontainer.json, and the three buttons from the table above appear as listed.
This prompt is not shown when you are already in remote, container, or WSL mode.
17.3.8 When the Container Stops from Outside
If the container stops outside PAIO — through docker stop, for example — the connection state
is cleared, the status bar item disappears, and the toast below appears. To use the container
again, reopen the folder in a container.
Disconnected — the <name> container has stopped. Reopen the folder to reconnect.
17.4 WSL (Windows)
There are three WSL items.
| Item | Action |
|---|---|
| Connect to WSL | Connects to the default distribution, or to the first one in the list if there is no default |
| Connect to WSL using Distro... | Lets you pick a distribution from the Select a WSL distribution to connect to list. The default distribution is marked default |
| Open WSL Folder... | Opens a folder inside a distribution. If a connection is already active it uses that distribution; otherwise it uses the default one |
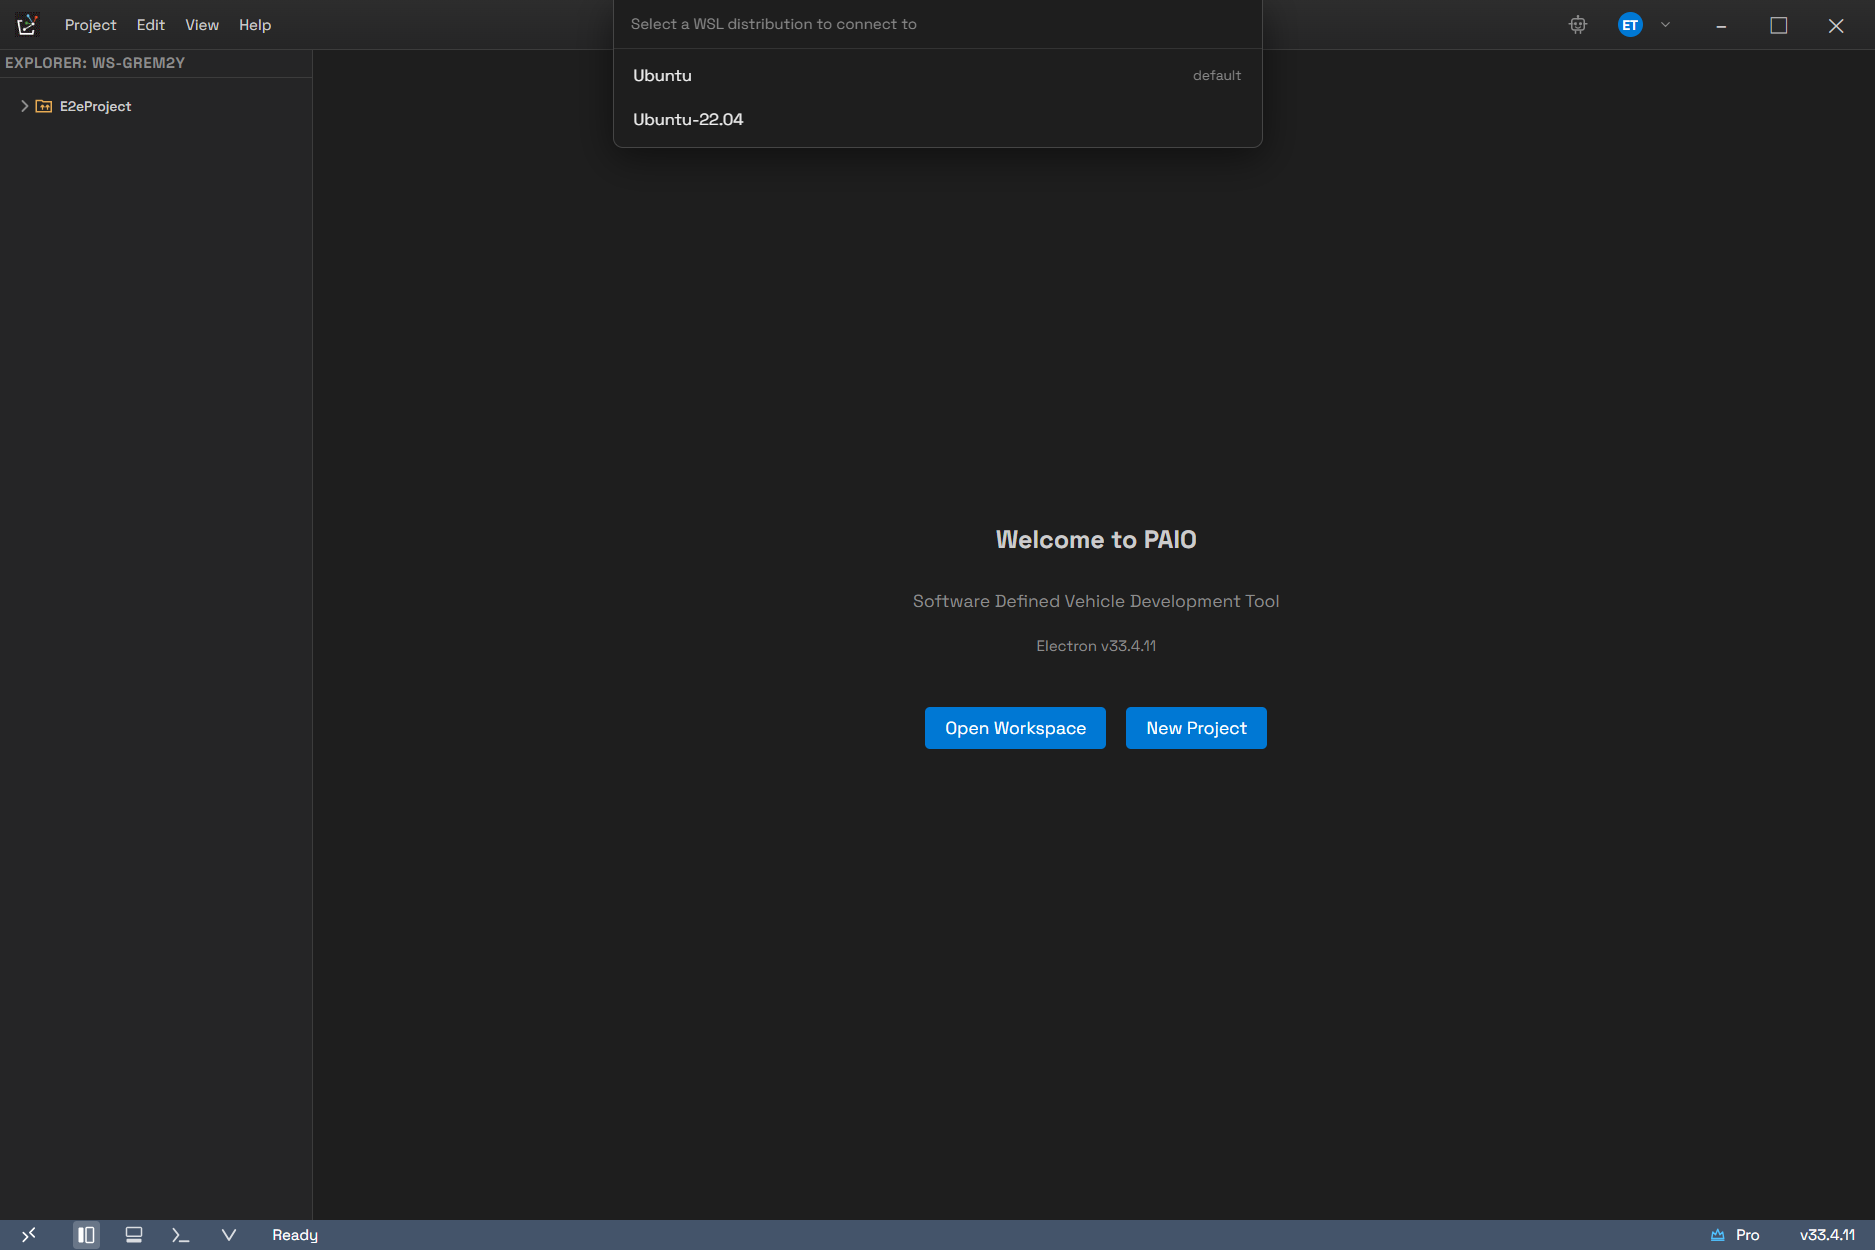
The list that opens when you choose Connect to WSL using Distro.... The header reads Select a WSL distribution to connect to, and only the default distribution carries a default marker on the right.
Both connection items follow the same sequence.
- The distribution is determined.
- The window reloads.
- After the reload, the folder browser for the distribution opens automatically. The starting
path is
$HOMEinside the distribution, or/homeif that lookup fails. - One terminal opens automatically inside the distribution.
- Picking a folder opens the workspace as
wsl://<distro><path>, and the status bar showsWSL: <distro>.
If WSL is missing or no distribution is installed, a WSL Not Available dialog shows the notice
below.
WSL is not available, or no Linux distribution is installed.

Install WSL:  wsl --install
Install a distro:  wsl --install -d Ubuntu
A workspace path of the form \\wsl$\... or \\wsl.localhost\... is recognized as a WSL
connection without any separate connection step, and the distribution name appears in the
status bar.
17.5 The Remote Folder Browser (Common)
SSH, WSL, and containers all use the same folder browser. It drops down from the top of the
window and only the header differs (Open Remote Folder (SSH), Open WSL Folder (<distro>),
Open Folder in Container (<name>)). Its elements behave as follows.
| Element | Action |
|---|---|
Eye icon (Hide dot files / Show dot files) | Hides or shows entries that start with a dot. All entries are shown by default |
| Path field | Type a path and press Enter to open that path |
| OK | Opens the directory you are currently viewing as the workspace |
| Show Local | Opens the local folder dialog so you can return to a local workspace |
.. | Moves to the parent directory. One click is enough |
| Folder entry | A single click enters that folder |
The list shows folders only. Files do not appear. If a path cannot be read,
Failed to browse: <reason> appears. Press Esc or click outside to close the browser.
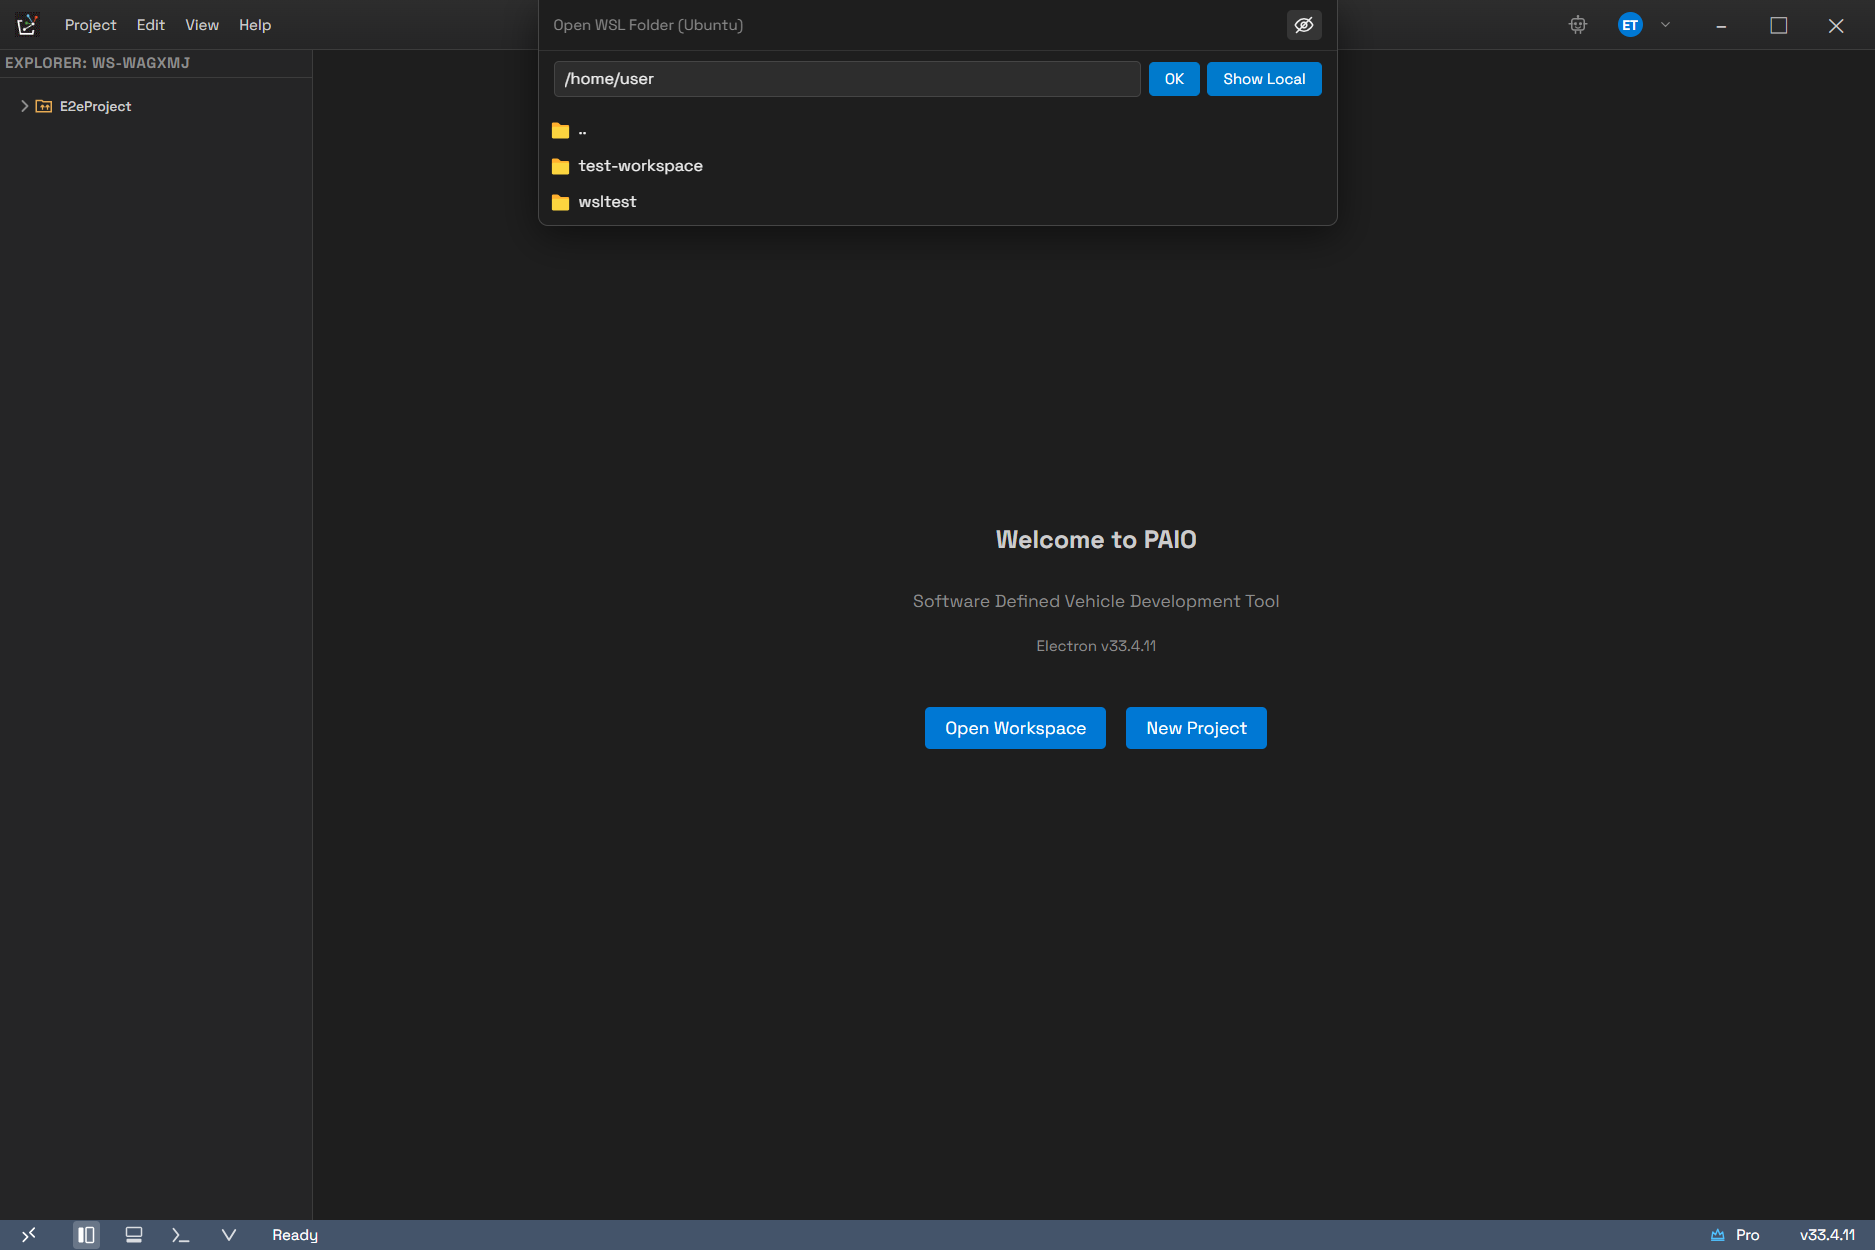
How it looks when opened for WSL. The header changes to Open WSL Folder (<distro>), and the eye icon sits at the far right. The starting path is $HOME inside the distribution, and the .. at the top of the list moves you to the parent. You can also see that only folders appear, with no files.
The position shown first depends on the case.
| Case | Starting path |
|---|---|
| SSH | /home |
| WSL | $HOME inside the distribution. /home if that lookup fails |
| Container | The container's working directory (workdir). / if there is none |
Choosing to open a folder while no connection is active shows a notice dialog and stops. For
SSH, a Not Connected dialog shows Connect to an SSH host first.; for containers, a
Not Attached to a Container dialog shows Attach to a container first..
17.6 Remote Language Servers and Build Tools
17.6.1 Automatic Deployment
When you open or build a C/C++/Rust file in a remote, container, or WSL workspace, PAIO uploads the Linux x64 binaries it ships with to the remote environment and runs them there. You do not need to install anything on the remote yourself. The tools that are deployed and where they land on the remote are as follows.
| Deployed tool | Install location on the remote |
|---|---|
| clangd | ~/.paio-server/bin/clangd |
| rust-analyzer | ~/.paio-server/bin/rust-analyzer |
| CMake | ~/.paio-server/cmake/ |
| gcc / g++ | ~/.paio-server/gcc/ |
| Rust toolchain (cargo, rustc) | ~/.paio-server/rust/ |
- If the same version is already uploaded, PAIO does not upload it again.
- Language server upload progress appears in a banner in the lower right corner. While it runs
you see
Deploying clangd to remote… (42%); when it finishes,Remote LSP readyappears briefly and disappears. On failure,Remote LSP: <tool> deploy failed (<reason>)stays for a few seconds. - If the CMake, gcc, or Rust deployment fails, PAIO falls back to the remote system's
cmake,gcc, orcargo. If those are missing too, the build output carries an installation notice (see 16.2.4).
17.6.2 Supported Environments
The bundled binaries are built for glibc-based Linux x86_64. The following environments are not supported.
| Condition | Result |
|---|---|
| Anything other than Linux x86_64 (arm64, macOS, and so on) | Deployment refused |
| musl-based distributions (Alpine and so on) | Deployment refused |
When an SSH remote is outside the supported range, the warning toast below appears once per workspace.
This remote server is not a supported environment (e.g. arm64, Alpine/musl, or non-Linux), so code intelligence (completion / diagnostics) is unavailable. PAIO bundles language servers for glibc Linux x64 remotes only.
When a WSL distribution is outside the supported range, language server deployment stops with
WSL distro is not x86_64 — only Linux x64 is supported or
WSL distro uses musl (Alpine) — only glibc is supported. CMake, gcc, and Rust toolchain
deployment stops for the same reason, with slightly shorter wording.
Using Rust inside a container requires cargo. PAIO first tries to deploy its own Rust toolchain, and if that is unavailable it looks for a cargo already installed in the container. rust-analyzer starts if either one is present.
If none of the three is present, rust-analyzer does not start. No notice appears on screen and the state simply stays
stopped, so when Rust completion silently does nothing in a container, check first whether cargo is installed inside the container (see 16.1.3).
17.7 Closing the Connection
Selecting Close Remote Connection drops the connection, closes the open remote workspace, and reloads the window. You return to the local state. All three methods also clear the stored remote workspace, so the next launch does not reconnect automatically. Editor tabs that are dirty are saved first while the workspace closes.
17.8 Limits and Constraints
These are the limitations worth knowing before you use remote development.
- The window reloads every time you connect or disconnect. Save any unsaved edits beforehand.
- Port forwarding is not provided.
- A file change on the remote may show up in the window late, because the detection method
varies by environment. When it lags, use the
Refresh Explorerbutton at the top of the Explorer. - The bundled toolchain paths PAIO prepends to
PATHare host paths, so they are of no use in a remote terminal. They are not applied to an SSH shell at all (see 16.3.3). Build tools used on the remote follow the automatic deployment paths in 17.6. - A remote build is killed after 120 seconds.
- The container features depend on the local Docker. If Docker Desktop is not running, no container item proceeds.
- One window holds one remote mode at a time. You cannot connect to SSH, a container, and WSL simultaneously.