AI Assistant
What This Chapter Covers
PAIO offers two AI features that create and modify the model from natural language. This chapter explains what each one does, how to phrase a request so you get the result you want, and how to check and revert what the AI wrote.
- Audience: users who want to create or modify the model from natural language
- Prerequisites: an active license and at least one LLM provider (15.2). To modify a model, a project must be open.
The AI drafts, the engineer decides. What the AI produces is always a draft. PAIO blocks malformed results from entering the model and gives you a way to revert, but it does not judge whether the content is correct as a design. Always check what was written in the relevant editors and in the 14. Validation panel.
15.1 What the AI Does for You
There are two features, and each suits a different situation.
| AI chat | QuickStart workflow | |
|---|---|---|
| When to use it | Adjusting a model that already exists | Creating a draft from scratch |
| Input | Free-form sentences | A domain template plus variables |
| Scope | Only the part you asked about | The whole project |
| Entry point | The robot icon at the right of the top bar | Project ▸ Quick Start |
AI chat can touch the following. As a rule of thumb, most of the work you do by hand in the editors can be expressed as a sentence instead.
- Network topology — ECUs, HPCs, communication clusters, connectors
- Signals, PDUs, frames
- Data types and units
- Port interfaces and service deployment
- SWCs and compositions, SWC-to-ECU mappings
- ECUC module definitions and configuration values
You can also ask questions that do not modify the model. Ask about an AUTOSAR concept or term,
discuss a design decision, or ask for a document to be written into the project's doc folder.
The two features run independently but share the same provider — the provider you select in the chat also applies to QuickStart.
15.2 Preparation — Connecting a Provider
To use the AI features, connect at least one LLM provider. Open the AI Providers dialog from the gear button in the chat header (Manage AI accounts) or from the command palette ▸ Manage AI Accounts....
| Provider | How to prepare it |
|---|---|
| Claude [OPUS] | Install the Claude CLI, then Log in |
| Claude [GLM] | Enter an API key |
| Gemini | Install the Gemini CLI, then Log in |
| Codex | Install the Codex CLI, then Log in |
| Ollama | Run an Ollama server locally and install at least one model |
The dot in front of each row shows its status — green means available, gray means unavailable, and yellow means the status is being checked. Click Use on one of the available providers to make it active. Clicking Log in opens a terminal window that runs that CLI's login procedure (a browser may open as well); when it finishes, the dot turns green.
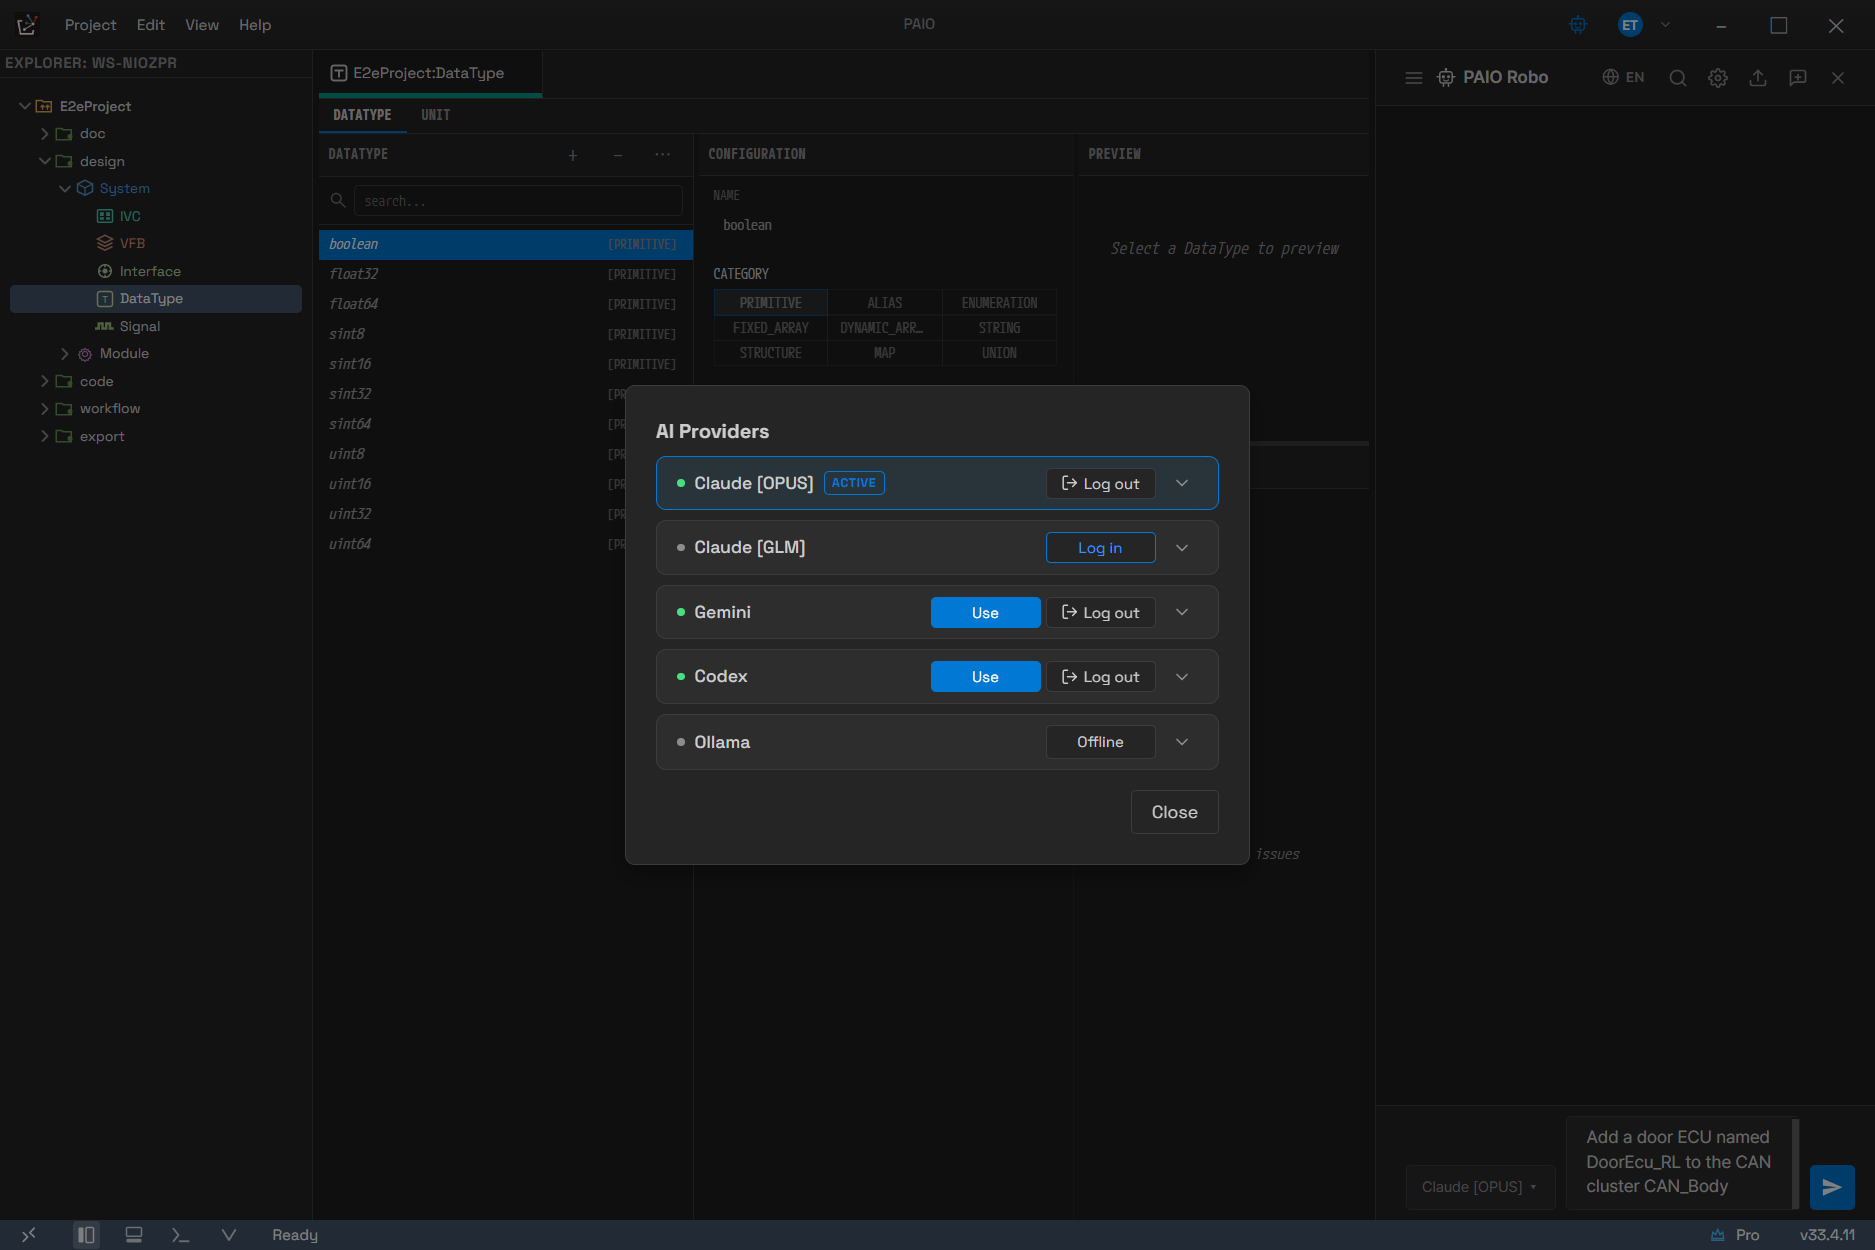
The buttons show what you can do with each provider right now. Claude [OPUS] at the top is
already active, so it carries an ACTIVE badge, while Gemini and Codex are available but not
active and therefore show Use. Claude [GLM] has no key yet, so it shows Log in, and
Ollama shows Offline because the local server is not running. The dot color in front of each
name states the same fact again.
- API keys are encrypted in the OS keychain and stored on this PC only; they are never shown on screen again. They survive a change of workspace.
- With no active provider, sending a message fails with the error
LLM provider is not available. - The Claude providers are deactivated automatically after three consecutive failed calls
(
Provider deactivated after 3 consecutive failures). Log in again or switch to another provider.
15.3 Using AI Chat
Click the robot icon at the right of the top bar (tooltip AI Chat Panel) to open the chat panel
on the right. Its title is PAIO Robo. Close it with the same button or with Close in the
header, and drag the panel's left edge to change its width. The panel always starts closed when you
restart the application.
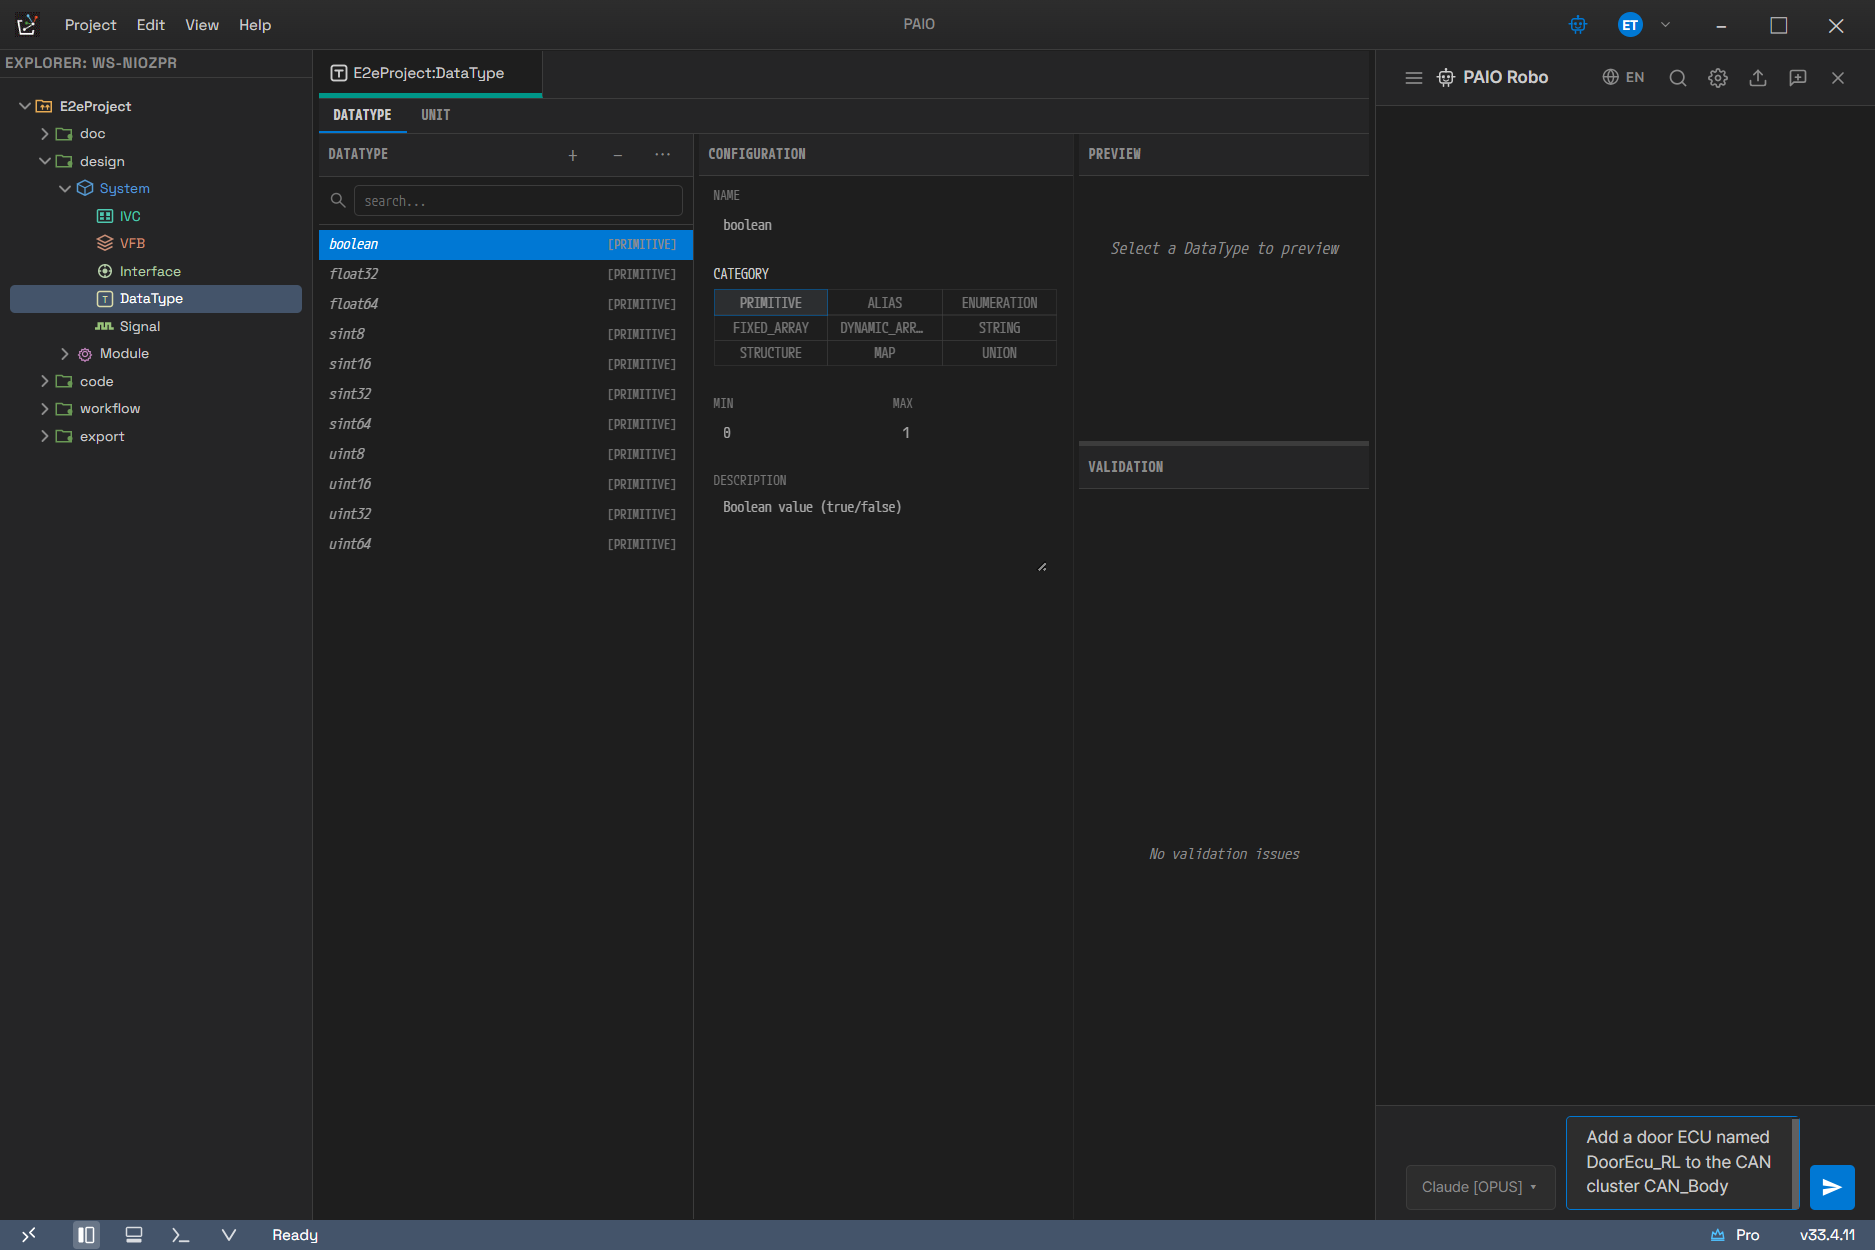
The chat opens beside the editor rather than covering it, so you can keep looking at the screen you
were editing while you make a request. A request has been typed into the field at the bottom, and
the provider in use (Claude [OPUS]) appears to its left. The field grows on its own as you type.
The EN in the header means the answer language is set to English.
Press Enter to send and Shift+Enter for a new line. Messages sent while an answer is streaming
are ignored, so send again only after the previous answer finishes. The header holds the conversation
list (Chat history), search, the answer language (KO / EN / JA / ZH), export (JSON and
text), and a new conversation. Once you choose a language, the assistant answers only in that
language no matter which language you ask in.
15.3.1 The Basic Flow
-
Write your request with the project open.
-
Read the answer. If the request modified the model, the result is written straight to the files and a summary is appended to the answer.
**Write Complete** | Parsed: 3 | Validated: 3 | Written: 3 | Verified: 3If anything failed, the title changes to
**Write Result**and the list of failures follows. -
Open each editor and check the result. Use the validation panel to check for constraint violations as well.
-
If you are not satisfied, revert (15.3.3).
PAIO filters some things out before writing. A document is rejected if a name is empty or does not
follow the AUTOSAR naming rules, and it is also rejected if its structure does not match. After a
rejection, PAIO summarizes the failures and re-sends the request automatically up to twice (an
[Auto-correction attempt 1/2] separator appears in the answer). If the write itself fails, a retry
prompt appears; sending the single word 재시도 (or retry, or 네) in the input field then writes
the same content again without calling the LLM. Adding anything else turns it into an ordinary
question.
These checks only block malformed documents; they do not look at whether the content is correct as a design. Reviewing that is up to you.
15.3.2 Which Project Gets Written
Having an editor open is not enough to determine the target. The target is resolved in this order.
- The project whose name in the workspace exactly matches the project name written in the document the AI produced
- The only project in the workspace, if the workspace holds just one
- If neither applies, the document is not written and fails with the error
Cannot determine target project.
So in a workspace with more than one project, spelling the project name out in your request is the most reliable approach.
15.3.3 Reverting Changes
If at least one file was written, a ↩ 되돌리기 button appears below the answer. Clicking it
restores the previous content and deletes the files this response created. The restore itself is also
recorded in the edit history.
You can also revert with Ctrl+Z — a change written by the AI is recorded as a single undo step.
The backup that
↩ 되돌리기uses is kept for 30 minutes only. Clicking it later fails withThe backup has expired or does not exist, so it is best to decide whether to revert on the spot.
15.4 How to Write a Good Request
The quality of the result is mostly decided by the wording of your request. Four rules are enough.
Name the Target Explicitly
The AI cannot see what you selected on screen. You have to state in words what to create and where.
| Request | |
|---|---|
| ✗ | Add one more ECU here |
| ✓ | Add the door ECU DoorEcu_RL to the CAN cluster CAN_Body in the project DoorProject |
Ask for One Thing at a Time
When one sentence carries several concerns, it is easy for only part of it to be applied or for the parts to contradict each other. Split the request, check each result, and then move on.
| Request | |
|---|---|
| ✗ | Create four door ECUs, attach signals, and map the SWCs too |
| ✓ | ① Add four door ECUs to the CAN cluster CAN_Body② Define the window position signals those ECUs exchange |
State the Conditions
Write down anything that needs a fixed value up front — a count, a bit length, a cycle time, a platform. If you leave it out, the AI picks a value on its own.
| Request | |
|---|---|
| ✗ | Create a window position signal |
| ✓ | Create a window position signal: 8-bit unsigned integer, range 0 to 100%, 100 ms cycle time |
Ask First When You Are Unsure
If you only ask instead of telling the AI to modify the model, the files stay untouched. This is a good way to talk a structure through before you commit to it.
"I am deciding whether to take the door domain Classic or Adaptive. What changes in each case?"
15.5 The QuickStart Workflow
Pick a domain template, fill in the variables, and the AI builds the model for the whole project over several steps. Use it to draft from a blank slate.
15.5.1 Procedure
- Run
Project ▸ Quick Start. If no workspace is open, a selection dialog appears first. - Name the new project. An unused number such as
QuickStart_01is proposed as the default, and the naming rules are the same as for an ordinary project (4.3.2). - Choose a template in the template gallery (Select a Template). The search field and the domain chips narrow the list, and clicking a card takes you straight to the next step.
- Fill in the variables and click Start Generation. If there are several variable groups, move between them with the tabs at the top. The button stays disabled while a required field is empty or a number is out of range.
- Watch the status of each step on the progress screen. When it finishes, the title changes to
Generation Complete!and you close it with Done.
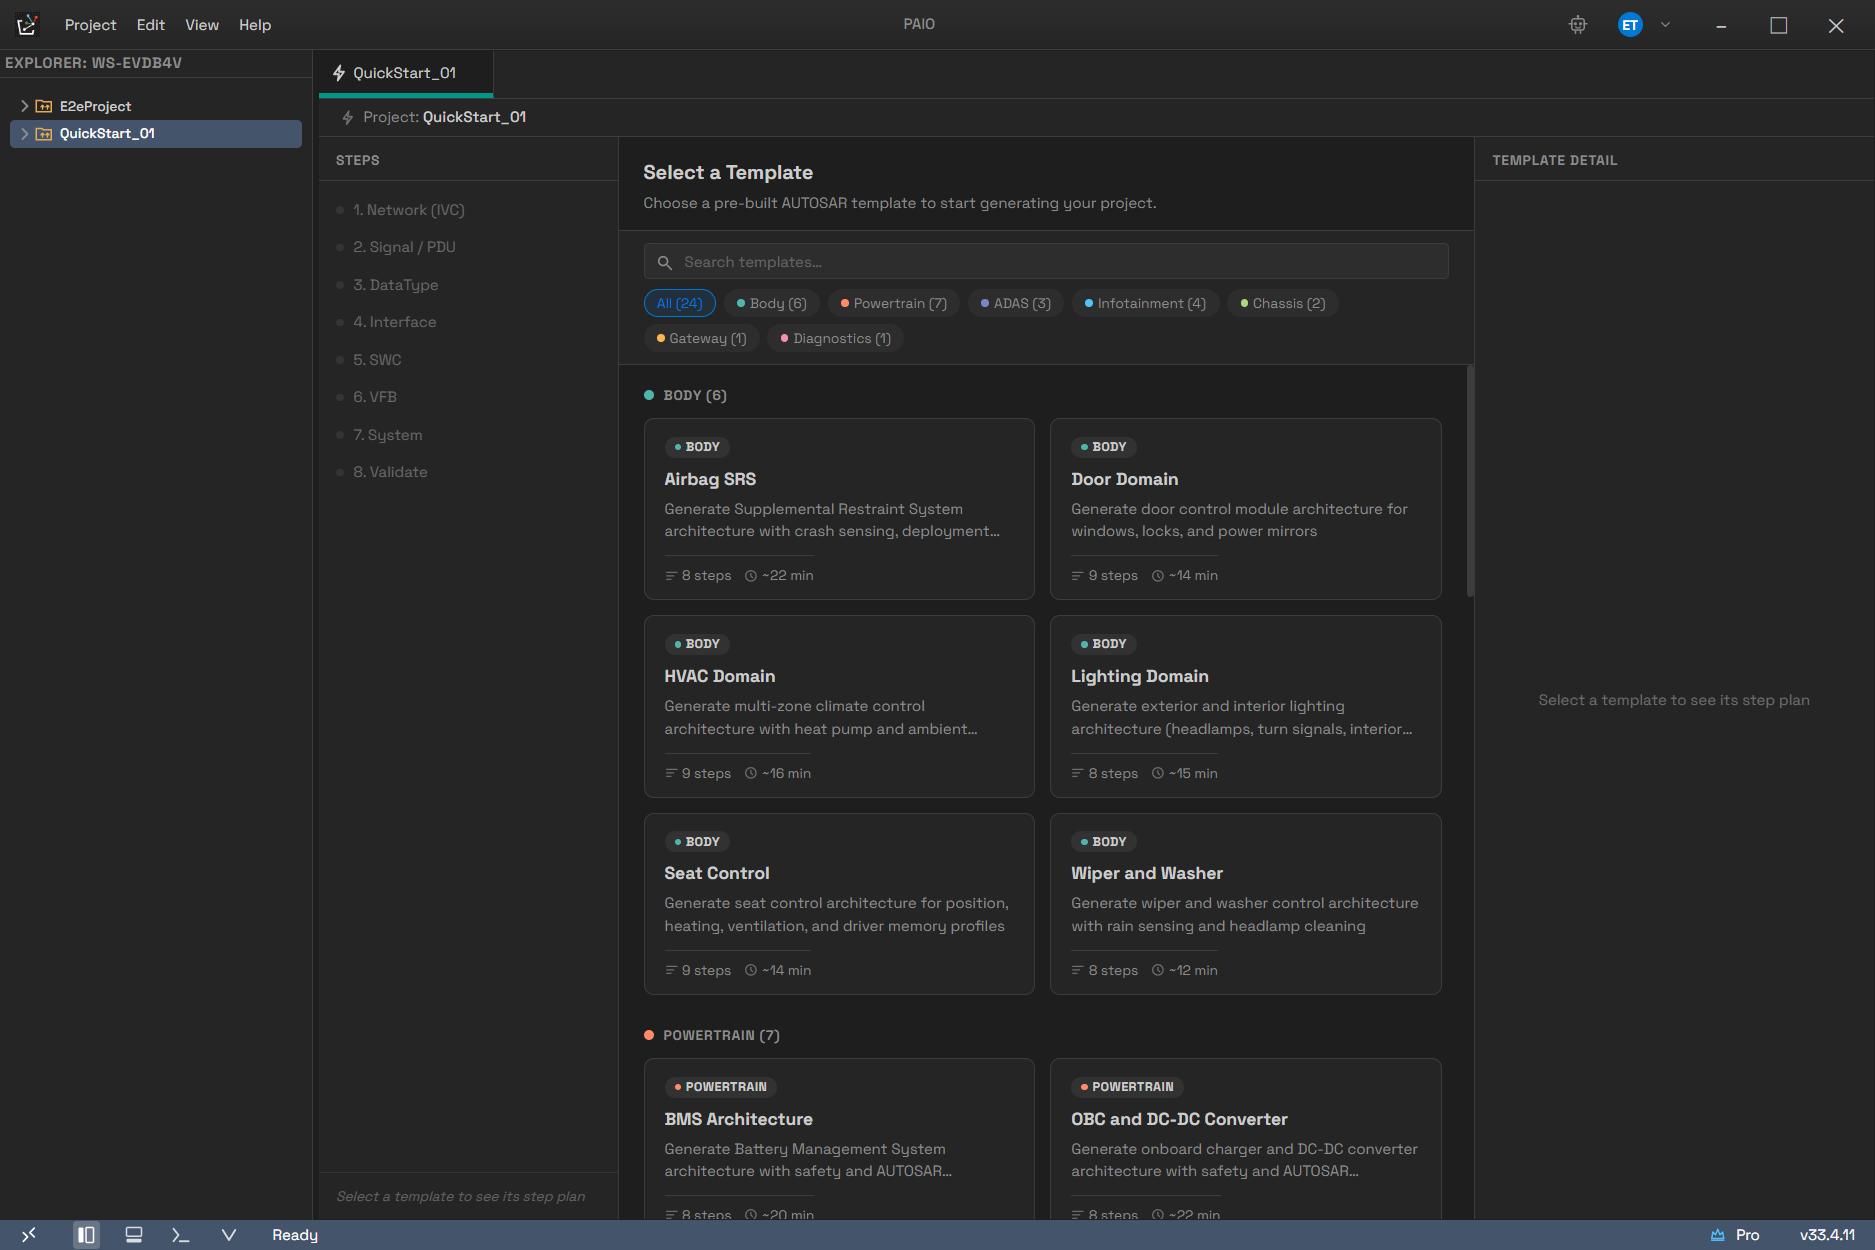
This is the gallery from step 3. The chips at the top narrow the list by domain (the number in
parentheses is the template count for that domain), and each card states its step count and estimated
time. STEPS on the left is still empty, and TEMPLATE DETAIL on the right still reads
Select a template to see its step plan — both fill in once you choose a template.
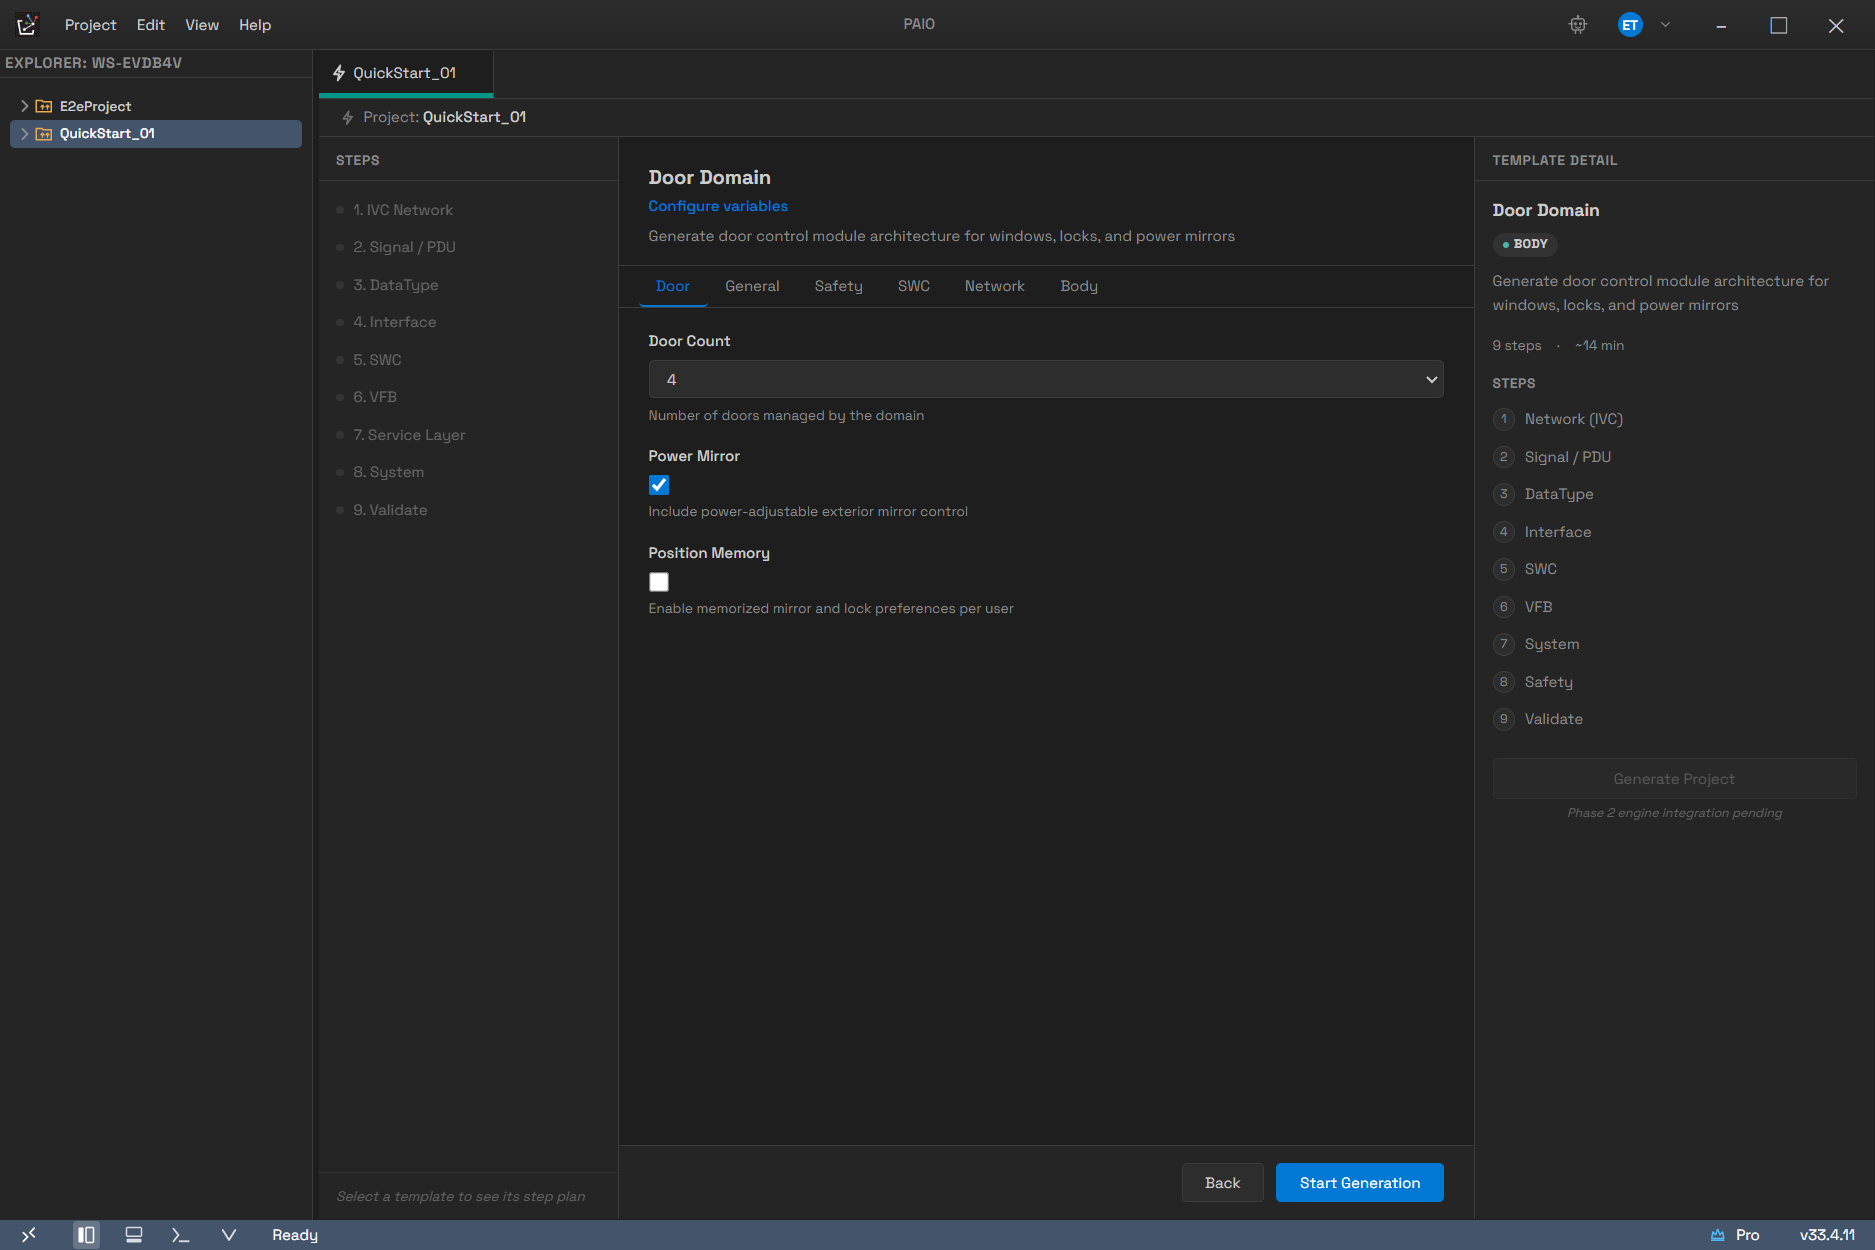
This is step 4. Clicking a card brings you straight to this screen without a further stop in the gallery. Door · General · Safety · SWC · Network · Body across the top are the variable group tabs, and STEPS on the left and TEMPLATE DETAIL on the right are now filled with this template's nine steps. Back and Start Generation appear at the bottom right, together with a grayed-out, disabled Generate Project below the detail panel — the two notes below explain these three buttons.
The button that starts generation is
Start Generationin the wizard. Generate Project below the detail panel on the right is always disabled and does nothing.
Back in the wizard does not move you to the previous group; it cancels the wizard. It discards the variables you entered and returns to the gallery. Move between groups with the tabs at the top.
15.5.2 Templates
There are 24 templates across 7 domains.
| Domain | Templates |
|---|---|
| Body (6) | Airbag SRS, Door Domain, HVAC Domain, Lighting Domain, Seat Control, Wiper and Washer |
| Powertrain (7) | BMS Architecture, OBC and DC-DC Converter, Engine Management, Exhaust Aftertreatment, Hybrid Coordinator, Inverter and Motor Control, Transmission Control |
| ADAS (3) | ACC Lane Keep, Parking Assist, Sensor Fusion |
| Infotainment (4) | Cluster and HUD, Connectivity, Display and Audio, Navigation and Media |
| Chassis (2) | Brake and Steering, Suspension and TPMS |
| Gateway (1) | Central Gateway |
| Diagnostics (1) | UDS and DoIP |
15.5.3 What Happens During Generation
Generation runs in the order IVC → signals → data types → interfaces → SWCs → VFB → (services) → System, and ends with a check step. Each step builds on the output of the one before it, so when a step that produces an artifact fails, the steps after it do not run and generation stops.
A failed step carries two controls.
- Show error detail — expands the full error message.
- Retry (on the step row) — reverts that step and the steps after it, then runs again from that step.
The Retry at the bottom of the screen behaves differently. It does not retry a step; it returns you to the variable wizard, and the values you entered are preserved, so you can change a value slightly and run again.
15.5.4 Checking the Result
When generation finishes, the editors are filled with content.
- Expand the project in the Explorer and open the editors one by one.
- Click the V button in the status bar to open the 14. Validation panel and work through the constraint violations.
- To export, follow the procedure in 13. Import and Export.
15.6 Limits to Know About
- An active license is required. When the license has expired, the chat button and the input
field are locked (tooltip
Plan expired), and Quick Start leads to an upgrade notice. - The conversation and the model content are sent to the provider you selected. Choose a provider that fits your company policy. Ollama communicates only with the local server, so nothing leaves your machine.
- A large project is not sent in full. For a large model, only summaries and lists are sent, so the more detailed your request, the more specifically you should name the target in the sentence.
- Questions about the product's internals are not answered. A question containing a word such as
"source code", "internal structure", or "plugin" comes back as a fixed notice. Ask the same thing in
AUTOSAR terms and it is handled normally. An
[internal reference removed]marker inside an answer has the same cause and is not an error. - What is generated is a draft. It must always be reviewed by a person.