Importing the PARA Platform and PNC Request Ports
What You Will Do
The HPC runs on top of the PopcornSAR AUTOSAR Adaptive Platform. In this chapter you first import the PARA base set into the HPC machine with the PARA Platform Import button. You then add an NM request P-Port to each application AA and map it to one of the NM network handles you created in Chapter 9, so that the application AAs (Adaptive Applications) can request and release a PNC (Partial Network Cluster) through ara::nm.
Follow ParkAssistApp through to the end as the worked example. Repeat the same steps for the other two AAs using the value table.
When you finish this chapter, the HPC composition contains the composition prototype PARA (type PARA_HPC), and each of the three application AAs has one circular NM P-Port and one NetworkHandle mapping.
Before You Begin
- Finish AP Machine — NM Handles and FunctionGroups. The HPC machine must have the NM network handles
NH_Comfort,NH_ParkAssist, andNH_Trailer, plus four FunctionGroups. - At the start of this chapter PARA is not imported yet, and the three application AAs have no ara::nm port and no NetworkHandle mapping.
- For the full description of the features used here, see sections 8.9 (AA Internal Behavior), 8.10 (Machine Configuration), and 8.11 (PARA Base Configuration) of the VFB editor, and section 9.3.5 (Adaptive) of the Interface editor.
You enter the following values yourself in this chapter.
| Item | Value |
|---|---|
| NM port interface NAME / C++ NAMESPACE | NMI_PncRequest / pnc::nm |
P-Port NAME on ParkAssistApp | PncParkAssist |
| PORT INTERFACE of the P-Port | NM.NetworkHandle: NMI_PncRequest |
| NetworkHandle mapping PORT / NETWORK HANDLE | PncParkAssist / NH_ParkAssist |
What the PARA Platform Is
PARA is the base configuration set of the PopcornSAR AUTOSAR Adaptive Platform. It adds the platform AAs, interfaces, data types, and machine module configuration that an AP machine needs to run, all in one step. The import brings in the following.
| Item | Contents |
|---|---|
| 11 platform AAs | EM, CM, PHM, SM, TBM, DM, IDSM, NM, UCM, VUCM, CSM (grouped into the composition PARA_HPC; the HPC composition holds it as the prototype PARA) |
| 8 service interfaces | UpdateRequest, StateMachineService, StateMachineNotification, UpdateAllowedService, PackageManagement, VehiclePackageManagement, VehicleDriverApplicationInterface, VehicleStateManagerInterface |
| 1 state management interface | StateClient_HPC_MachineFG (the name carries the machine name HPC) |
| 4 error domains | ComErrorDomain, SmErrorDomain, UcmErrorDomain, VucmErrorDomain |
| Data types | 62 |
Internal connectors in PARA_HPC | 5 |
| Machine | The FunctionGroup MachineFG and 7 modules (LOG, CM, SM, NM, PHM, TIME_SYNC, CRYPTO) |
Note. PARA does not include the NM port interface that an application AA uses to request a PNC. You create
NMI_PncRequestyourself in Creating the NM Port Interface in this chapter.
Importing the PARA Platform
-
In the EDITOR view on the left, click VFB under DESIGN. The VFB editor opens in the tab PNC:VFB.
-
In the root view, click the machine icon (the light blue three-bar icon) to the right of the HPC [HPC] composition header. It is the same icon you clicked in Chapter 9.
-
The Machine Configuration [HPC] dialog opens on the MACHINE tab. Click the PARA Platform Import button at the top right.
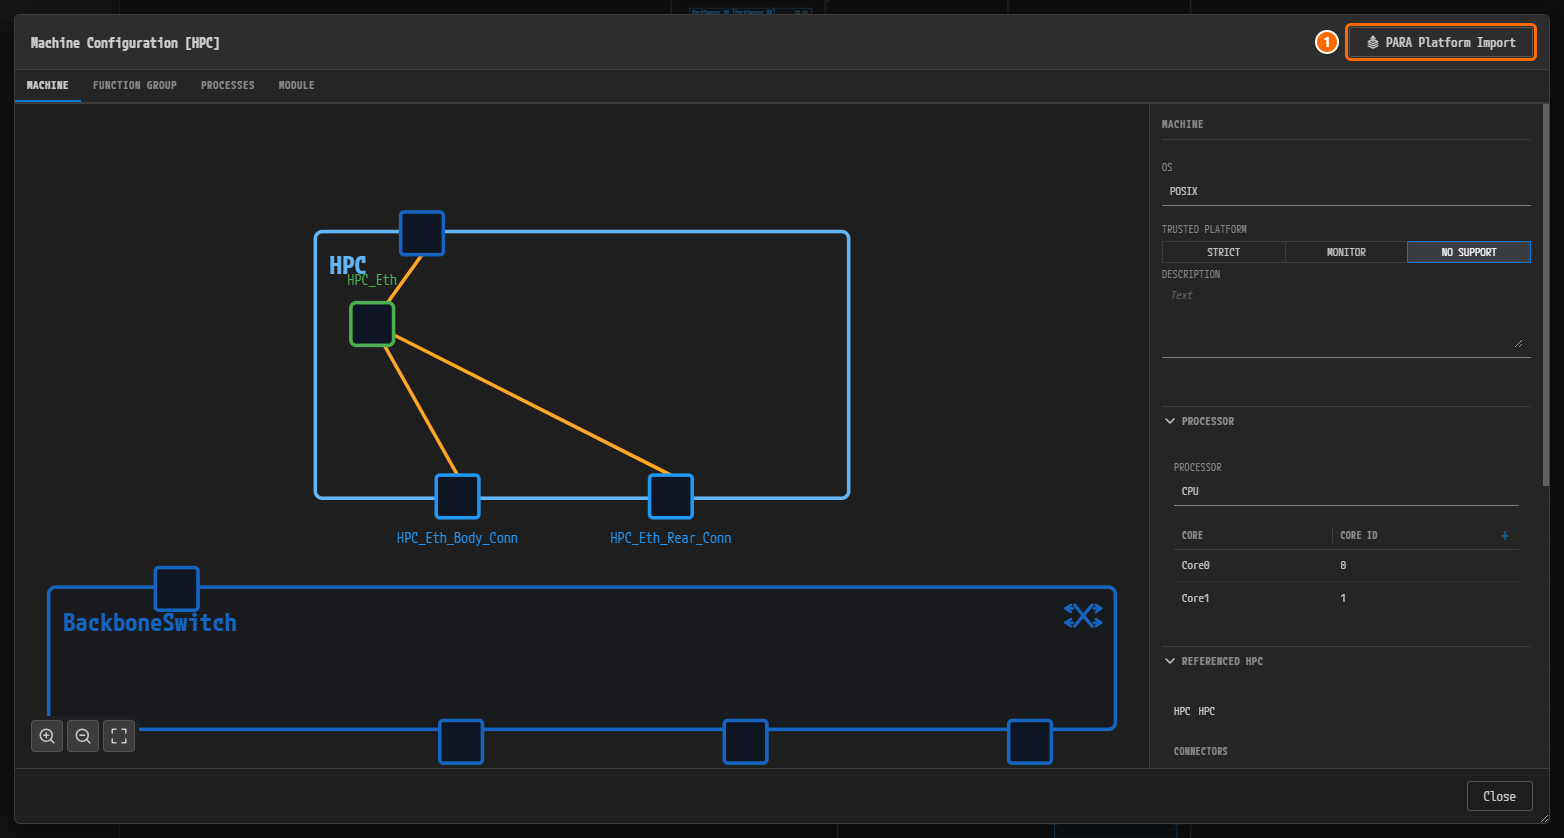
Figure 10-1. The MACHINE tab of the Machine Configuration [HPC] dialog. The topology on the left shows the HPC machine, the Ethernet connectors
HPC_Eth_Body_ConnandHPC_Eth_Rear_Conn, and the switchBackboneSwitch. ① The PARA Platform Import button to click (top right of the dialog). -
The PARA Platform Import confirmation window opens on top of the dialog. Its subtitle is "PopcornSAR AUTOSAR Adaptive Platform". The window shows no summary of the contents. Click Import.
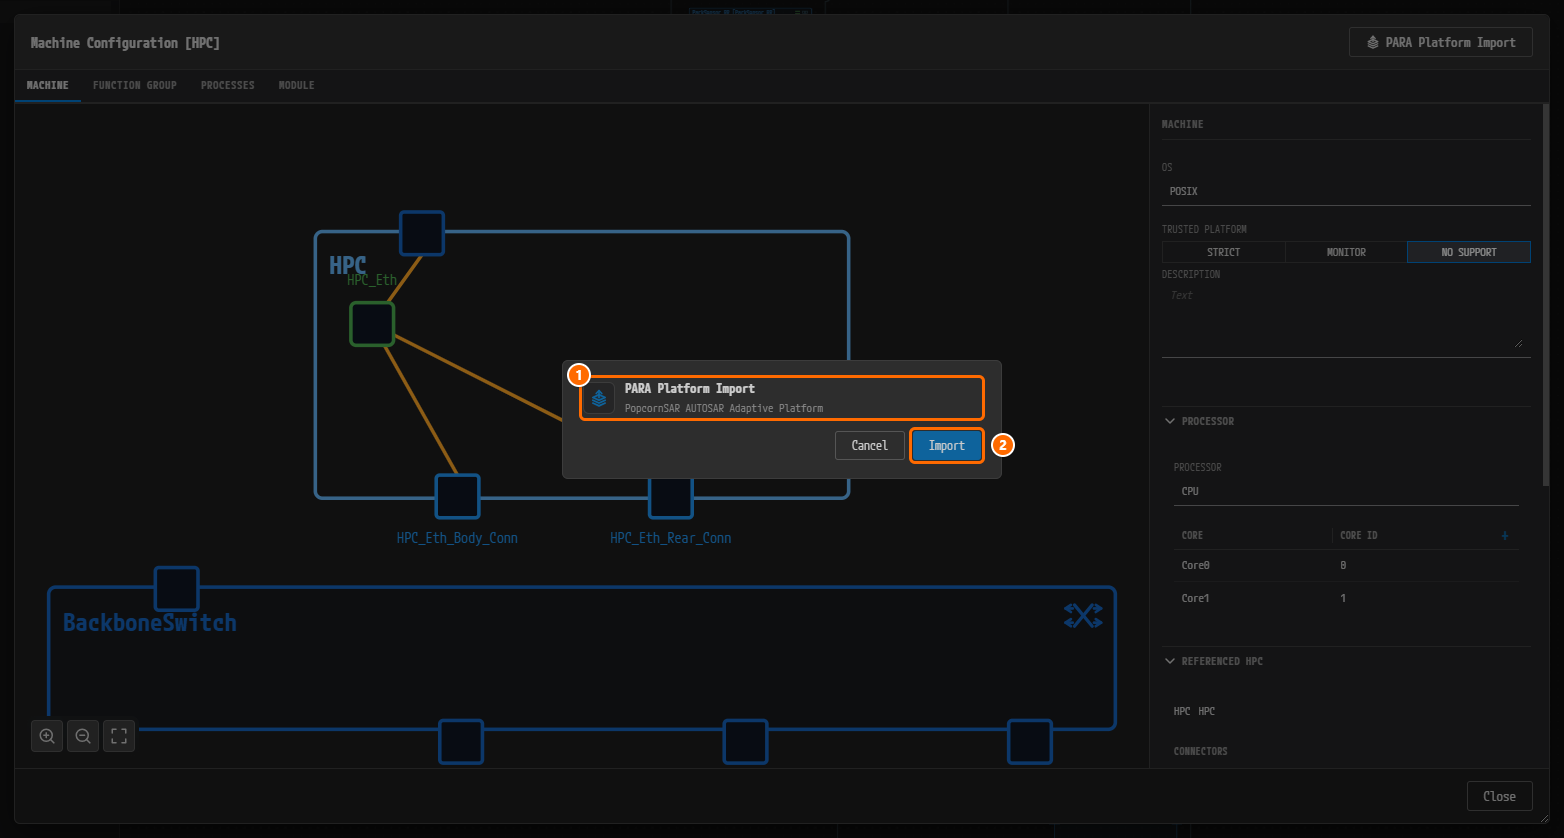
Figure 10-2. The PARA Platform Import confirmation window. ① The title PARA Platform Import and the subtitle "PopcornSAR AUTOSAR Adaptive Platform". The window lists no contents; What the PARA Platform Is lists what the import brings in. ② The Import button.
-
The Machine dialog closes and the progress window "PARA Platform Import" appears with the message "Importing the PARA platform into the project...". The PARA bundle sets MAX ACTION LIST DURATION of the State Management module to
5, while you entered1in Chapter 9. Because of this one difference, the progress window closes and the Conflict Resolution dialog opens with one conflict, Machine (1) › HPC. -
Keep the value from Chapter 9. In the right pane, the field Max Action List Duration under Module Instantiation SM shows PROJECT
1and IMPORT5. Click Keep Project below the two values. The title changes toConflict Resolution: 1 conflict (1 decided · 0 in-progress · 0 pending), and the button at the bottom right changes from Resolve 0/1 to Resolve 1/1. Click Resolve 1/1.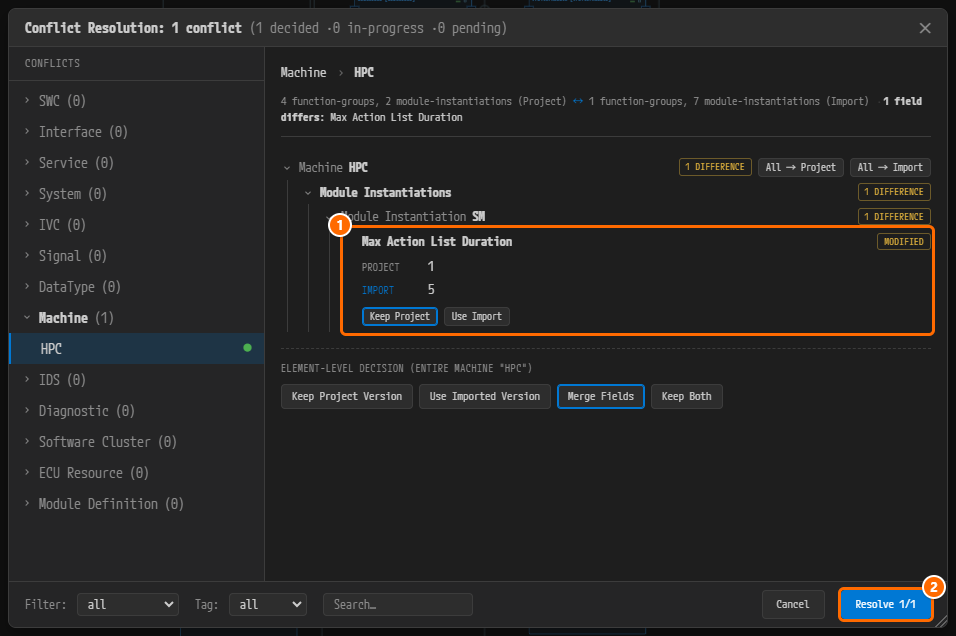
Figure 10-19. The Conflict Resolution dialog after the choice. Machine (1) › HPC on the left is the only conflict. The summary at the top gives the number of FunctionGroups and modules on each side,
(Project)and(Import), followed by1 field differs: Max Action List Duration. ① Max Action List Duration with PROJECT1, IMPORT5, and Keep Project chosen. Below it, Merge Fields is the decision for the whole machine. ② The Resolve 1/1 button. -
The message "Import complete, conflicts resolved: done" appears, and the Machine Configuration [HPC] dialog reopens by itself.
Note. The import works through the same merge mechanism as an ARXML import. With Merge Fields and Keep Project, the machine keeps your NM network handles, FunctionGroups, and State Management configuration, including the value
1that the finished example also uses, and the PARA modules are merged in.
Caution. Decide before you click Resolve. While the button reads Resolve 0/1, the conflict is undecided, and an undecided conflict is overwritten with the imported values (the Unresolved Conflicts window asks first; click Cancel there). The buttons under ELEMENT-LEVEL DECISION (ENTIRE MACHINE "HPC") decide for the whole machine: Use Imported Version replaces it with the PARA bundle's machine, which has only
MachineFGand no NM network handles, and Keep Project Version keeps it unchanged, so the PARA modules are not merged in. Use the field-level Keep Project as in step 6.
Note. The network bindings of the PARA services (SOME/IP, DDS, IPC) are not imported. If you need them, configure them separately in the deployment configuration after the import. This tutorial does not configure bindings for the PARA services.
Checking the Import Result
In the reopened dialog, confirm that the import preserved your existing configuration. You do not change any value in this section.
-
Click the MODULE tab.
-
In the MODULES list on the left, click Network Management. The NETWORK HANDLES table must still contain the three rows you created in Chapter 9.
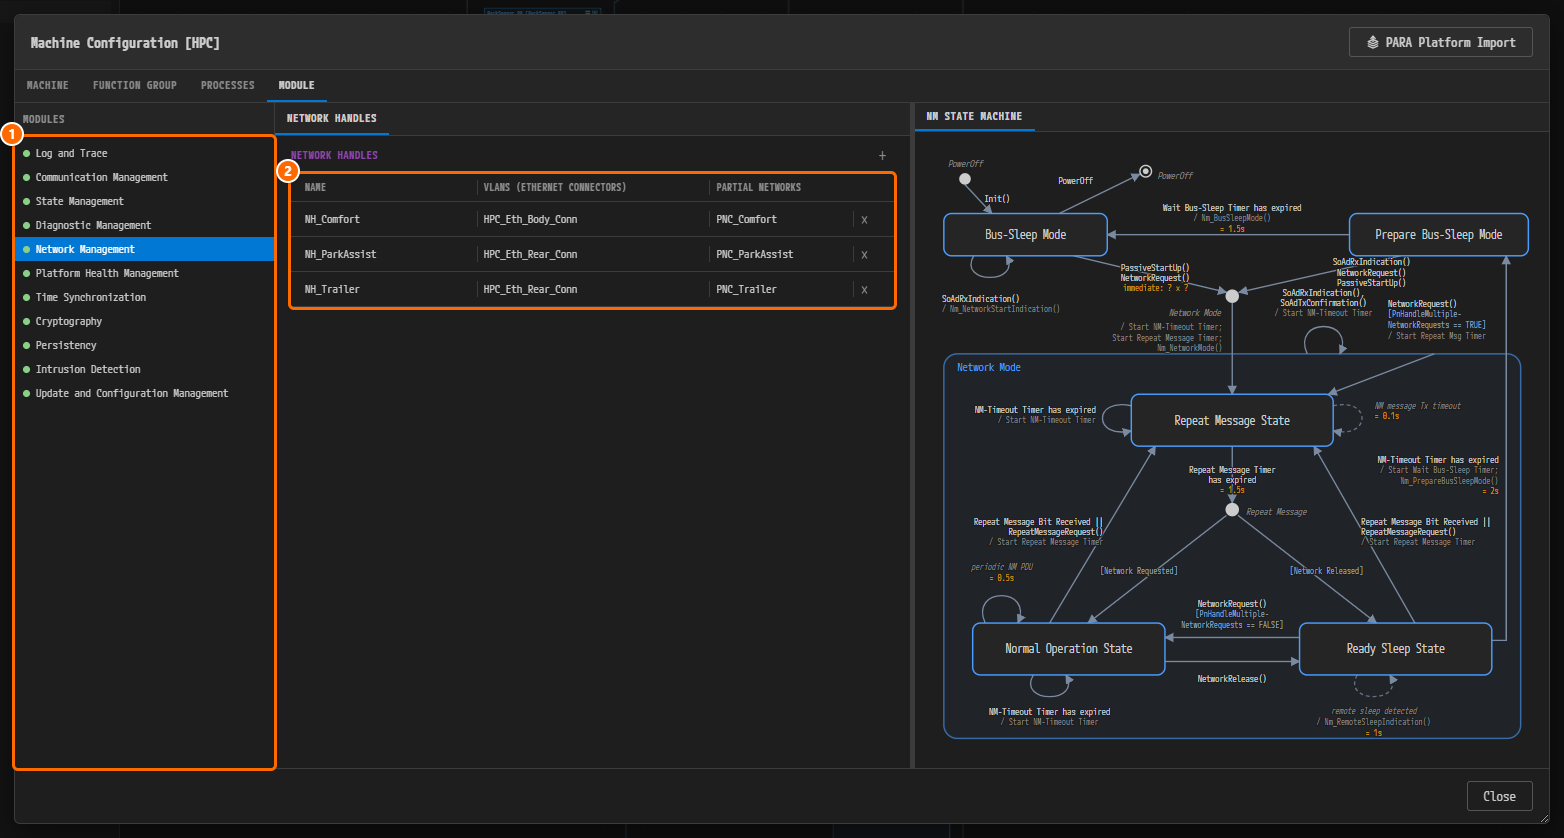
Figure 10-3. The MODULE tab right after the import. ① The MODULES list, showing 11 entries: Log and Trace, Communication Management, State Management, Diagnostic Management, Network Management, Platform Health Management, Time Synchronization, Cryptography, Persistency, Intrusion Detection, and Update and Configuration Management. ② The NETWORK HANDLES table.
NH_Comfort(HPC_Eth_Body_Conn,PNC_Comfort),NH_ParkAssist(HPC_Eth_Rear_Conn,PNC_ParkAssist), andNH_Trailer(HPC_Eth_Rear_Conn,PNC_Trailer) are unchanged from before the import.Note. PARA adds 7 modules, but the MODULES list shows 11. This dialog lists all 11 module kinds whenever it opens. You do not edit the remaining four (Diagnostic Management, Persistency, Intrusion Detection, Update and Configuration Management) in this tutorial.
-
Click the PROCESSES tab. The PROCESSES list on the left must show the three application processes (
ParkAssistApp,VehicleStateApp,ComfortApp) followed by the 11 PARA processes (EM,CM,PHM,SM,TBM,DM,IDSM,NM,UCM,VUCM,CSM).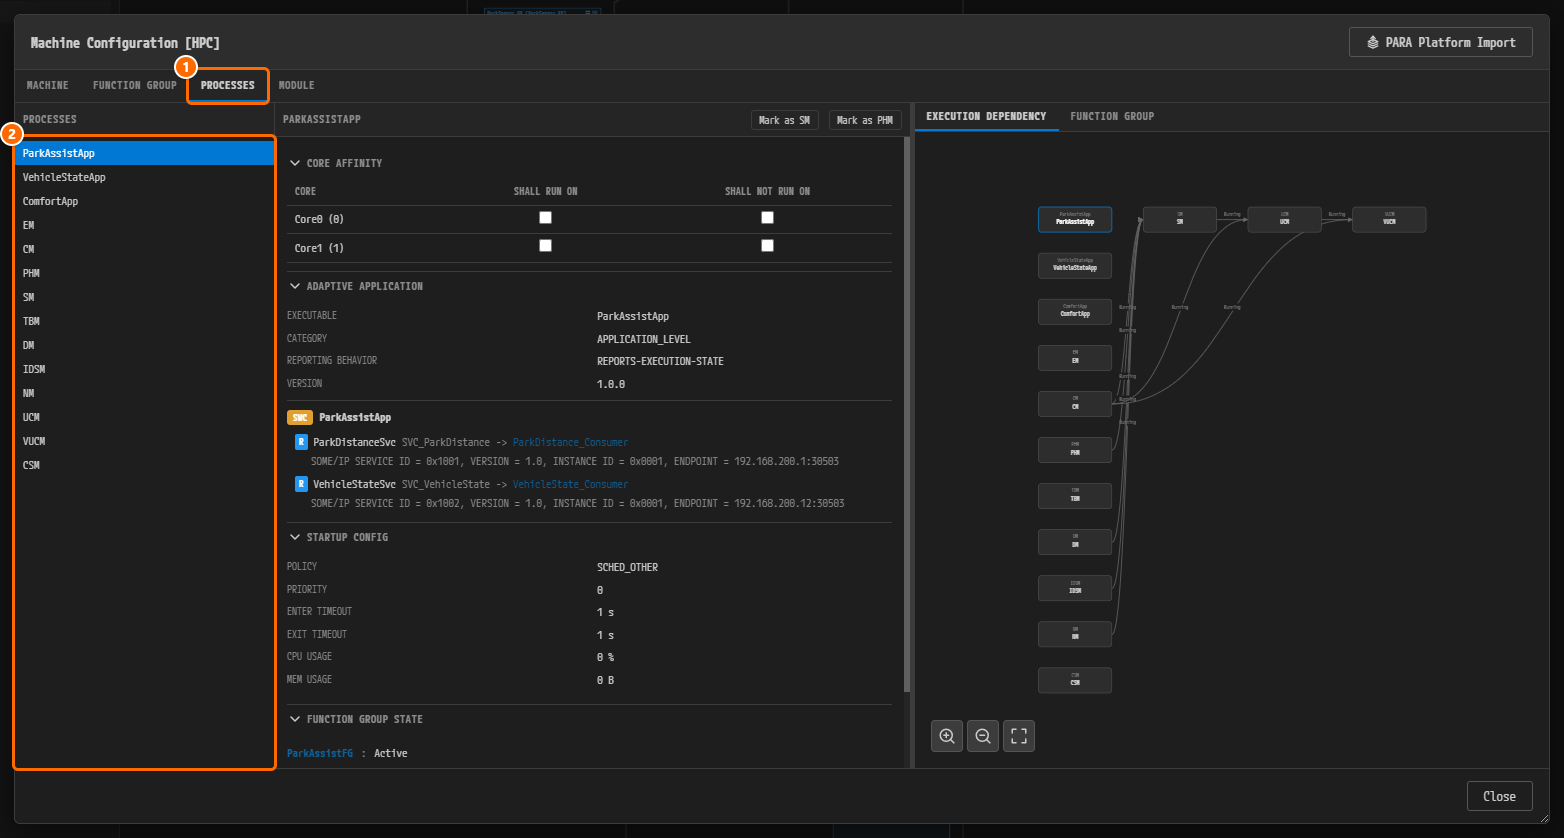
Figure 10-4. The PROCESSES tab after the import. ① The PROCESSES tab. ② The process list with 14 entries. The middle shows the details of the selected
ParkAssistApp, and EXECUTION DEPENDENCY on the right draws the execution dependencies between the PARA processes. -
Click Close at the bottom right. The import result is already saved to the file, so the dialog closes without a save prompt.
Tidying Up the HPC Composition
The imported composition prototype PARA is added inside the HPC composition. Like the application AAs, its node shows the type name, PARA_HPC. Its position may overlap an existing node, so tidy the layout automatically.
-
On the VFB canvas, double-click the HPC [HPC] composition to drill into it. The breadcrumb at the top left of the canvas changes to System > HPC.
-
You see the three application AAs (ParkAssistApp, ComfortApp, VehicleStateApp) and the new composition PARA_HPC. If PARA_HPC overlaps ComfortApp, click the Auto Layout button on the toolbar below the canvas.
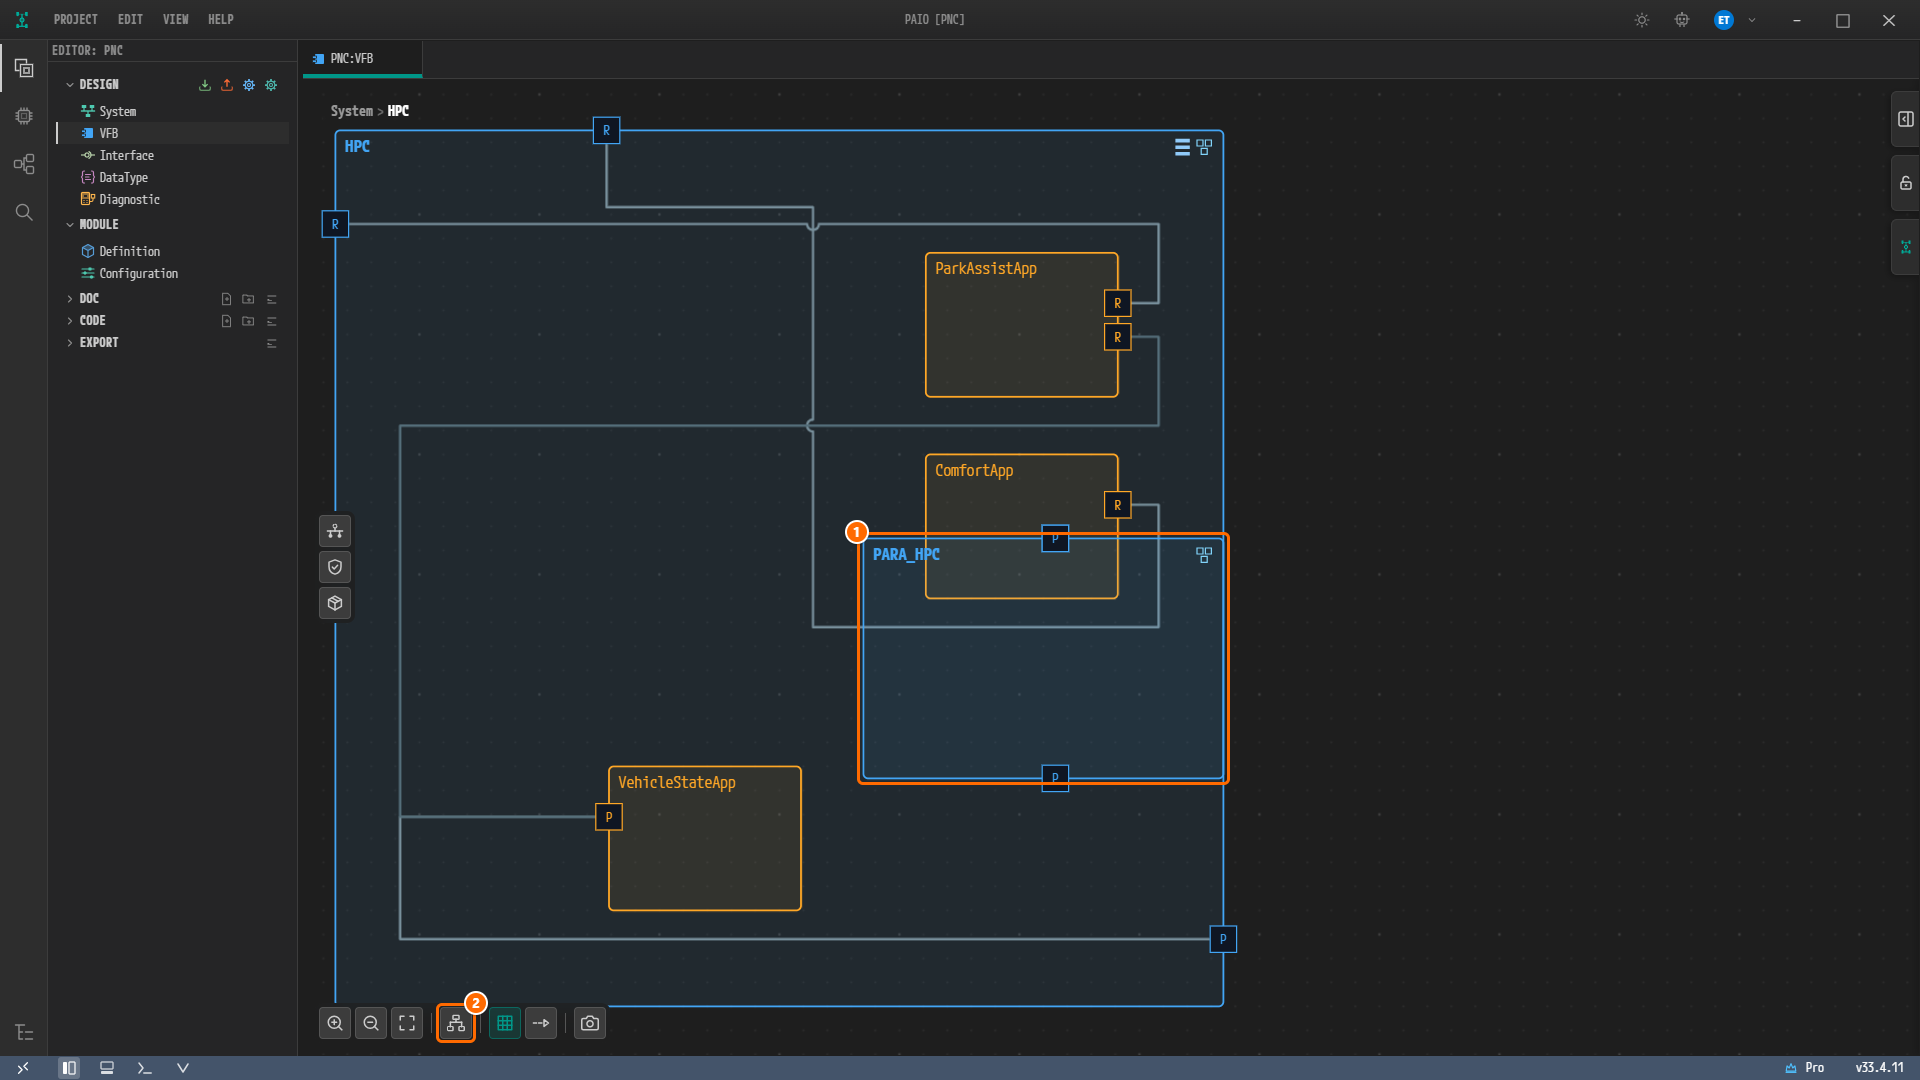
Figure 10-5. Inside the HPC right after the import. ① The newly added composition PARA_HPC overlaps ComfortApp. ② The Auto Layout button on the toolbar (fourth from the left).
-
The nodes are laid out again so that they do not overlap. Press Ctrl+S to save.
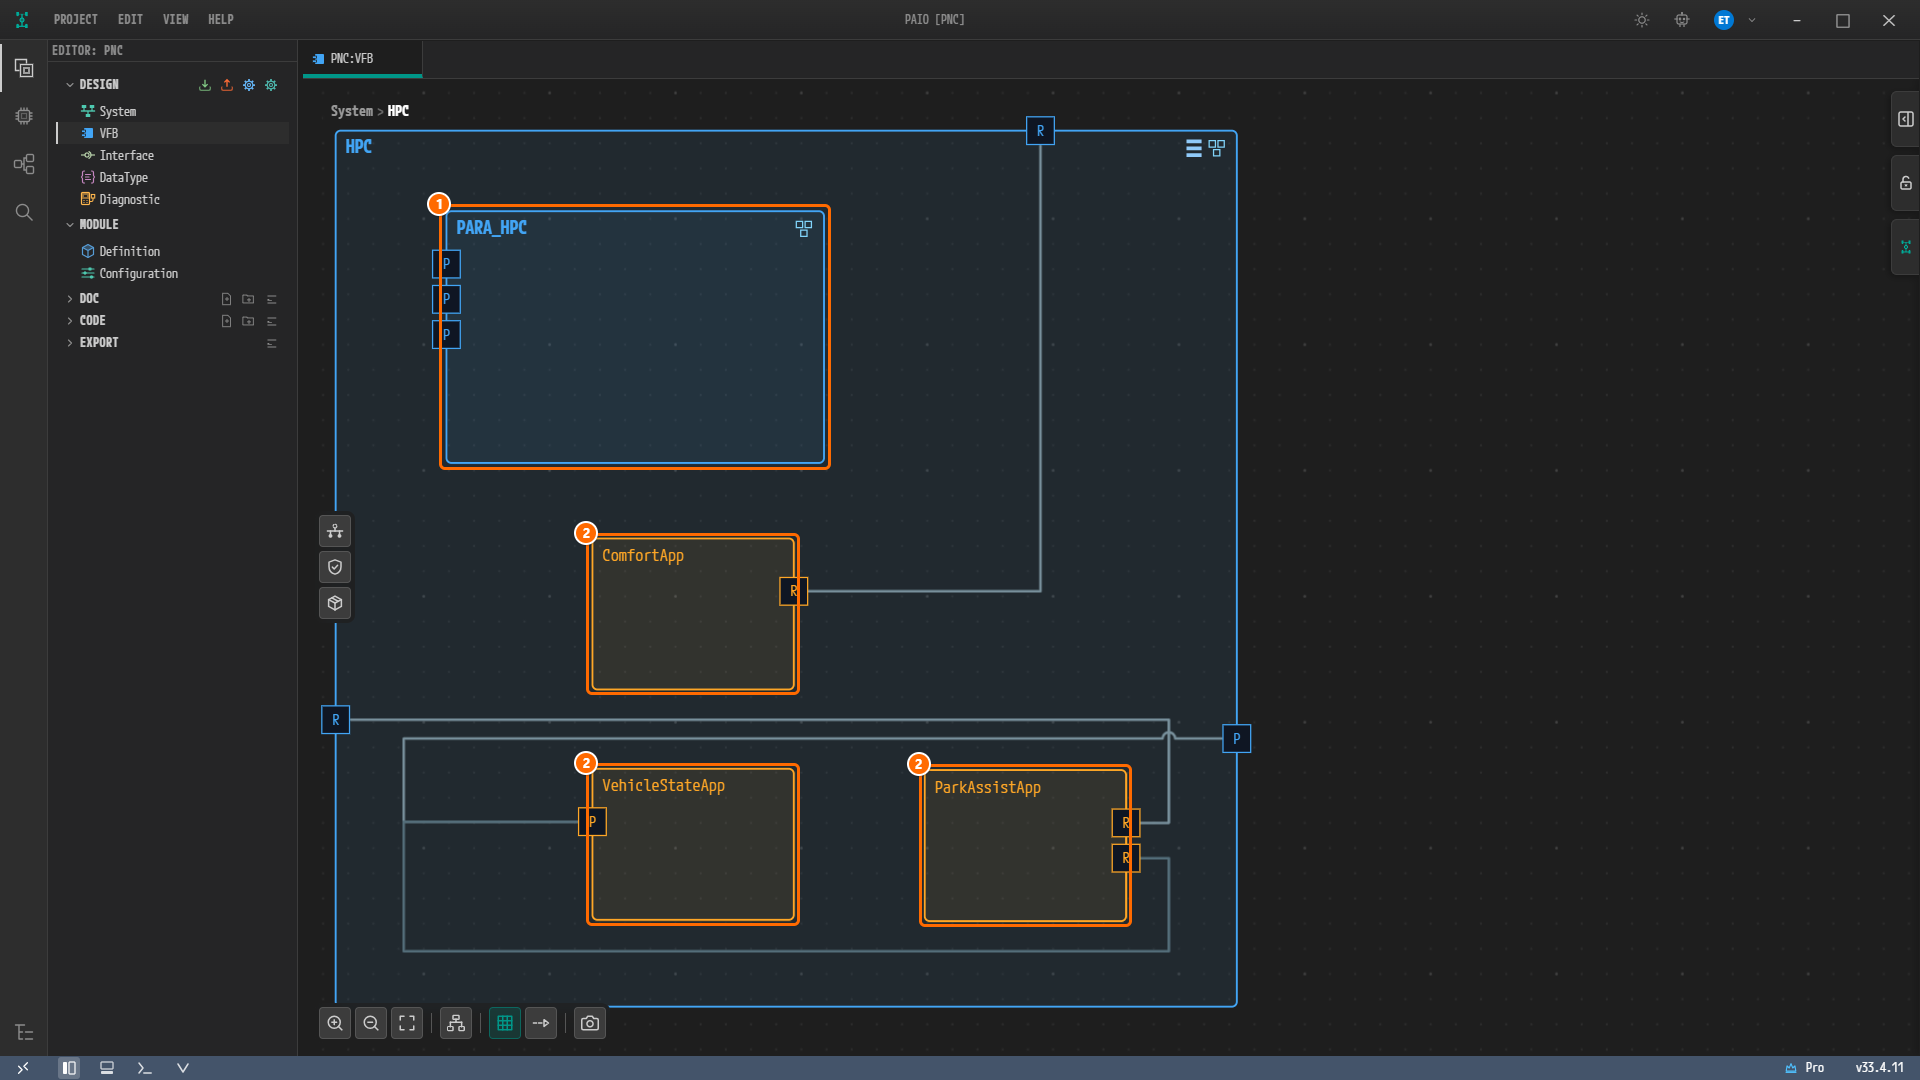
Figure 10-6. Inside the HPC after Auto Layout. ① The composition prototype
PARA, shown as PARA_HPC. ② The three application AAs ComfortApp, VehicleStateApp, and ParkAssistApp. The nodes show the type names (the prototype names arePARA,Comfort,VehicleState, andParkAssist).
Note. The import adds no validation findings. If your project had none before the import, the validation icon (V) in the status bar at the bottom left still shows no number, and the VALIDATION panel reads "No validation issues.". Validation is covered in The System Editor and Validation.
Creating the NM Port Interface
The NM request port of an application AA needs a NetworkManagement port interface. Neither PARA nor the previous chapters provide one, so you create it here.
-
In the EDITOR view on the left, click Interface under DESIGN. The Interface editor opens in the tab PNC:Interface.
-
In the tab row at the top, click the ADAPTIVE tab. So far the INTERFACES list holds only state-client interfaces (
StateClient_…), among themStateClient_HPC_MachineFG, which PARA brought in. There is no NetworkManagement interface yet. -
Click the + button to the right of the INTERFACES title. A functional cluster menu opens (ara::log, ara::sm, ara::phm, ara::nm, and so on).
-
Choose ara::nm › NetworkManagement.
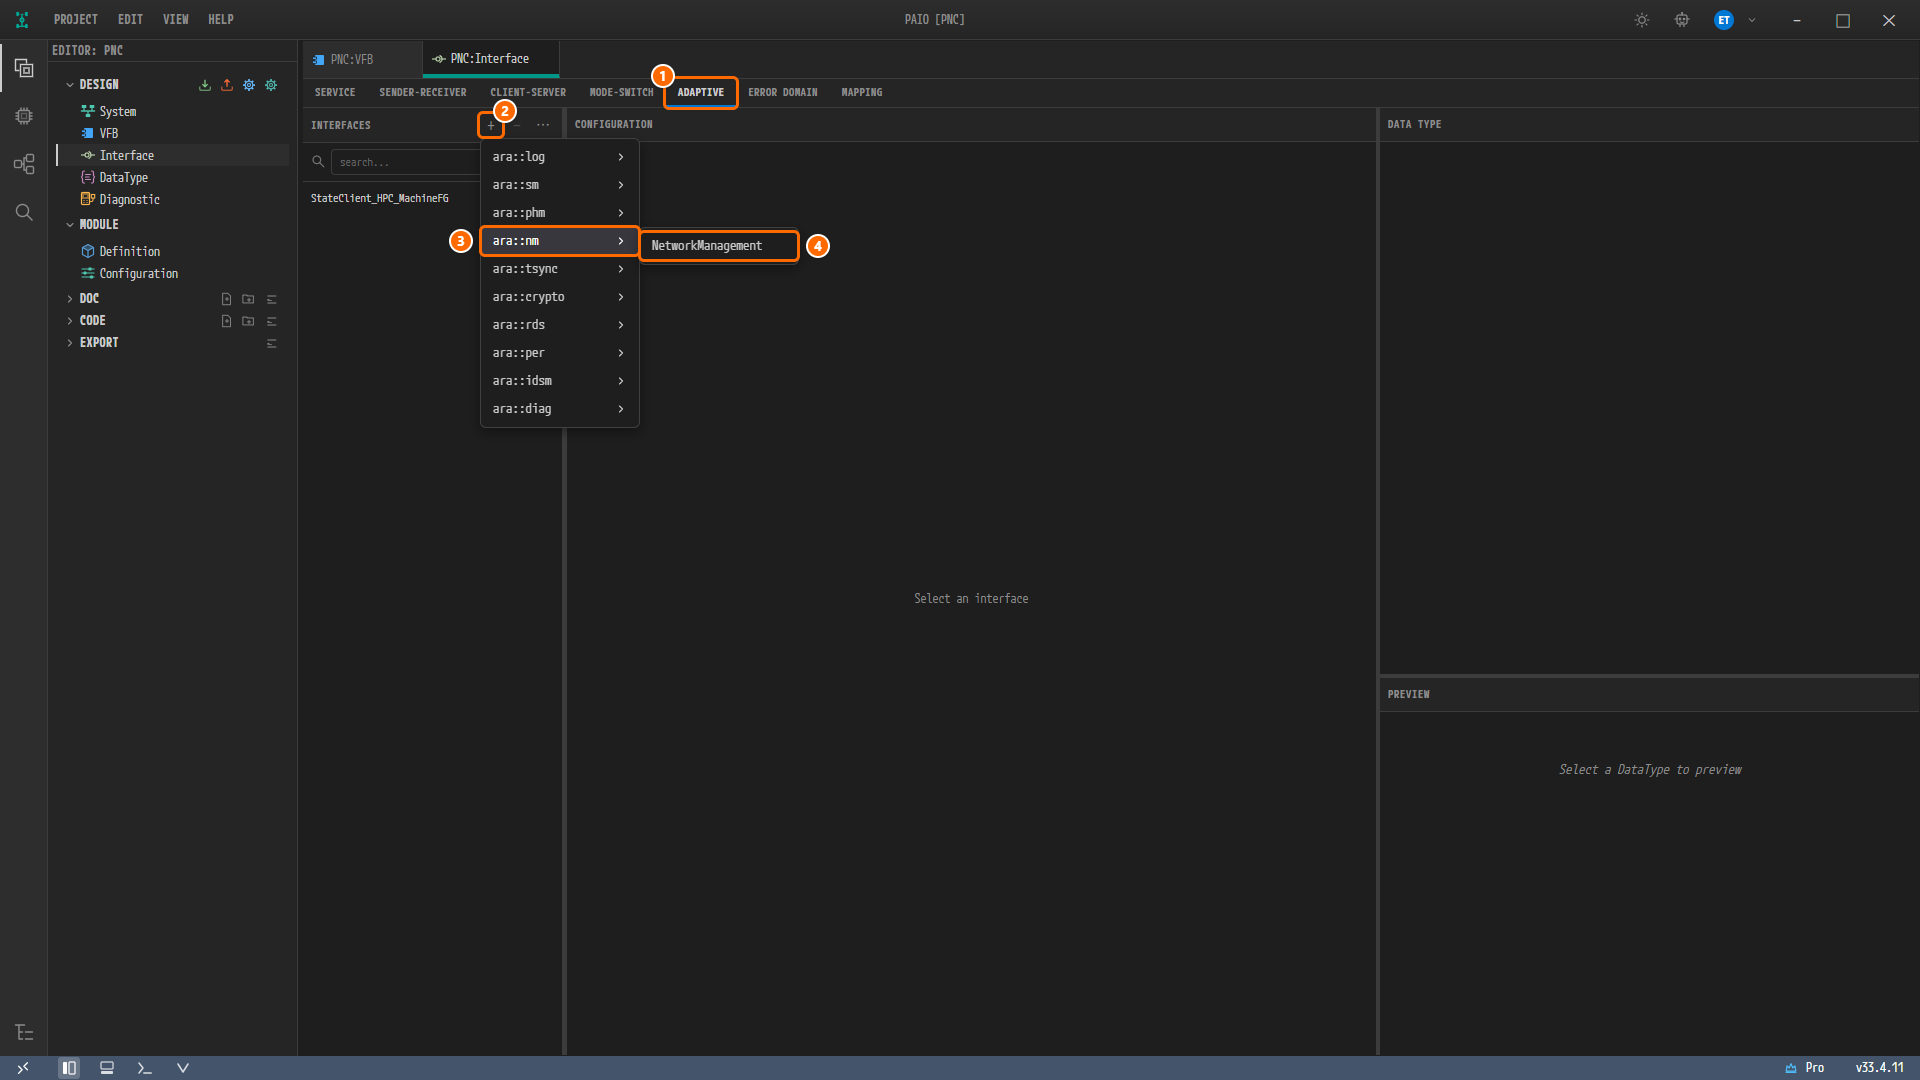
Figure 10-7. The ADAPTIVE tab of the Interface editor. ① The ADAPTIVE tab. ② The + of INTERFACES. ③ ara::nm. ④ NetworkManagement.
-
NetworkManagementPortInterface_0appears in the list and is selected. Enter the following values under CONFIGURATION in the middle.- NAME:
NMI_PncRequest - C++ NAMESPACE:
pnc::nm - DESCRIPTION (optional): the example uses
PNC request/release handle for application-level partial networks (ara::nm).
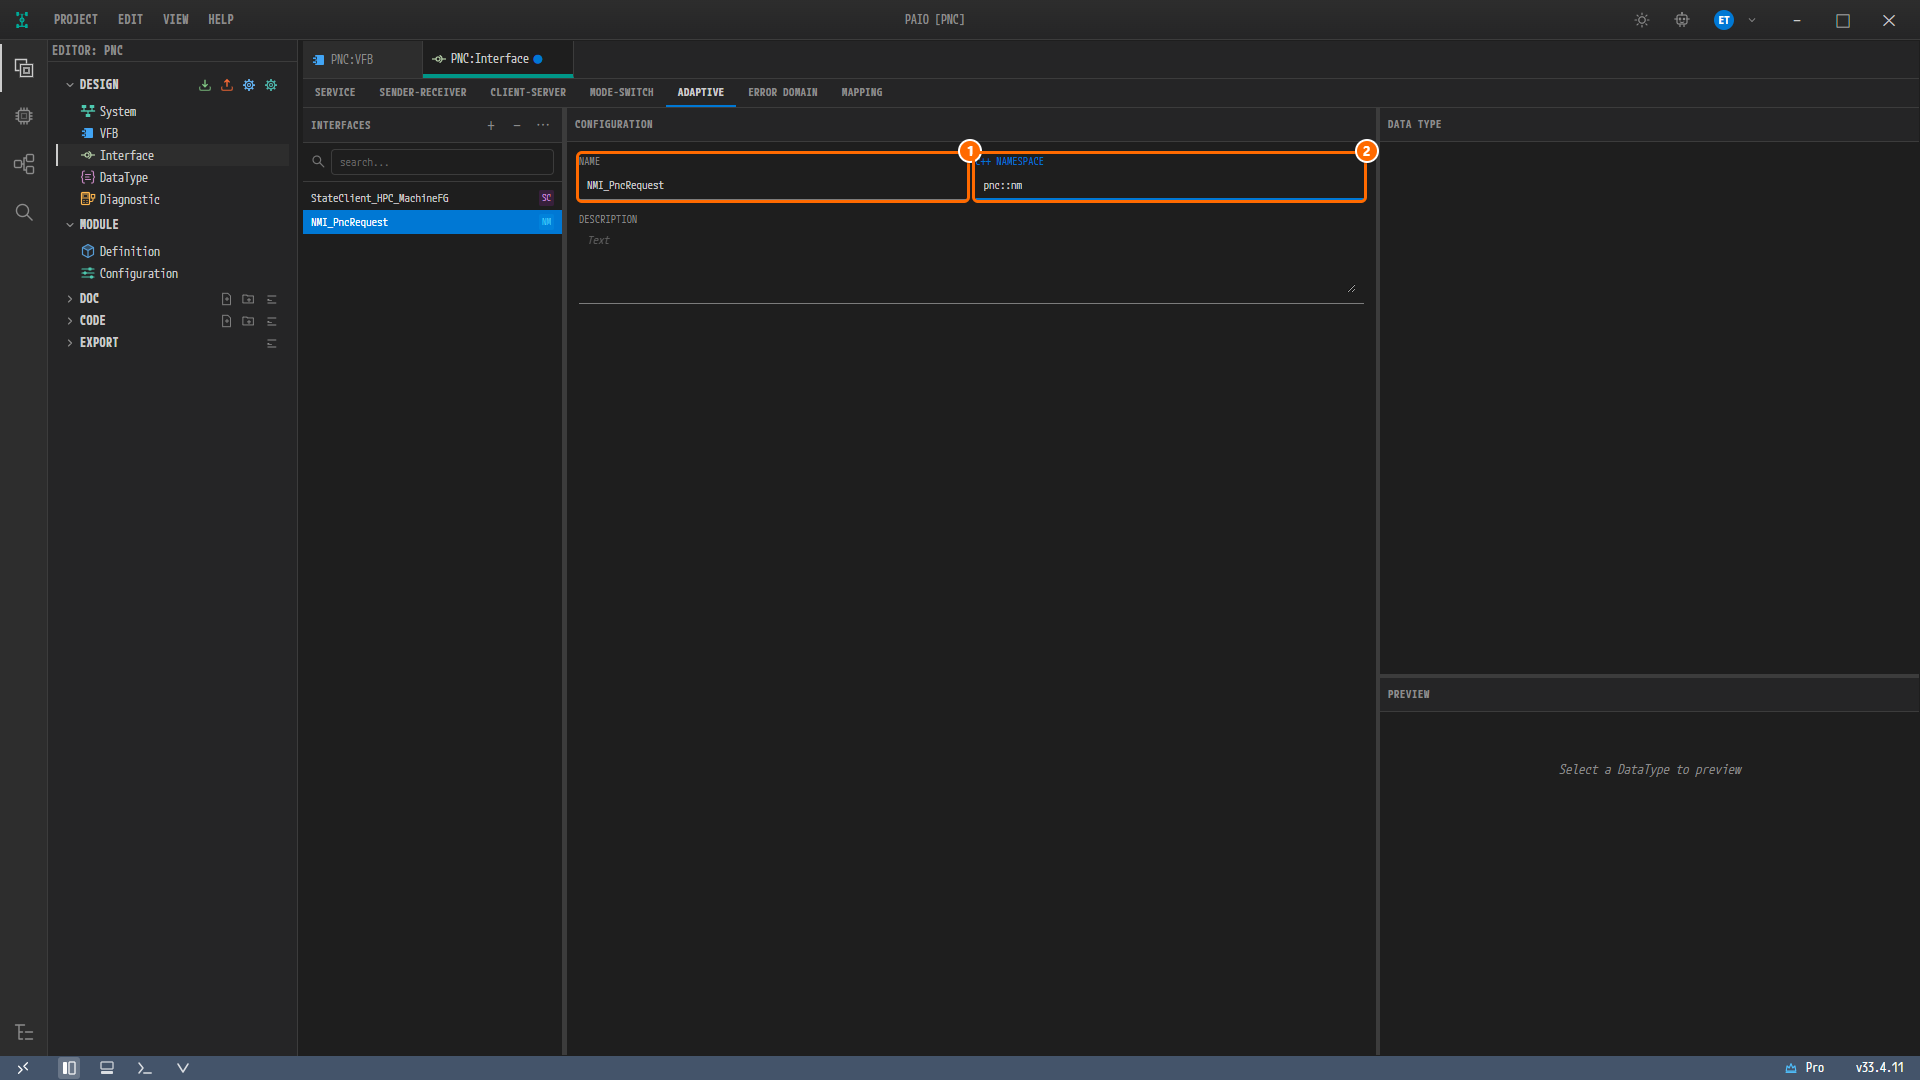
Figure 10-8.
NMI_PncRequestwith the values entered. ① NAME. ② C++ NAMESPACE. TheNMmarker next toNMI_PncRequestin the list means it is a NetworkManagement interface. The blue dot beside the tab name marks unsaved changes. - NAME:
-
Press Ctrl+S to save. The blue dot on the tab disappears.
Adding the PNC Request Port to ParkAssistApp
-
Return to the PNC:VFB tab. The view inside the HPC is still open.
-
Right-click the ParkAssistApp node. From the menu, choose Add Port › PPort.
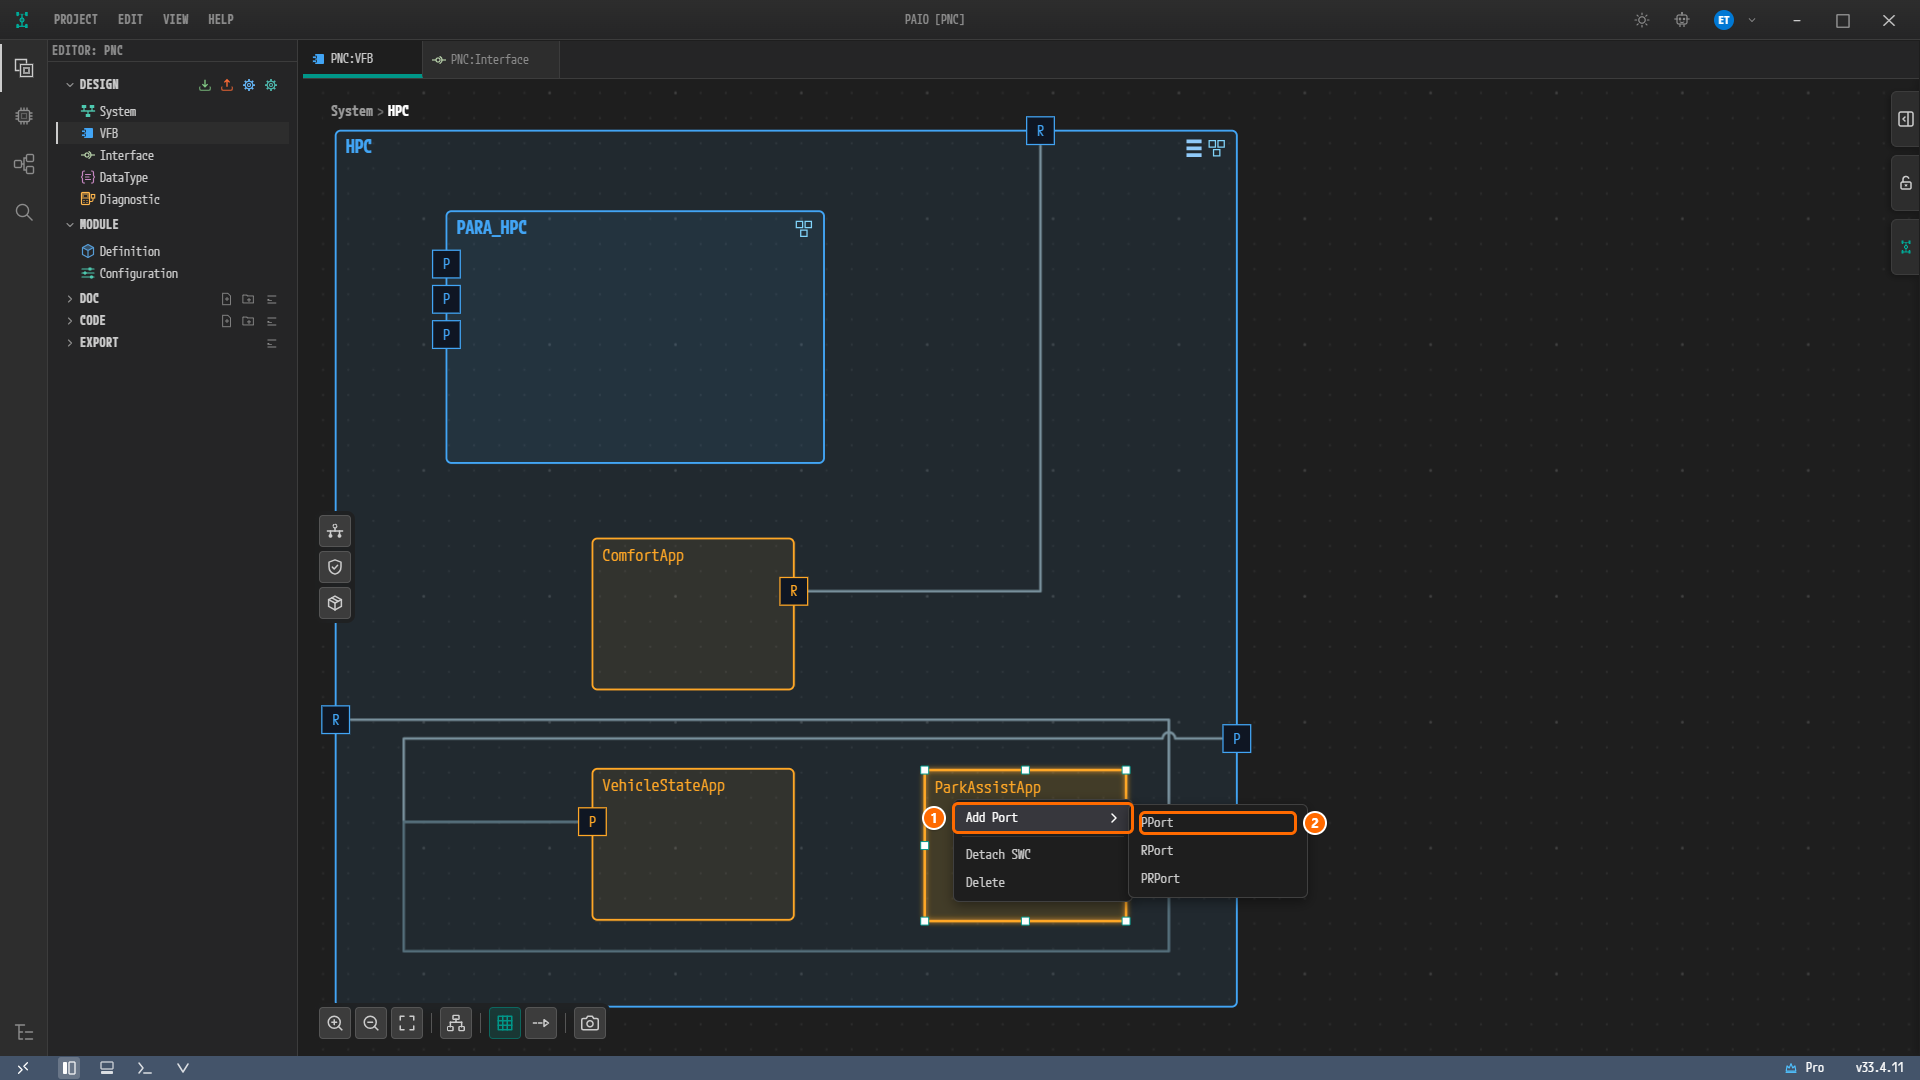
Figure 10-9. The right-click menu of ParkAssistApp. ① Add Port. ② PPort. The menu also offers Detach SWC and Delete, and the submenu also offers RPort and PRPort.
-
The new P-Port
PPort_0appears on the left edge of the node. Click the port to open the PPORT properties panel on the right. -
Change NAME to
PncParkAssistand pressTab. -
Click the PORT INTERFACE field. The candidate list shows service interfaces and NM interfaces together. Type
NMIto narrow the list, then choose NM.NetworkHandle: NMI_PncRequest.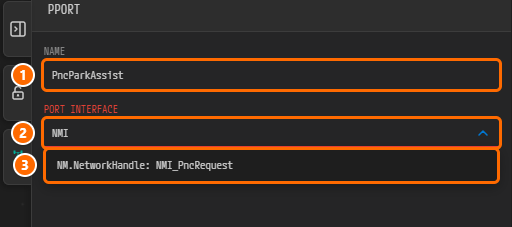
Figure 10-10. The PPORT properties panel. ① NAME
PncParkAssist. ② The PORT INTERFACE search field withNMItyped in. ③ The candidate to choose, NM.NetworkHandle: NMI_PncRequest. A port requires a PortInterface, so until you choose one, the PORT INTERFACE label is red and the V icon in the status bar carries the error badge1; once you choose it, the label returns to normal and the badge disappears. -
Press Ctrl+S to save. The port icon changes to a circle. A circular port marks a port that uses an NM interface.
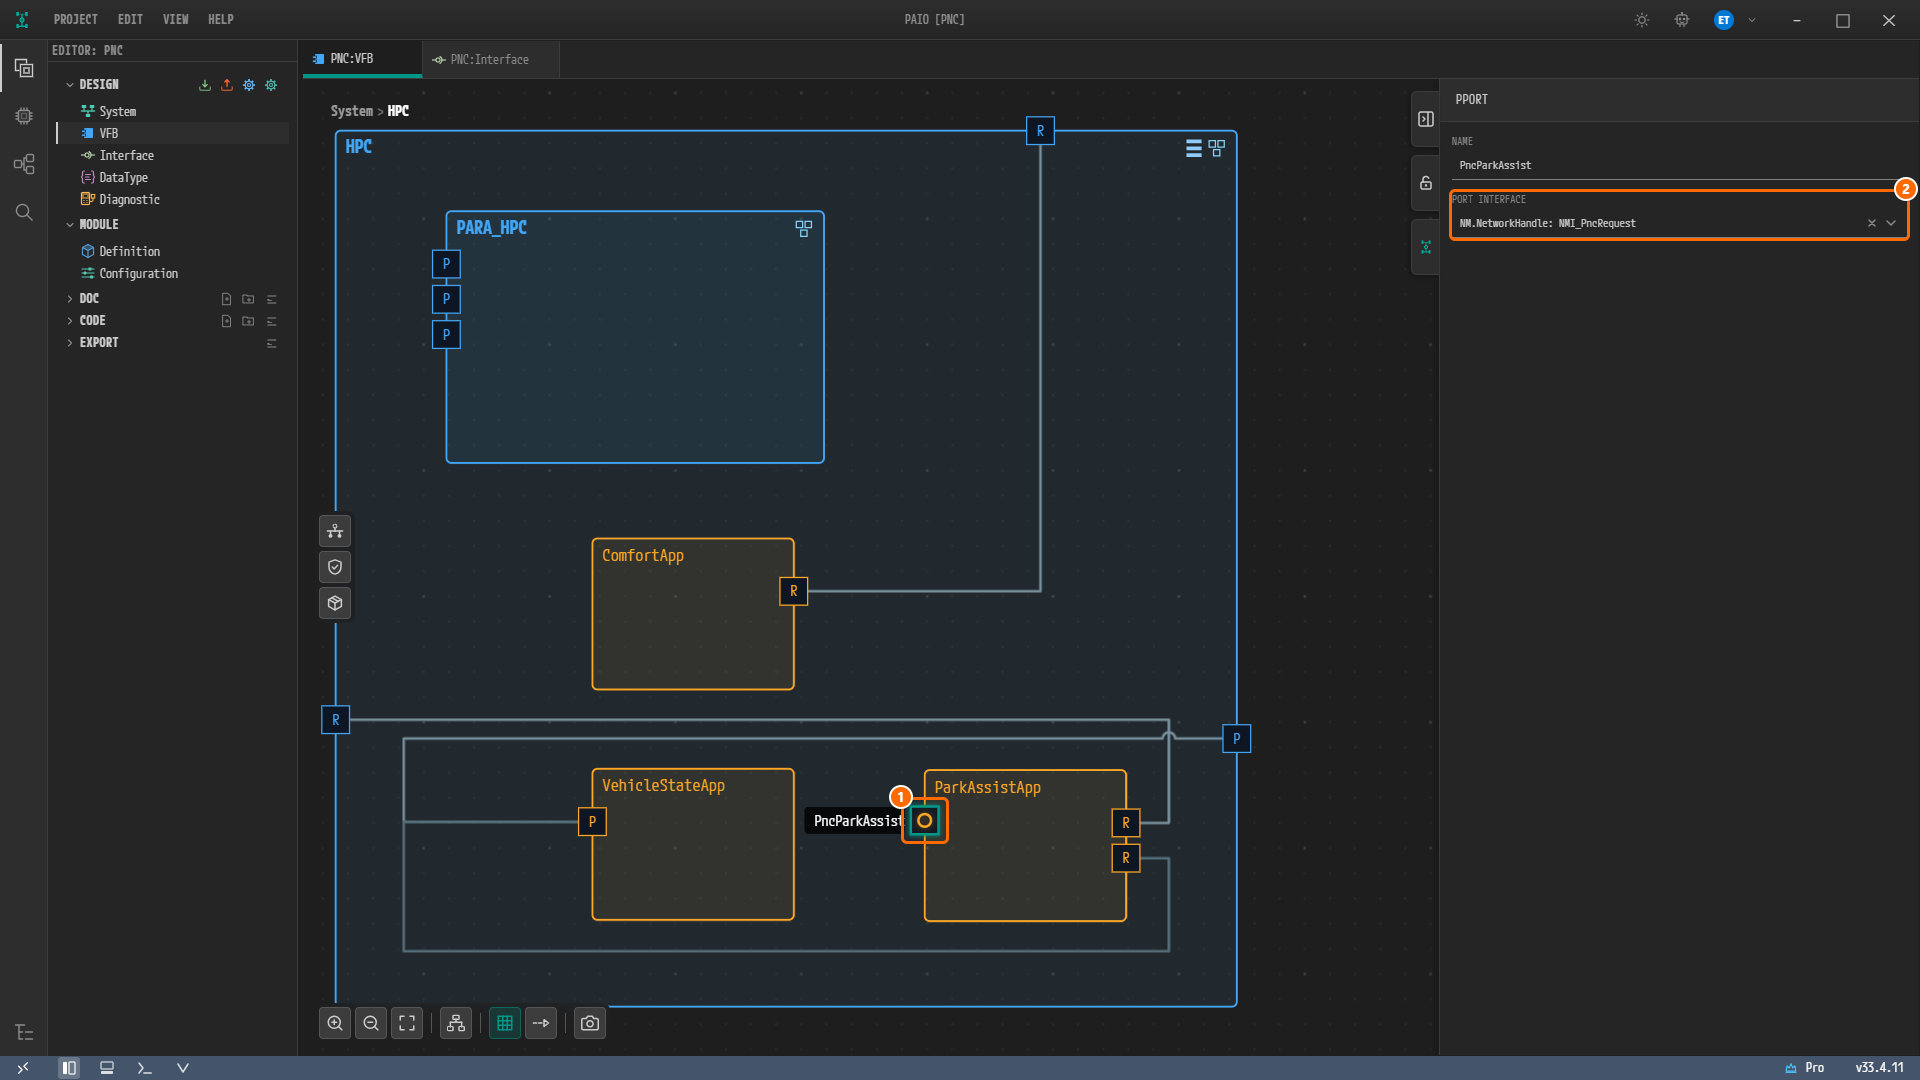
Figure 10-11. Inside the HPC after saving. ① The circular port
PncParkAssiston the left of ParkAssistApp (selected, so its name is visible). ② The PORT INTERFACE in the PPORT panel on the right isNM.NetworkHandle: NMI_PncRequest.
Mapping the NetworkHandle
The P-Port alone does not say which NM network handle the port requests. You map the port to the handle inside the AA.
-
Double-click the ParkAssistApp node. The AA Internal Behavior [ParkAssistApp] dialog opens.
-
Confirm that PORTS on the PROPERTIES tab on the right shows three ports.
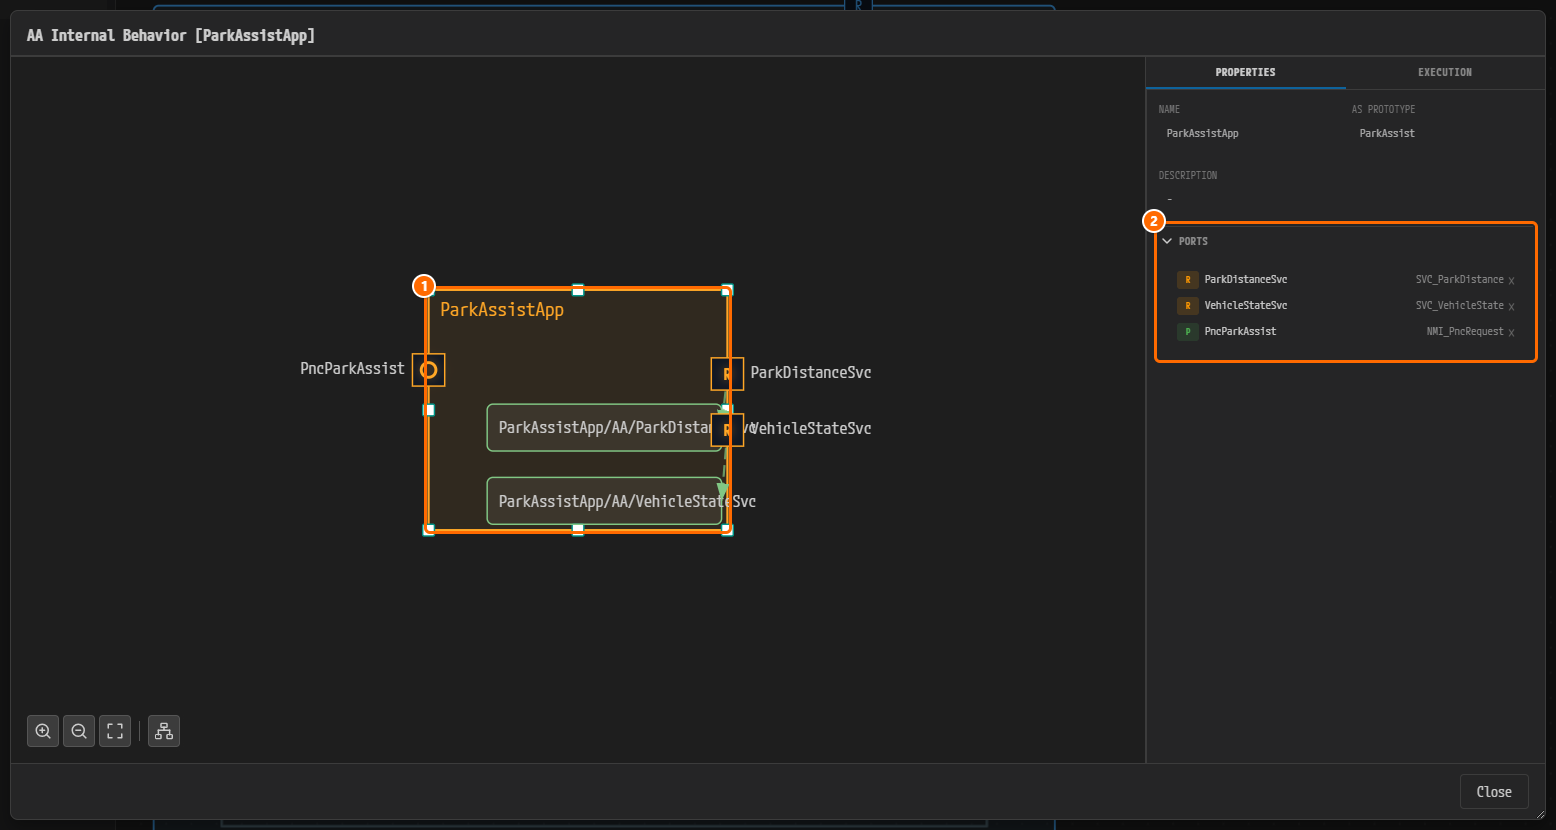
Figure 10-12. AA Internal Behavior [ParkAssistApp]. ① The AA box. It has the circular port
PncParkAssiston the left, two R-Ports on the right, and two service instance mapping boxes inside (ParkAssistApp/AA/ParkDistanceSvc,ParkAssistApp/AA/VehicleStateSvc). ② PORTS:ParkDistanceSvc(SVC_ParkDistance),VehicleStateSvc(SVC_VehicleState),PncParkAssist(NMI_PncRequest). -
Right-click an empty spot inside the AA box. Choose Add Instance › ara::nm › Network Handle.
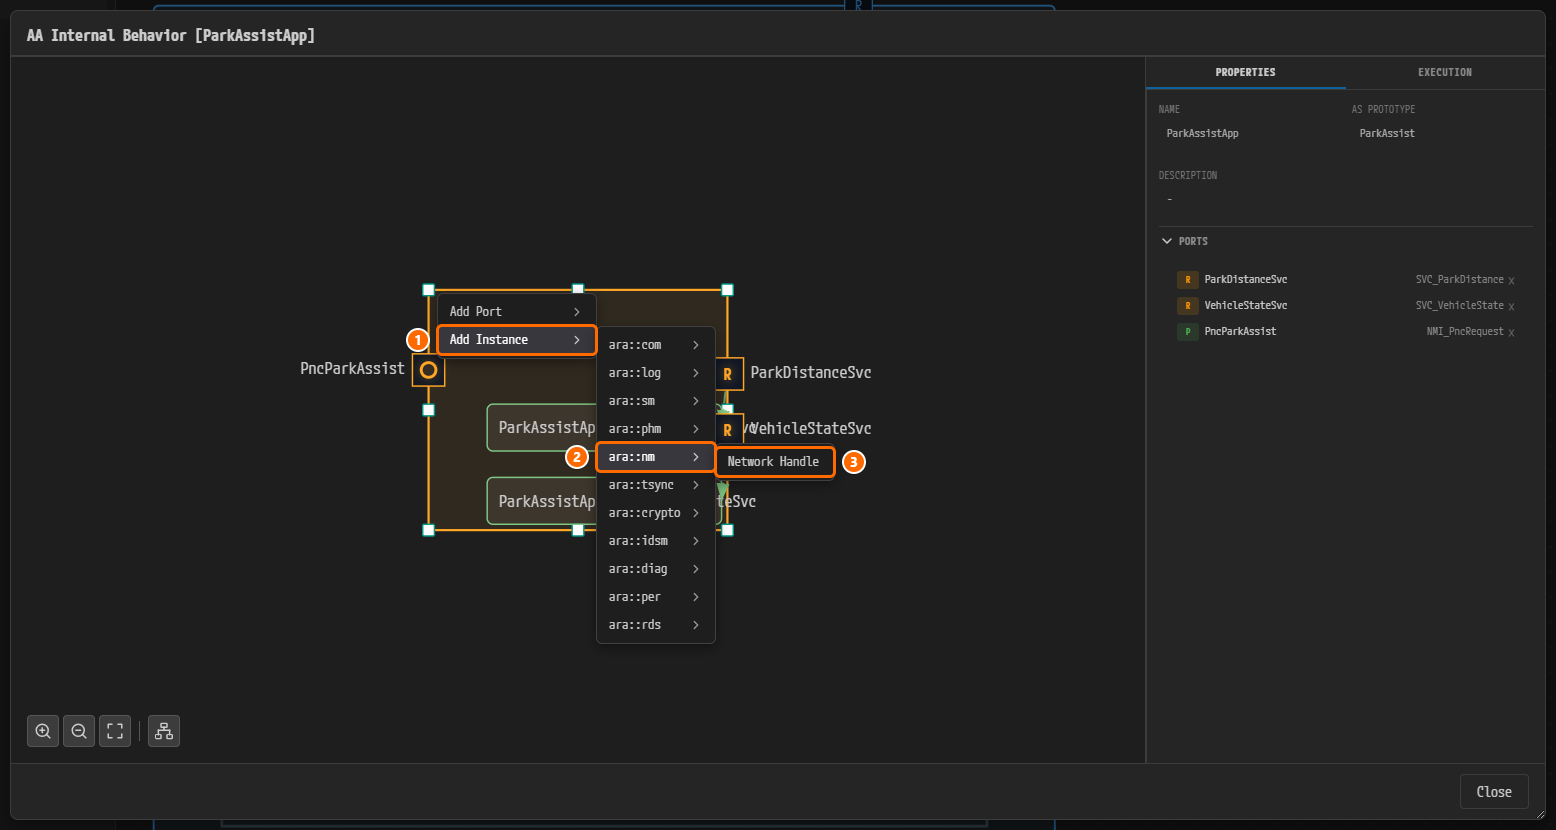
Figure 10-13. The right-click menu of the AA box. ① Add Instance. ② ara::nm. ③ Network Handle.
-
A new mapping box
ParkAssistApp/AA/appears inside the AA box and is selected. The NETWORK HANDLE MAPPING panel opens on the right. INSTANCE SPECIFIER is a read-only value that is generated automatically, and PROCESS is filled in automatically withParkAssistApp. PORT and NETWORK HANDLE are required: until you choose a value, each label is red withPort is requiredorNetwork Handle is requiredbelow the field, and the bottom of the panel reads "Select a port and network handle to view details". -
Click the PORT field and choose
PncParkAssist. The candidates include only P-Ports that use an NM interface, soPncParkAssistis the only one.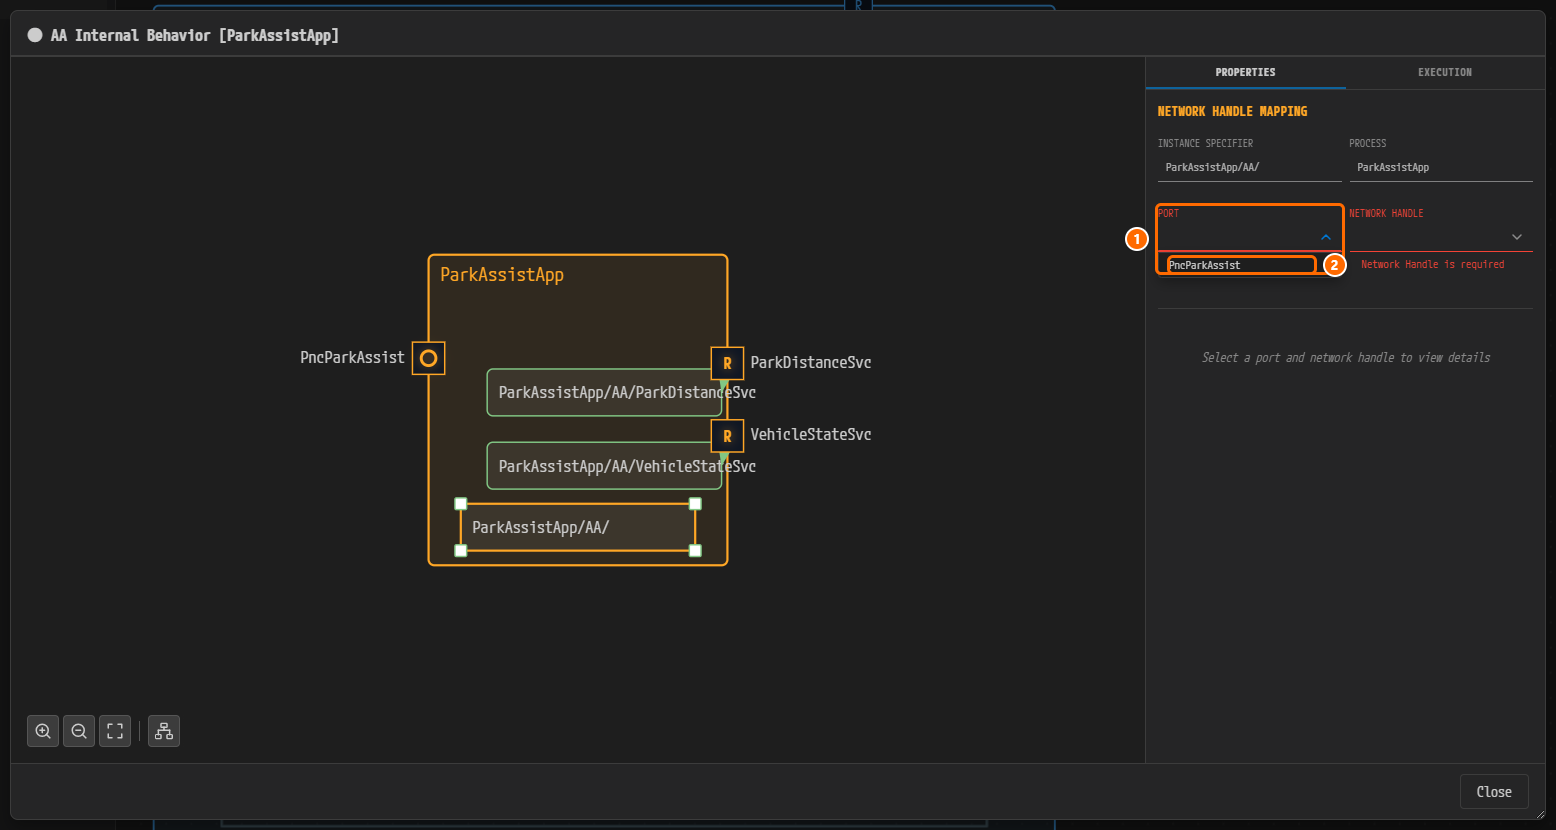
Figure 10-14. The new mapping box
ParkAssistApp/AA/and the NETWORK HANDLE MAPPING panel. ① The PORT field. ② The candidatePncParkAssist. NETWORK HANDLE on the right still showsNetwork Handle is requiredin red. The dot in front of the dialog title marks unsaved changes. -
Click the NETWORK HANDLE field and choose
NH_ParkAssist. The candidates are the handles you created in Chapter 9:NH_Comfort,NH_ParkAssist, andNH_Trailer. Once both PORT and NETWORK HANDLE are set, a summary of the chosen handle (NM NETWORK HANDLE) appears at the bottom of the panel.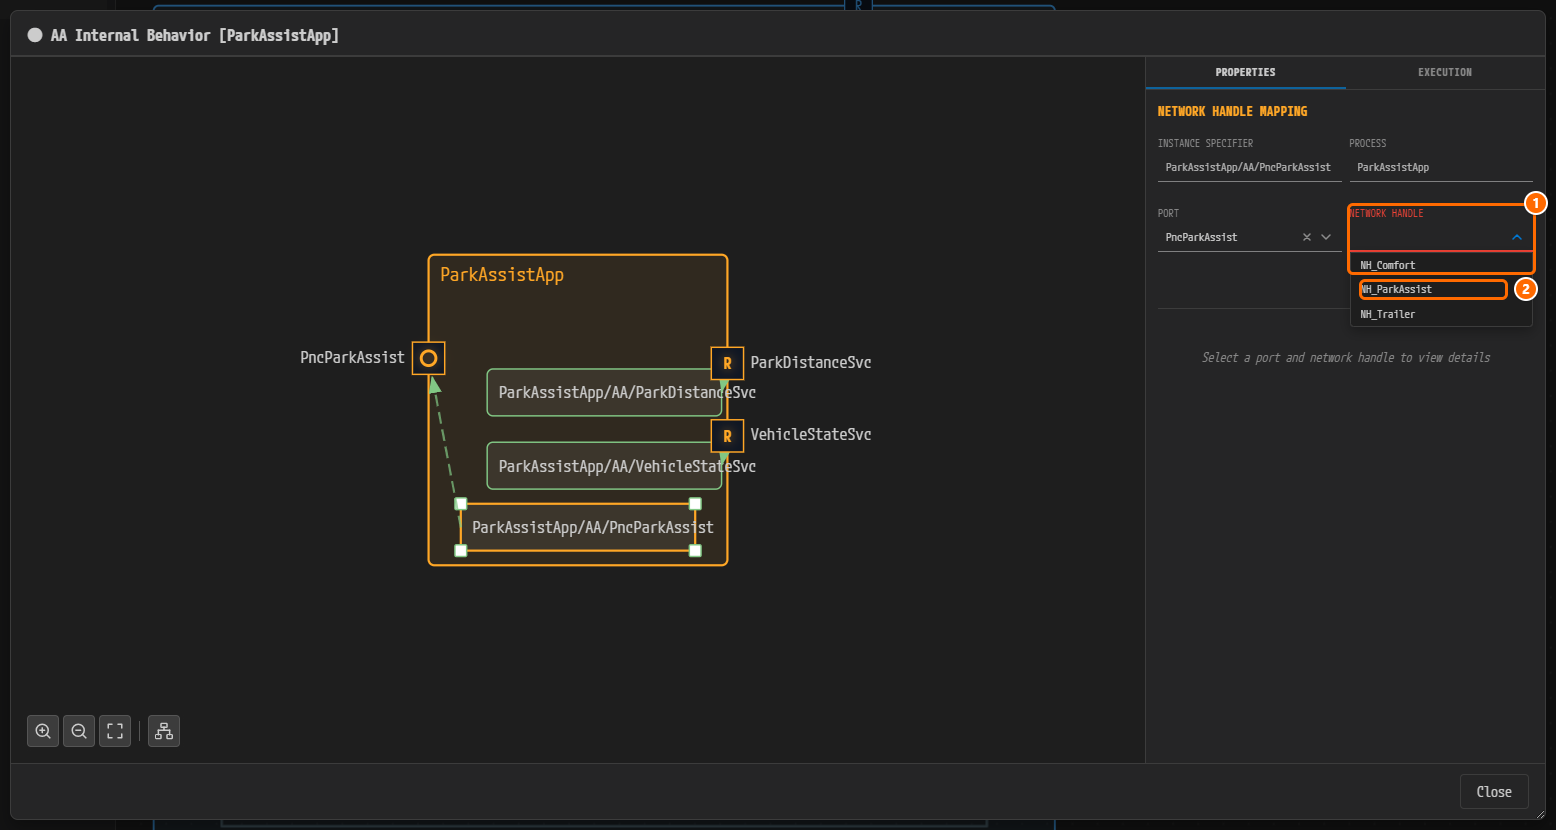
Figure 10-15. ① The NETWORK HANDLE field. ②
NH_ParkAssistto choose. Now that the port is set, INSTANCE SPECIFIER has changed toParkAssistApp/AA/PncParkAssist, and a dotted line runs from the mapping box to the port. -
Press Ctrl+S inside the dialog to save. The dot in front of the dialog title disappears.
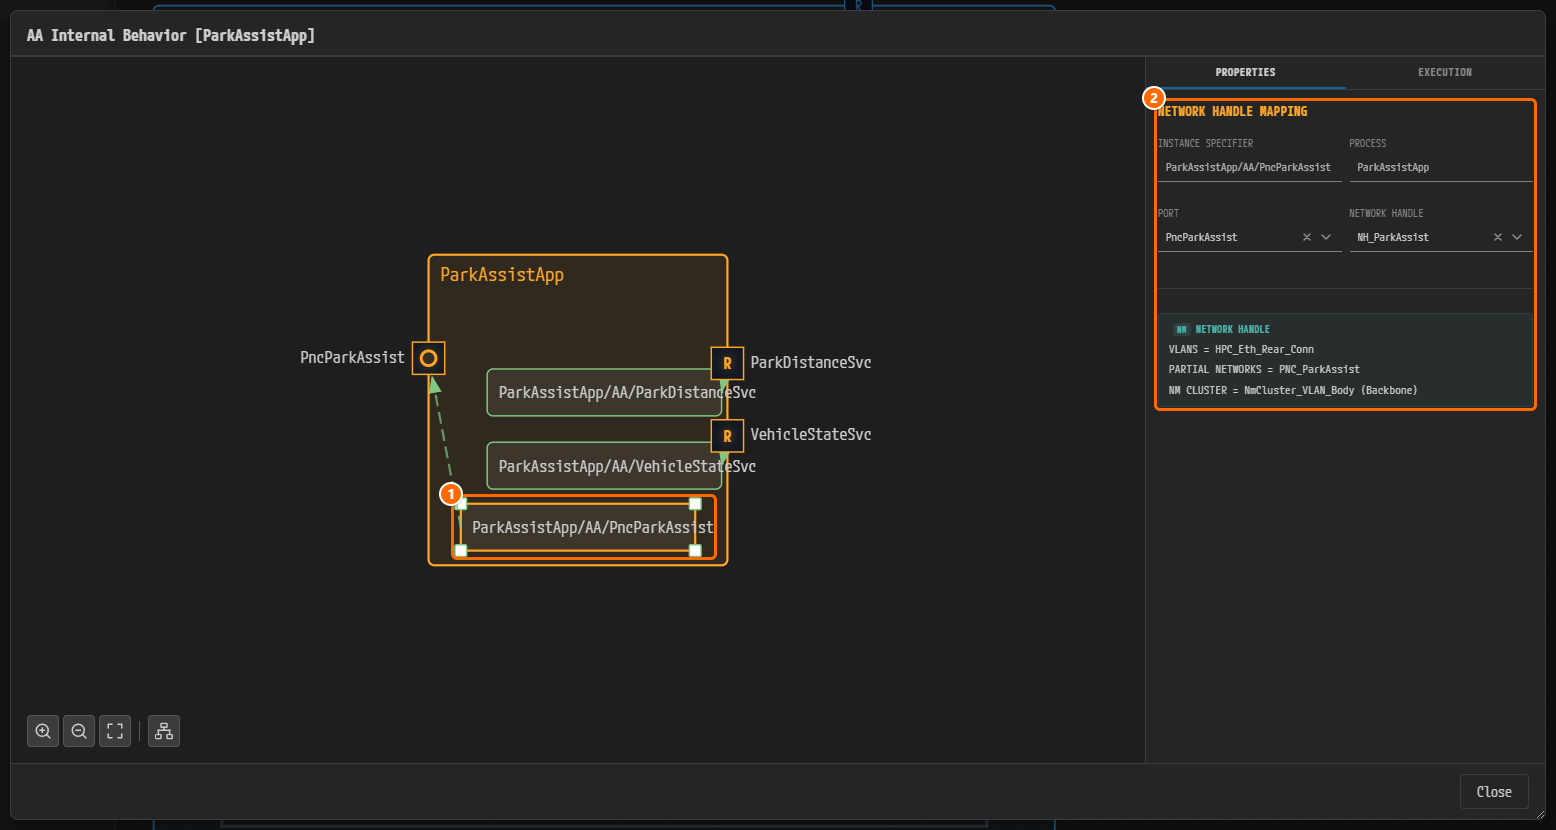
Figure 10-16. The saved NetworkHandle mapping. ① The mapping box
ParkAssistApp/AA/PncParkAssist. ② The NETWORK HANDLE MAPPING values (PORTPncParkAssist, NETWORK HANDLENH_ParkAssist) and the handle summaryVLANS = HPC_Eth_Rear_Conn,PARTIAL NETWORKS = PNC_ParkAssist. -
Click Close at the bottom right. You have saved, so it closes without a prompt.
Caution. In the current version, the NM CLUSTER line of the handle summary shows
NmCluster_VLAN_Body (Backbone)(Figure 10-16, Figure 10-18). The NM cluster that the VLANHPC_Eth_Rear_ConnofNH_ParkAssistactually belongs to isNmCluster_VLAN_Rear. This line is a display-only summary and has no effect on the mapping values. Use the VLANS and PARTIAL NETWORKS values to confirm that the handle is linked correctly.
Connecting the Remaining AAs
Repeat the same steps for VehicleStateApp and ComfortApp. Add a P-Port to each AA (Adding the PNC Request Port to ParkAssistApp), then create the NetworkHandle mapping in AA Internal Behavior (Mapping the NetworkHandle). All three ports use the same port interface, NMI_PncRequest.
| AA (node label / prototype) | P-Port NAME | PORT INTERFACE | NETWORK HANDLE | Saved mapping name |
|---|---|---|---|---|
ParkAssistApp / ParkAssist | PncParkAssist | NM.NetworkHandle: NMI_PncRequest | NH_ParkAssist | ParkAssistApp_AA_PncParkAssist |
VehicleStateApp / VehicleState | PncTrailer | NM.NetworkHandle: NMI_PncRequest | NH_Trailer | VehicleStateApp_AA_PncTrailer |
ComfortApp / Comfort | PncComfort | NM.NetworkHandle: NMI_PncRequest | NH_Comfort | ComfortApp_AA_PncComfort |
When you have finished all three, the inside of the HPC looks like this.
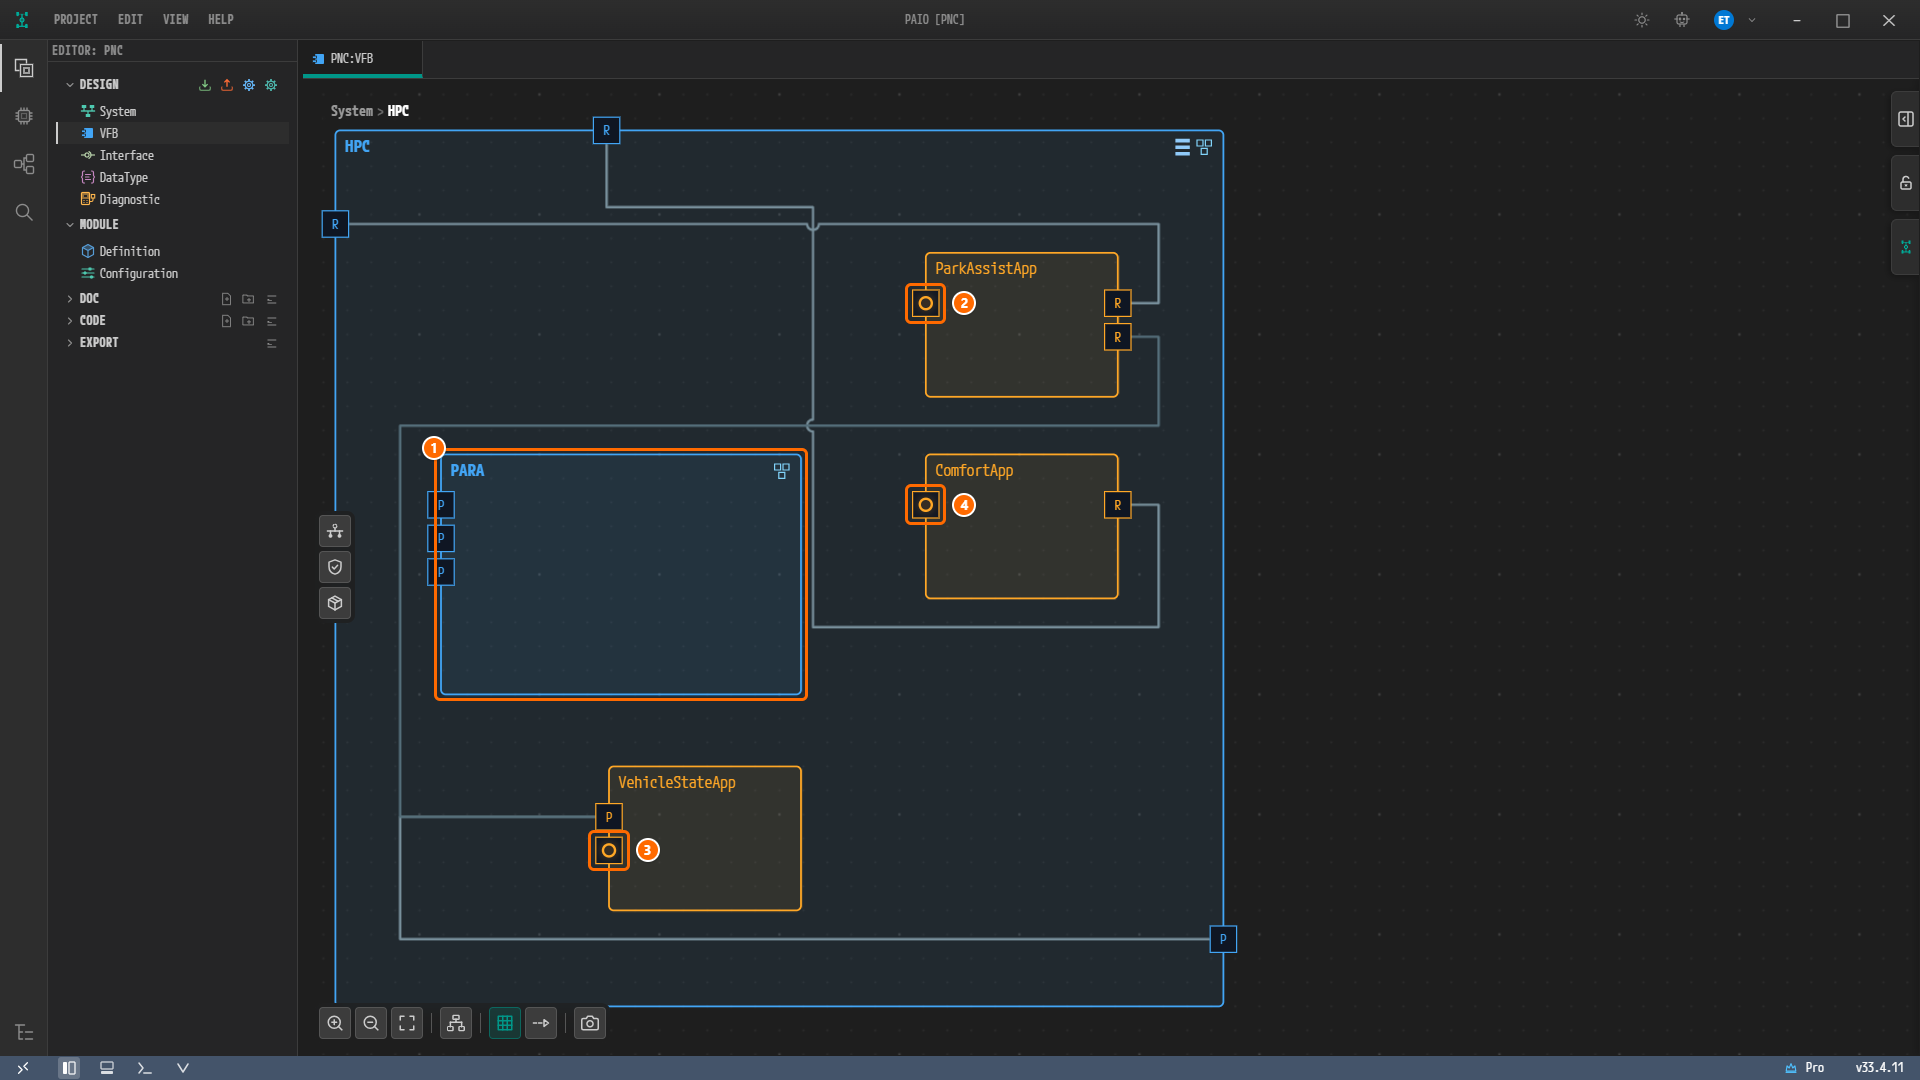
Figure 10-17. The finished state inside the HPC. ① The PARA composition prototype. ② PncParkAssist on ParkAssistApp. ③ PncTrailer on VehicleStateApp. ④ PncComfort on ComfortApp. All three are circular ports on the left edge of their node. This figure shows the layout of the finished example file, so the node positions may differ from the view you tidied with Auto Layout (Figure 10-6). Node positions have no effect on the result. The finished example also keeps the earlier form of PARA, in which the composition type is named PARA, so its node reads PARA where your project shows PARA_HPC.
In the finished example, double-click ParkAssistApp and select the NetworkHandle mapping box to see the following.
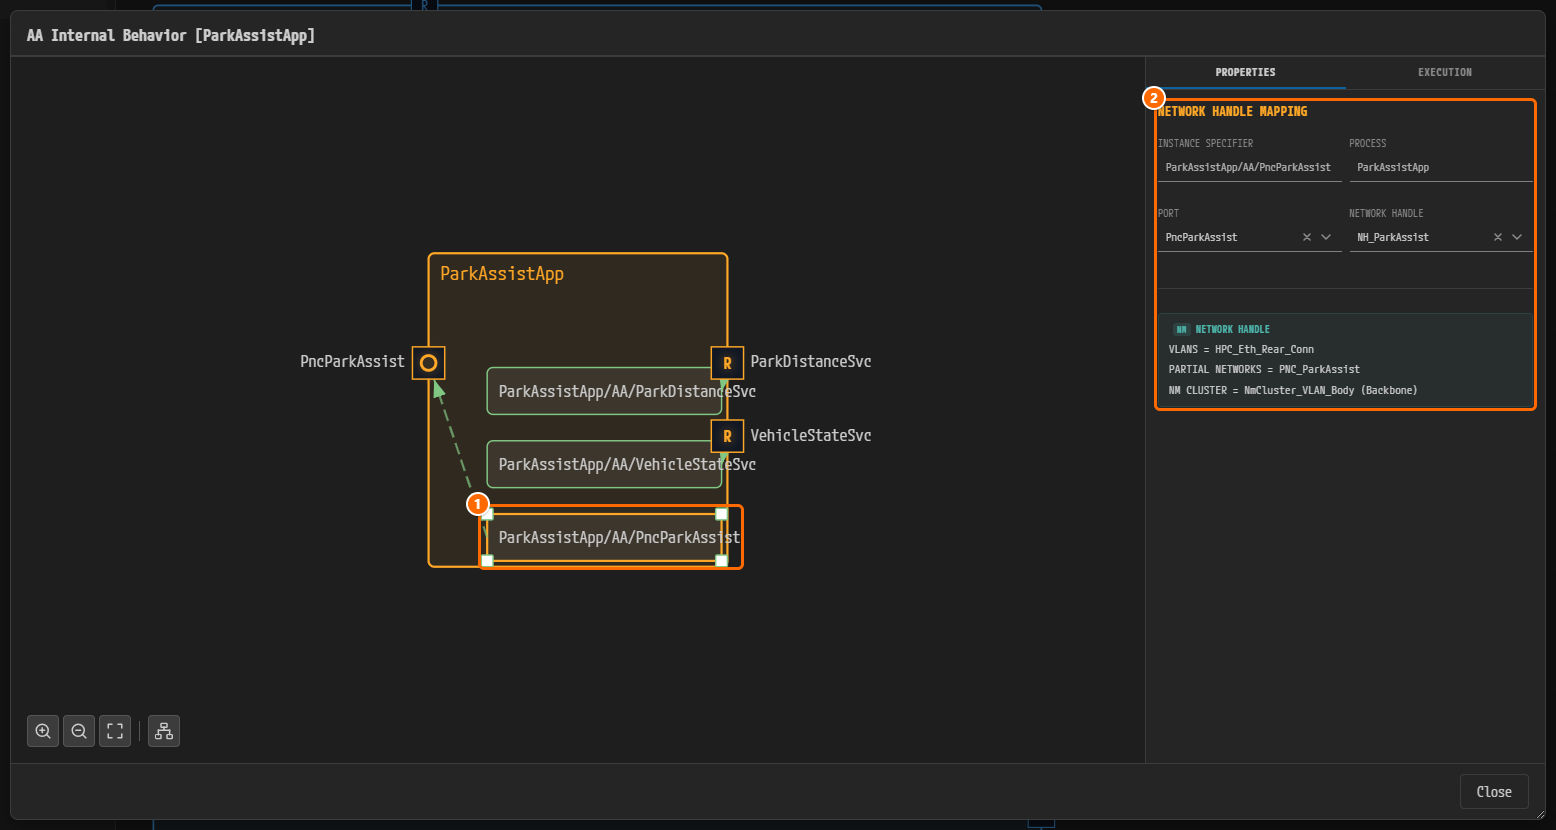
Figure 10-18. AA Internal Behavior [ParkAssistApp] in the finished example. ① Of the three mapping boxes, the NetworkHandle mapping ParkAssistApp/AA/PncParkAssist is selected. ② PORT PncParkAssist, NETWORK HANDLE NH_ParkAssist, and the handle summary. This must match the result you built yourself (Figure 10-16).
What Gets Exported
The configuration you created in this chapter leaves as the following elements on ARXML export. The export procedure is covered in ARXML Export.
| What you created in this chapter | Exported element |
|---|---|
NMI_PncRequest | NETWORK-MANAGEMENT-PORT-INTERFACE in the interface document |
| The three NetworkHandle mappings of the application AAs | NETWORK-HANDLE-PORT-MAPPING in the AA Executable Manifest |
Why Is It Designed This Way?
- The HPC is an AP machine, so it is a PNC participant, not a PNC gateway. The NM network handles of Chapter 9 decide "which PNC on which VLAN", and the NetworkHandle mappings of this chapter decide "which application requests that handle".
- An application AA requests and releases a handle through its ara::nm P-Port. The application never deals with a VLAN or a PNC number directly; it refers only to the handle.
- You must import PARA before the State Management and Network Management modules connect to the actual platform AAs (
SM,NM). The import is a merge, so you do not lose the machine configuration you built in the previous chapters.
Check Your Work
- MODULE › Network Management in the Machine Configuration [HPC] window still has the three rows
NH_Comfort,NH_ParkAssist, andNH_Trailer. - The PROCESSES list has the three application processes and the 11 PARA processes.
- The HPC contains the composition PARA_HPC (prototype
PARA), and it does not overlap another node. - The ADAPTIVE tab of the Interface editor has
NMI_PncRequest(C++ NAMESPACEpnc::nm). - The three application AAs have circular P-Ports (
PncParkAssist,PncTrailer,PncComfort), and all of their PORT INTERFACE values areNM.NetworkHandle: NMI_PncRequest. - Each AA has a NetworkHandle mapping in its AA Internal Behavior, and the NETWORK HANDLE matches the table in Connecting the Remaining AAs.
- No tab name and no dialog title carries the unsaved-change marker (the dot).
Next Steps
In The System Editor and Validation, you validate the design built so far with the SYSTEM panel and the Validation panel, then find and fix the reported findings.