Validation
What You Will Do
In this chapter you deliberately plant three defects in the design built so far and see how PAIO validation reports them. PAIO validates the project as soon as the window opens it, so you only open the VALIDATION panel with the V icon in the footer and read its four rows (three errors and one warning) and the badges. Then you click a row to jump straight to the faulty element, fix the value on screen and save.
There are three places to fix. You set the DLT application ID of Fusion back to FUSN, add the function group state MachineFG : Startup to the EM process, and set the interface of the P port of Sensor back to Service: Sensor. Fusion is shown as a procedure from start to finish, and the other two follow the same flow.
When you finish this chapter, the VALIDATION panel shows No validation issues. again, and the badges next to the panel title and in the footer are gone. The three values are the same as in the design at the end of Logging and DLT.
Before You Begin
- Start from the state at the end of Logging and DLT. At that point the VALIDATION panel shows
No validation issues.. - The screens in this chapter show that design with the three defects below in it. No editor is open, and the VALIDATION panel is closed.
| Defect | File (design/SWC/AdaptiveApplication/) | Original value | Planted value |
|---|---|---|---|
The DLT application ID of Fusion is the same as that of Sensor | Fusion.swc.io.model › process.log-config.application-id | FUSN | SENS |
The EM process has no function group state | EM.swc.io.model › process.startup-configs[0].function-group-states | one row MachineFG : Startup | [] (empty list) |
The P port of Sensor points at an interface that does not exist | Sensor.swc.io.model › ports[0].port-interface | Sensor | SensorIf |
Note. To create the defects yourself and follow along, change the values in the table above. The first one is made by changing APPLICATION ID to
SENSin the LOG CONFIG ofFusion, and the second by deleting the row with the × (tooltip Remove Function Group State) at the end of the FUNCTION GROUP STATE row ofEM. The third cannot be made on screen, because the PORT INTERFACE drop-down offers onlyService: Sensor. Make the third one by changing"port-interface": "Sensor"to"port-interface": "SensorIf"inSensor.swc.io.modelwhile PAIO is closed.
The only value you type on the keyboard in this chapter is FUSN in APPLICATION ID. Everything else is a click, the + button, a drop-down choice, Ctrl+S or Close.
Running Validation and Reading the VALIDATION Panel
Opening the VALIDATION Panel
-
Look at the V icon in the footer at the bottom left of the window. PAIO validated the whole project when the window opened it, without opening an editor, so the icon already carries a red badge
4. When you hover over the icon, the tooltip readsValidation: 3 error(s), 1 warning(s), 0 info(s). -
Click the V icon in the footer. The VALIDATION panel opens at the bottom of the window. Next to its title is a red badge
3(tooltip3 error(s)), and the column headers are ELEMENT TYPE, NAME, DESCRIPTION and CONSTR. Below them are four rows: three errors and one warning. The panel badge counts only the error rows, while the footer badge counts every row.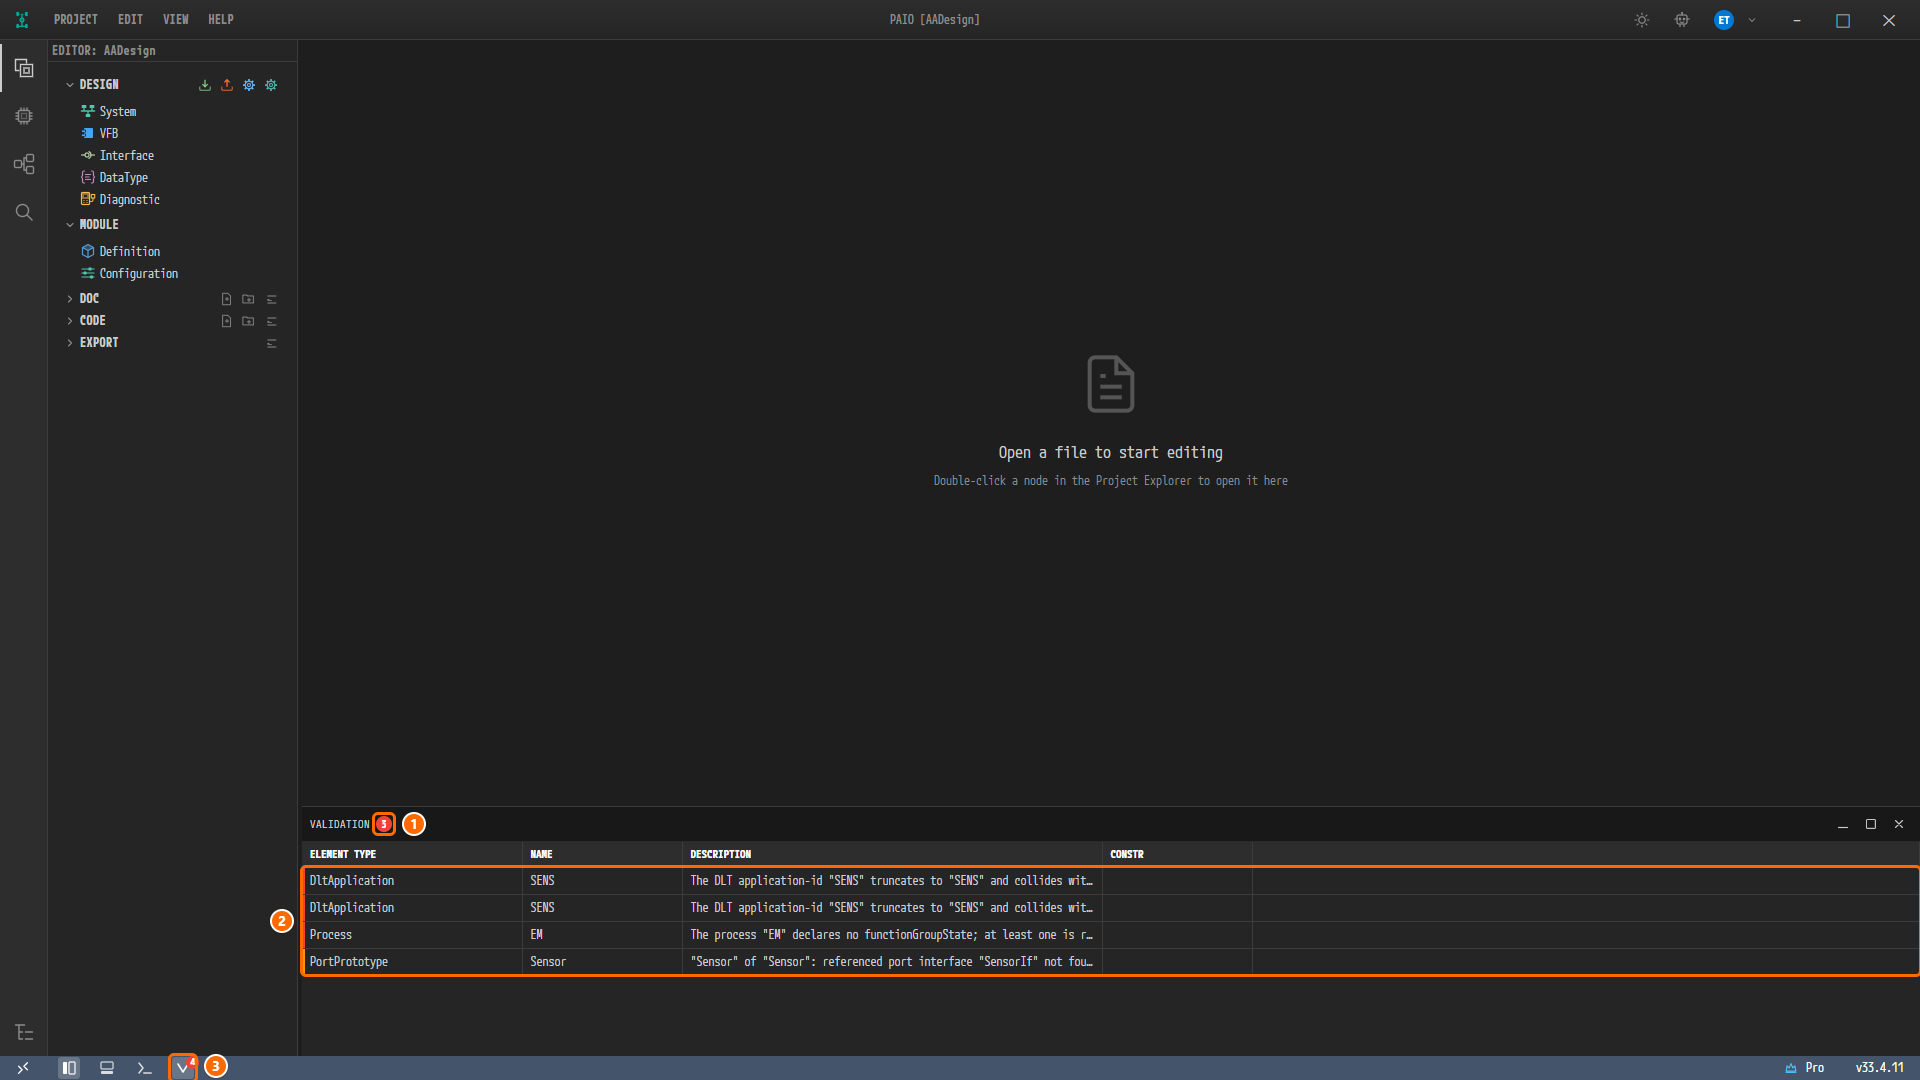
Figure 12-1. The screen after opening the panel. ① The badge
3next to the panel title VALIDATION, ② the four rows, ③ the V icon in the footer (badge4). No editor is open, so the centre shows the empty editor area (Open a file to start editing). At the default column width the descriptions of all four rows are cut off with….
Reading the Columns
Each row of the panel is one finding. The columns mean the following.
| Column | Content |
|---|---|
| ELEMENT TYPE | The kind of the faulty element |
| NAME | The name of that element |
| DESCRIPTION | A sentence that explains what is wrong |
| CONSTR | The AUTOSAR constraint number (constr_*). All four rows in this chapter come from PAIO's own rules, so it is empty |
-
If the descriptions are cut off, drag the right border of the DESCRIPTION header to the right to widen it. This step is optional. Once widened, all four sentences are visible in full.

Figure 12-2. The VALIDATION panel with the DESCRIPTION column widened. ① The
DltApplicationSENSrow (…(Sensor).), ② theDltApplicationSENSrow (…(Fusion).), ③ theProcessEMrow, ④ thePortPrototypeSensorrow (the warning).
The four rows, in panel order, are as follows. Rows 1 to 3 are errors and row 4 is a warning; the thin bar at the left edge of each row shows which, red for an error and orange for a warning. The CONSTR cell is empty.
| # | ELEMENT TYPE | NAME | DESCRIPTION | Where a click takes you |
|---|---|---|---|---|
| 1 | DltApplication | SENS | The DLT application-id "SENS" truncates to "SENS" and collides with "SENS" (Sensor). | AA Internal Behavior [Fusion] › EXECUTION › LOG CONFIG › APPLICATION ID |
| 2 | DltApplication | SENS | The DLT application-id "SENS" truncates to "SENS" and collides with "SENS" (Fusion). | AA Internal Behavior [Sensor] › the same field |
| 3 | Process | EM | The process "EM" declares no functionGroupState; at least one is required. | AA Internal Behavior [EM] › EXECUTION › FUNCTION GROUP STATE |
| 4 | PortPrototype | Sensor | "Sensor" of "Sensor": referenced port interface "SensorIf" not found. | VFB editor System > HPC, properties panel PPORT › PORT INTERFACE |
Note. There are three defects but four rows. When DLT application IDs collide, each of the two colliding applications gets a row, so there are two rows. The parentheses at the end of the sentence name the other party of the collision. The element of row 1 is the
Fusionside, and(Sensor)is the other party. That is why clicking row 1 opensFusion.
Note. A single click on a row jumps to the element. When you hover over a row that can jump, the tooltip
Go to the element to fixappears.
Fixing the DLT Application ID of Fusion
Clicking the Row to Jump to APPLICATION ID
-
Click the first row (
DltApplication,SENS, …(Sensor).) of the VALIDATION panel. The VFB editor tabAADesign:VFBopens insideSystem > HPC, and the dialog AA Internal Behavior [Fusion] appears above it on the EXECUTION tab. The process card and LOG CONFIG expand by themselves, and the APPLICATION ID field (valueSENS) is marked with a red label and underline, its value selected and focused.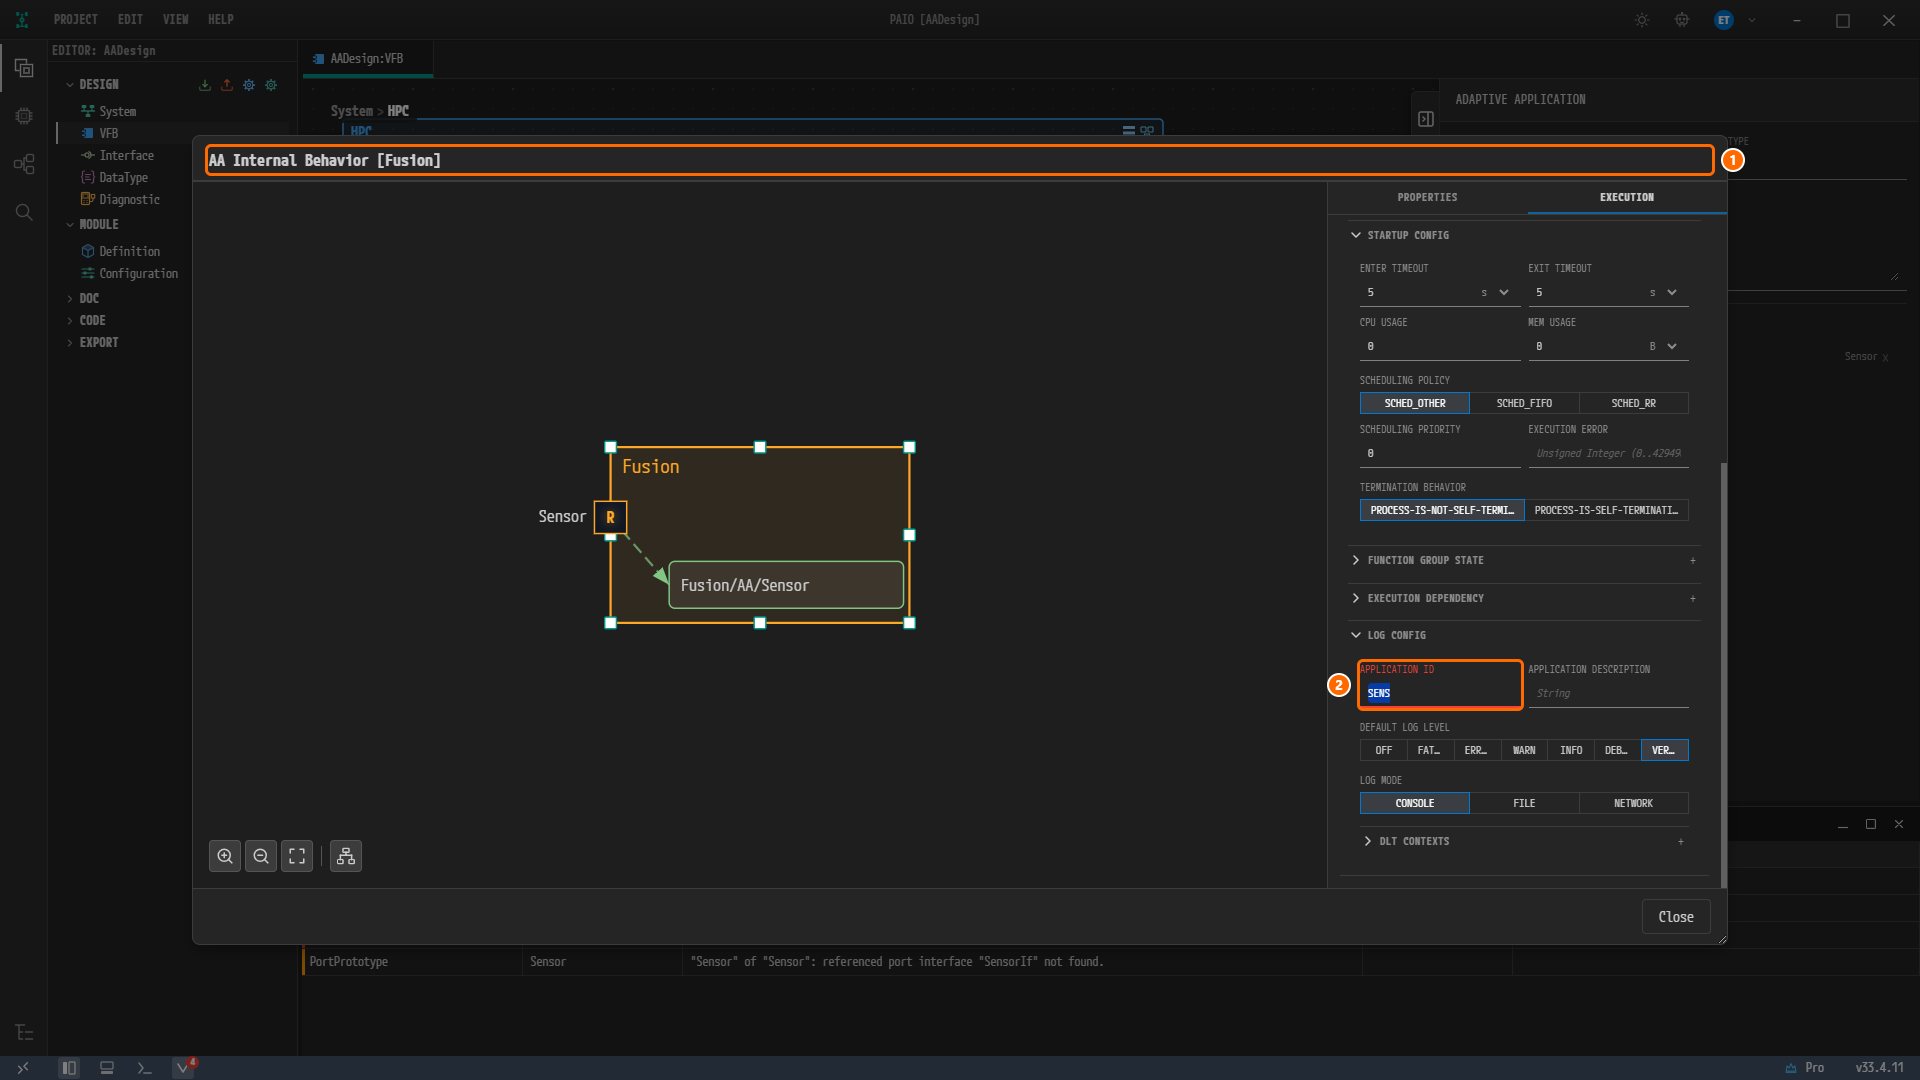
Figure 12-3. The result of clicking the first row. ① The dialog title AA Internal Behavior [Fusion]. The right panel is on the EXECUTION tab, and the canvas on the left shows
Fusionwith the R portSensorand the service instance mappingFusion/AA/Sensor. In this figure the right panel is scrolled down to LOG CONFIG. ② The APPLICATION ID field (valueSENS) is marked with a red label and underline, its value selected. If the field is not visible, scroll the right panel down.
Entering FUSN and Saving
-
Type
FUSNin the APPLICATION ID field and pressTab. The value is selected, so typing straight away overwritesSENS. The title changes to● AA Internal Behavior [Fusion]. -
Press
Ctrl+Sinside the dialog. The●disappears from the title, and with the dialog still open the badge in the footer changes to2. Saving collapses LOG CONFIG, so click its header to expand it again: APPLICATION ID readsFUSN, and its red marking is gone.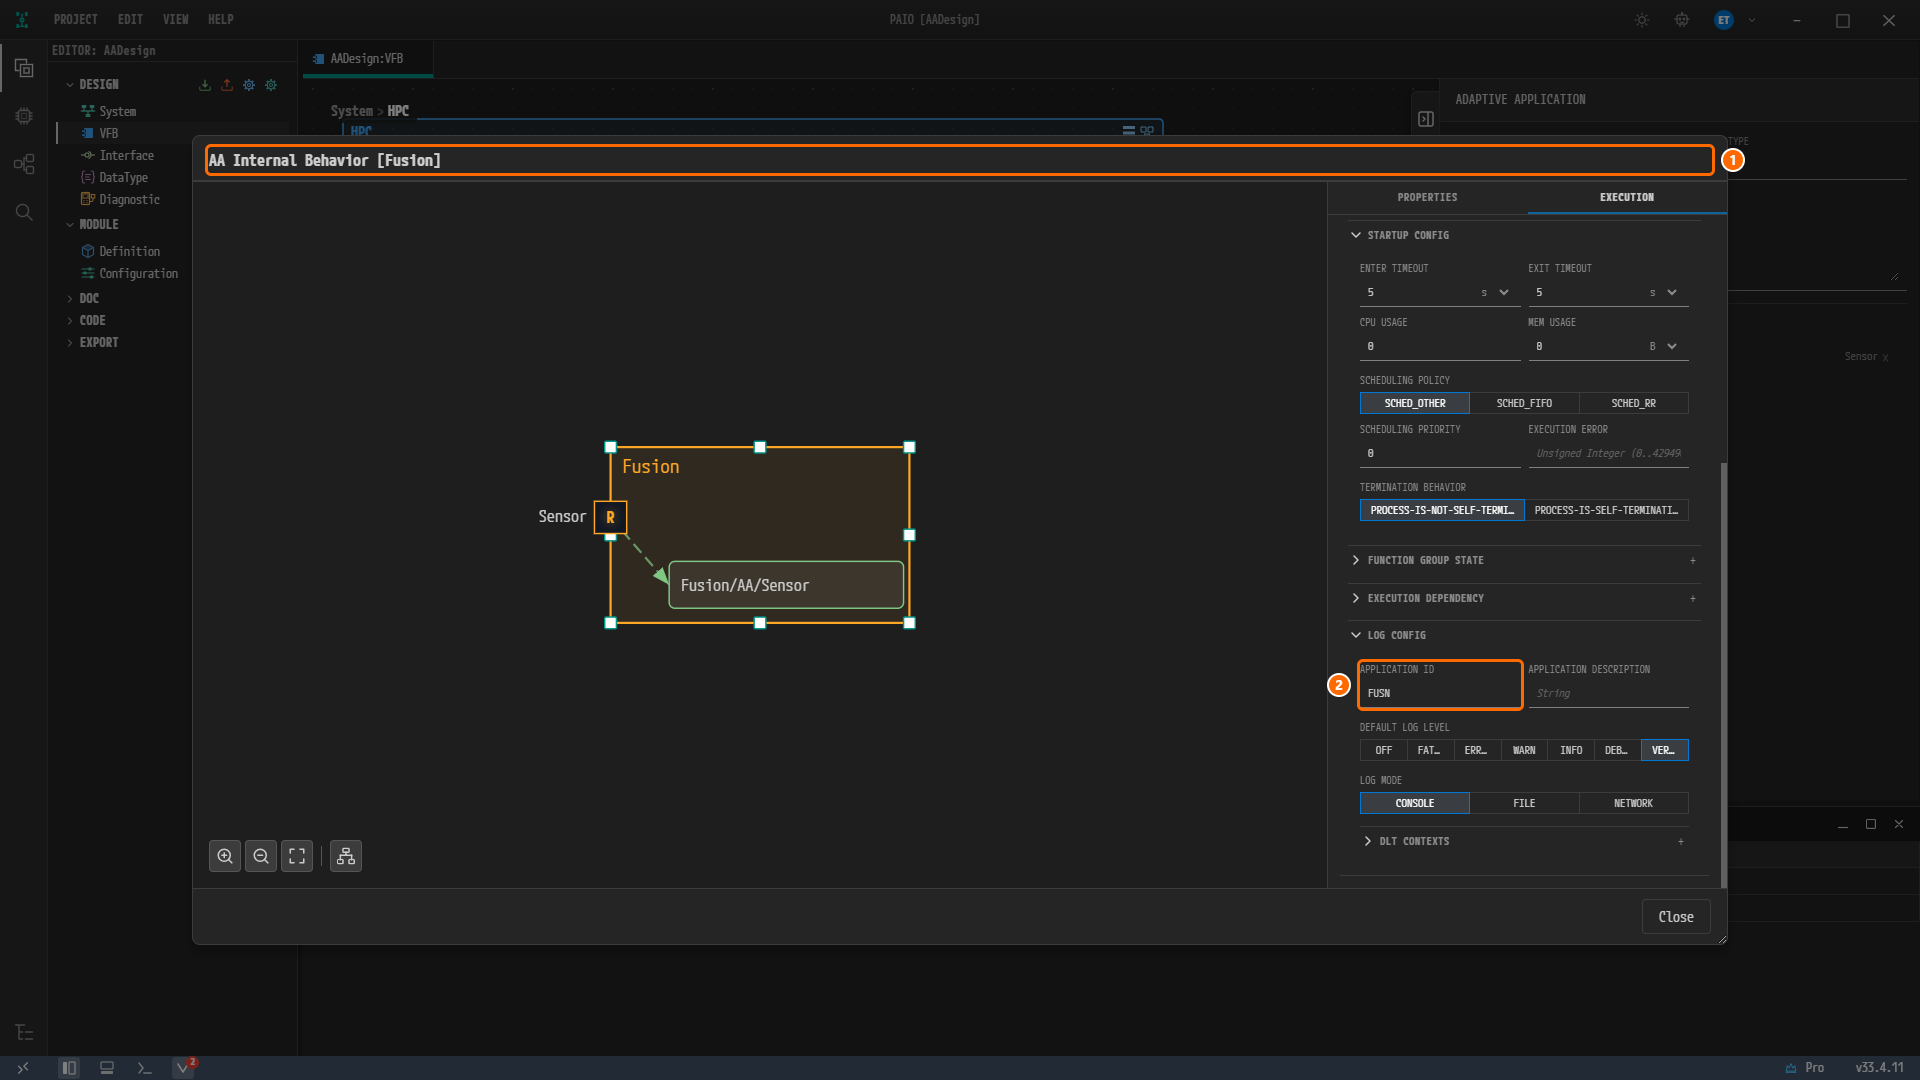
Figure 12-4. The screen after saving, with LOG CONFIG expanded again. ① The title AA Internal Behavior [Fusion] without the modified marker, ② APPLICATION ID =
FUSN. DEFAULT LOG LEVEL is stillVERBOSE(VER…) and LOG MODE is stillCONSOLE. The badge on the footer V icon is2. -
Click Close. Because you saved, the dialog closes without a prompt.
Note. An accordion that a row click expands closes again whenever the dialog redraws the tab, and saving redraws it. That is why LOG CONFIG collapses on saving while the process card and STARTUP CONFIG stay expanded. An accordion you expand yourself stays open.
After the dialog closes, only two rows (the error Process EM and the warning PortPrototype Sensor) remain in the VALIDATION panel. The panel badge is 1 and the footer badge is 2. The panel is recalculated the moment you save, so there is nothing to run again. Rows 1 and 2 disappear together although you fixed only Fusion, because both rows came from the same single collision. There is no need to click row 2.
Adding a Function Group State to EM
Clicking the Row to Jump to FUNCTION GROUP STATE
-
Click the
ProcessEMrow. The dialog AA Internal Behavior [EM] opens on the EXECUTION tab. The FUNCTION GROUP STATE accordion of the process cardEMis expanded and marked in red, and it contains onlyNo function group states defined.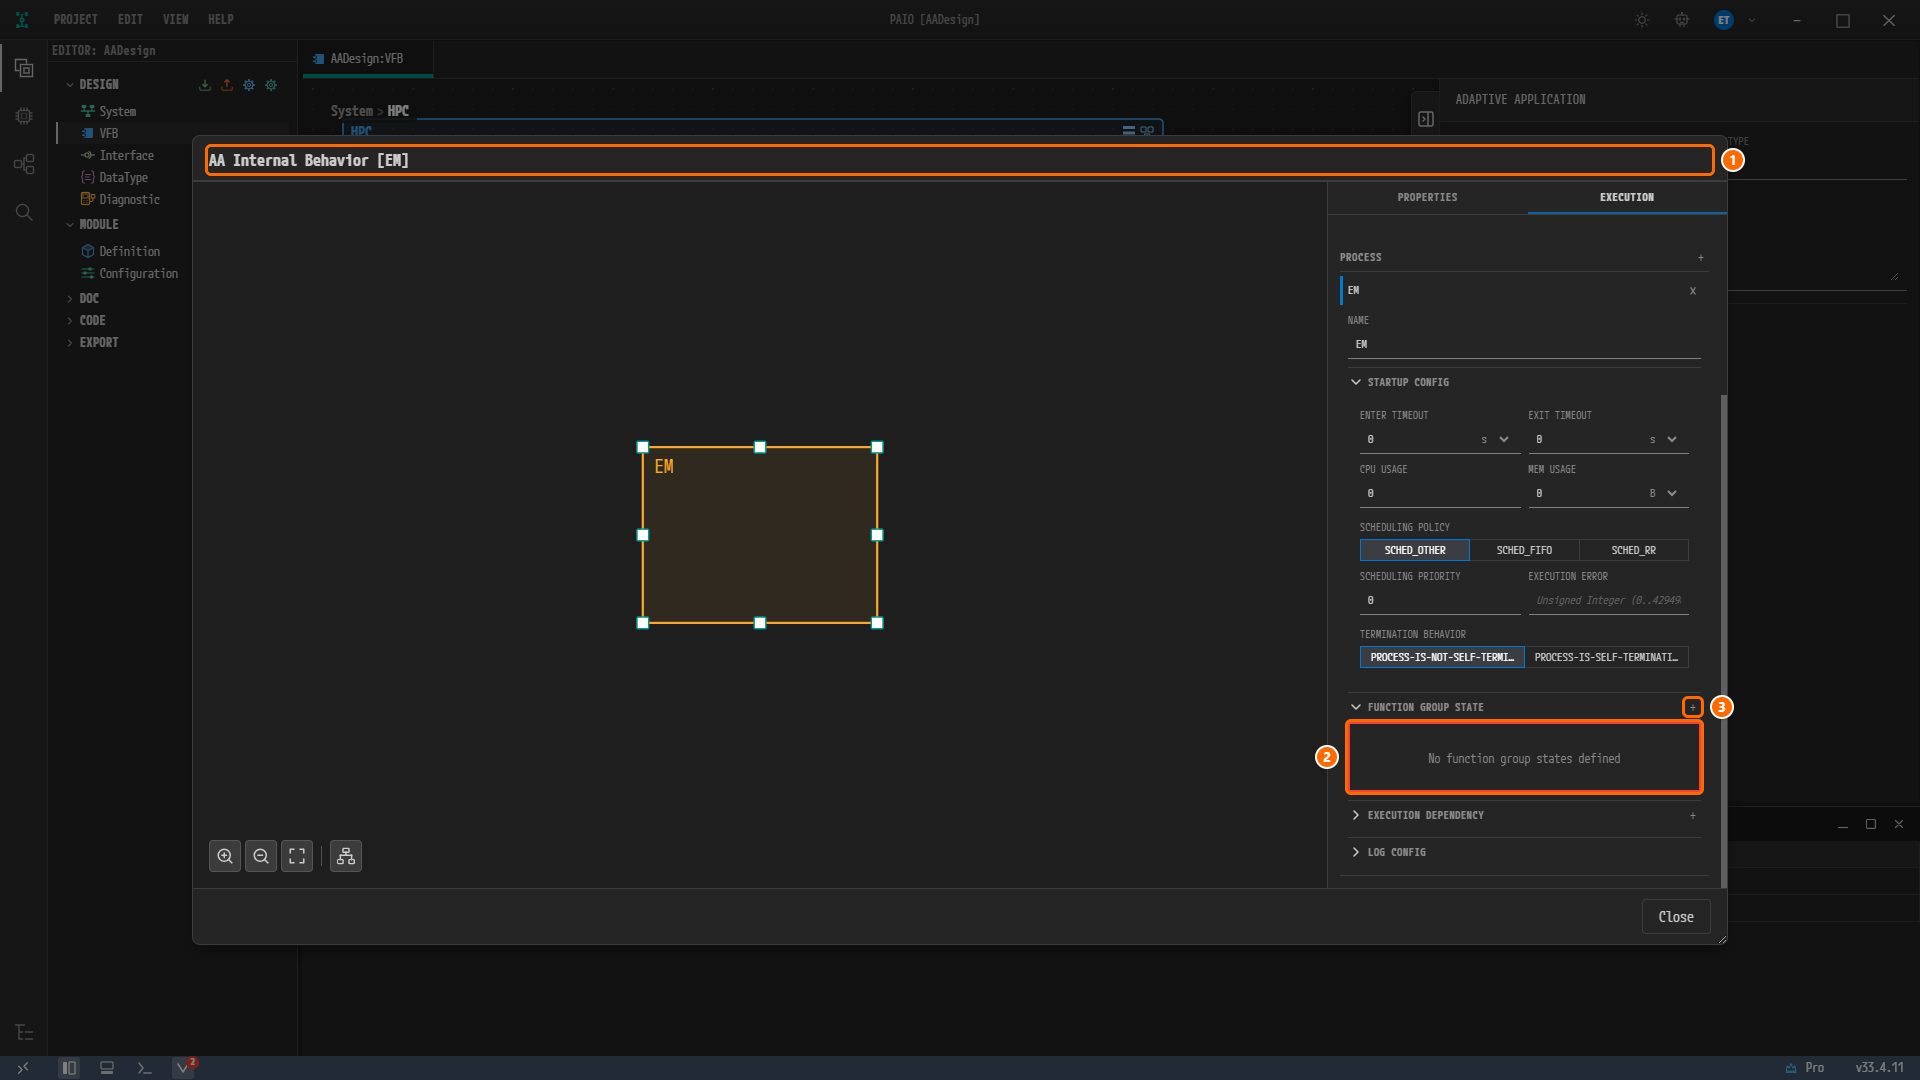
Figure 12-5. The result of clicking the
ProcessEMrow. ① The dialog title AA Internal Behavior [EM], ② the FUNCTION GROUP STATE contentNo function group states defined, ③ the + button at the right of the header. ENTER TIMEOUT and EXIT TIMEOUT under STARTUP CONFIG are the0entered in Executables and Processes.
Adding the Startup State
-
Click the + button (tooltip Add Function Group State) at the right of the FUNCTION GROUP STATE header. A row
MachineFG : Offis added and the title changes to● AA Internal Behavior [EM]. The + also redraws the tab, so the FUNCTION GROUP STATE accordion that the row click had expanded collapses and loses its red marking; click its header to expand it again and see the new row. -
Click the row header
MachineFG : Offto expand it. The FUNCTION GROUP field isMachineFGand the FUNCTION GROUP STATE field isOff. -
Click the FUNCTION GROUP STATE field. The drop-down shows
Off(current value, with a check mark),Startup,Shutdown,RestartandVerify.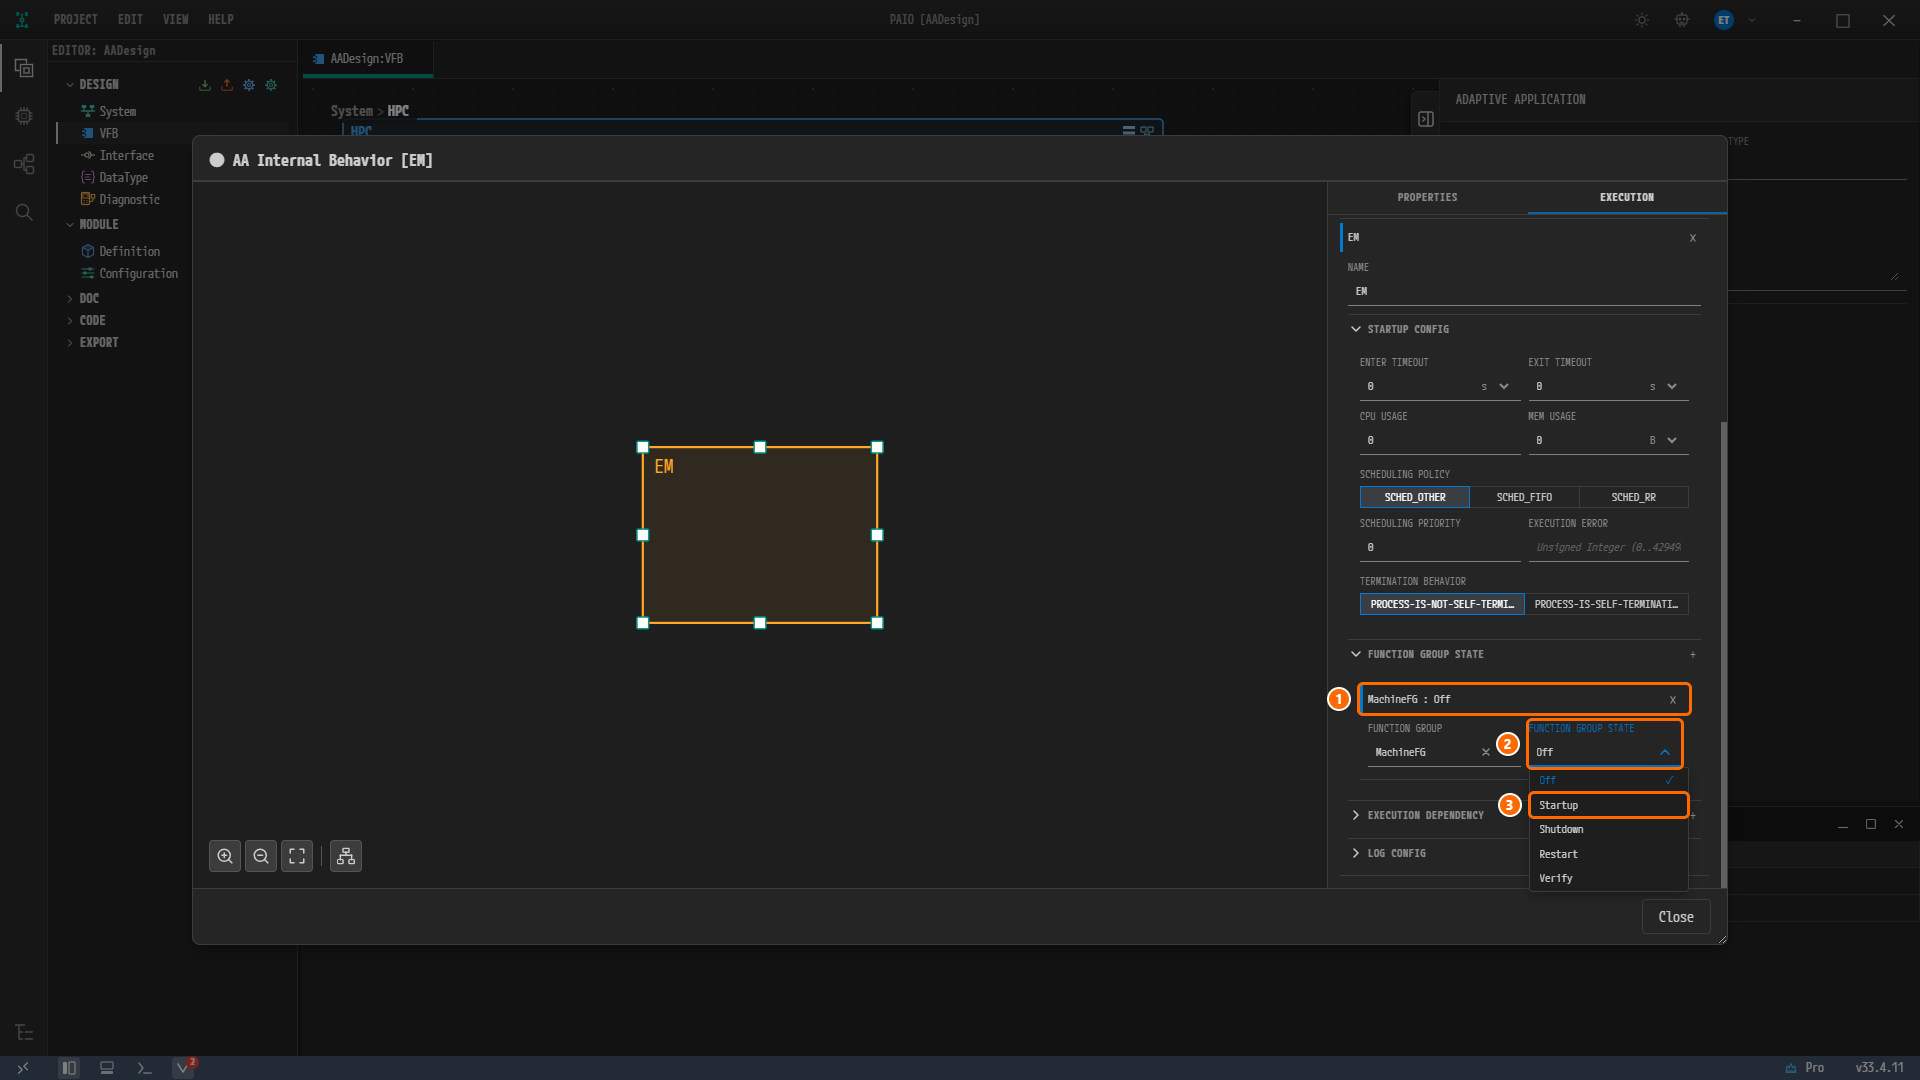
Figure 12-6. The state drop-down of the new row. ① The new row header
MachineFG : Off, ② the FUNCTION GROUP STATE field, ③ the drop-down itemStartup. The title reads● AA Internal Behavior [EM]. -
Click
Startup. The row header changes toMachineFG : Startup.
Saving and Closing
-
Press
Ctrl+Sinside the dialog. The●disappears from the title. The badge in the footer changes to1and turns orange, because the one row left is a warning.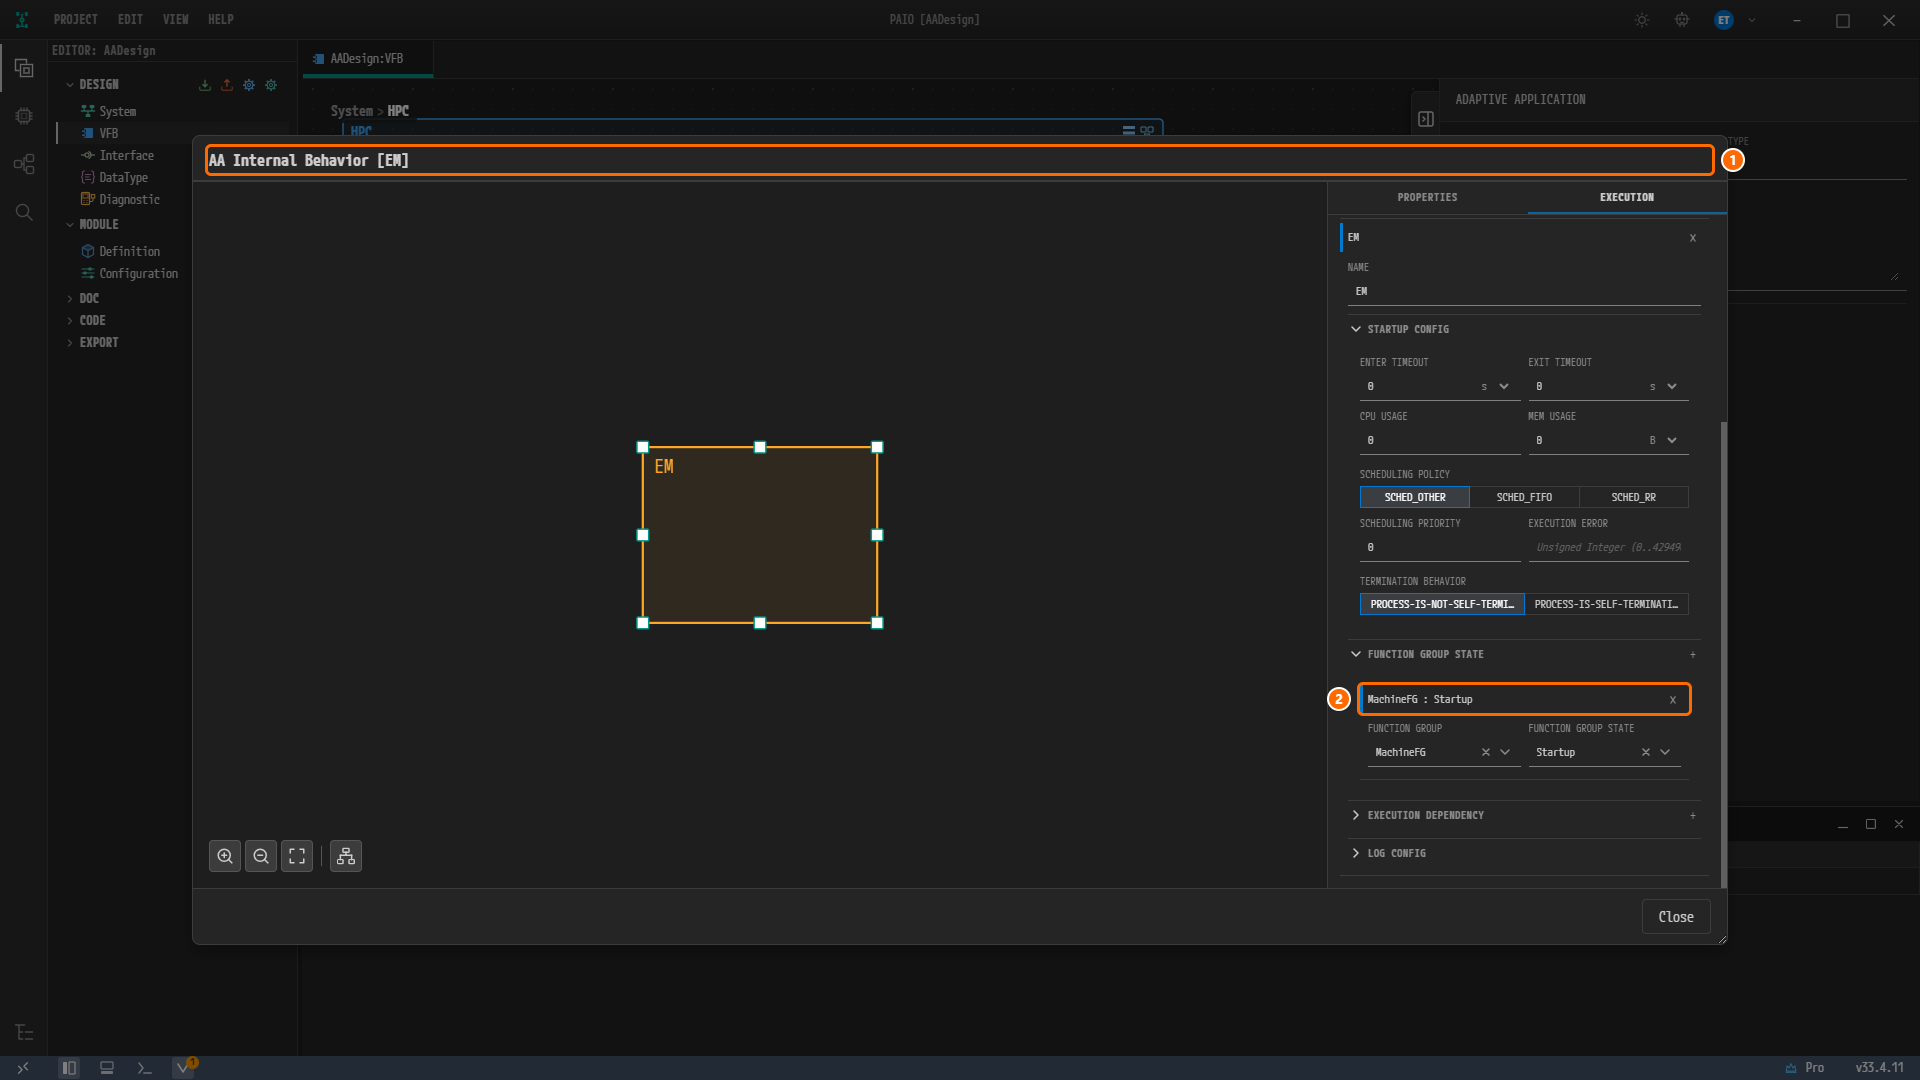
Figure 12-7. The screen after saving. ① The title AA Internal Behavior [EM] without the modified marker, ② the row
MachineFG : Startup. Below it, FUNCTION GROUP isMachineFGand FUNCTION GROUP STATE isStartup. The badge on the footer V icon is1(orange). -
Click Close. The dialog closes without a prompt. One row, the warning
PortPrototypeSensor, remains in the VALIDATION panel. The panel title has no badge any more, because no error is left, and the footer badge is1.
process.startup-configs[0].function-group-states in EM.swc.io.model becomes [{"function-group":"MachineFG","state":"Startup"}]. You expanded the FUNCTION GROUP STATE accordion and the row yourself, so they stay open after saving, as Figure 12-7 shows.
Restoring the Interface of the Sensor Port
Clicking the Row to Jump to PORT INTERFACE
-
Click the
PortPrototypeSensorrow. This time no dialog opens. In the open VFB editor (System > HPC), the nodeSensorglows orange and its P portSensoris selected. The title of the properties panel on the right is PPORT and NAME isSensor. The PORT INTERFACE label and underline are orange, andReferenced item not foundappears under the valueSensorIf. The marks are orange, not red, because this row is a warning.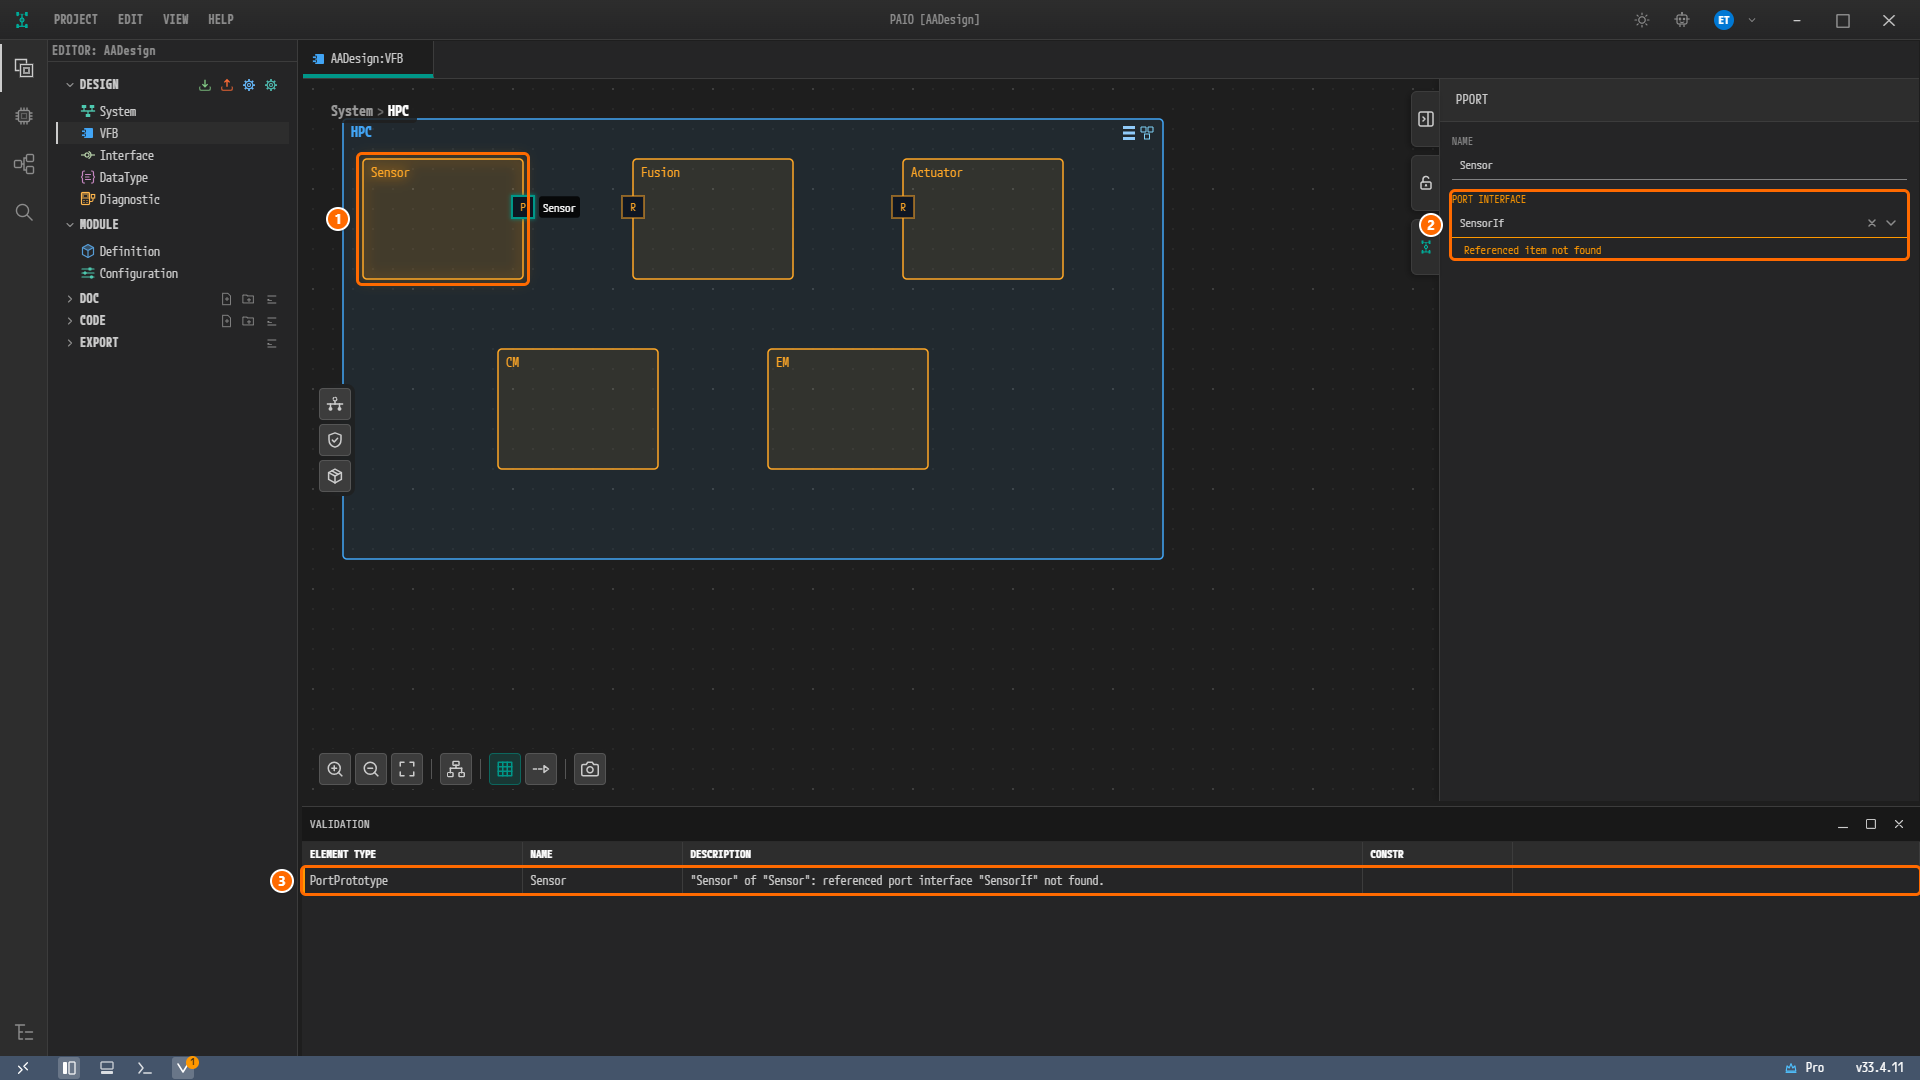
Figure 12-8. The result of clicking the
PortPrototypeSensorrow. ① The nodeSensormarked in orange, ② PORT INTERFACE in the properties panel PPORT (valueSensorIf, withReferenced item not foundbelow), ③ the one row left in the VALIDATION panel. The panel title carries no badge, and the footer V icon carries the orange badge1. No connector lines are visible on the canvas. See the note below.
Note. A row click does not always lead to the same kind of place.
DltApplicationandProcessrows open the AA Internal Behavior dialog and expand and mark the field. APortPrototyperow opens no dialog; it marks the node in the VFB editor, selects the port and marks the field in the properties panel.
Choosing Service: Sensor
-
Click the PORT INTERFACE field in the properties panel. A drop-down with the hint text
Type to search...opens, and its only item isService: Sensor.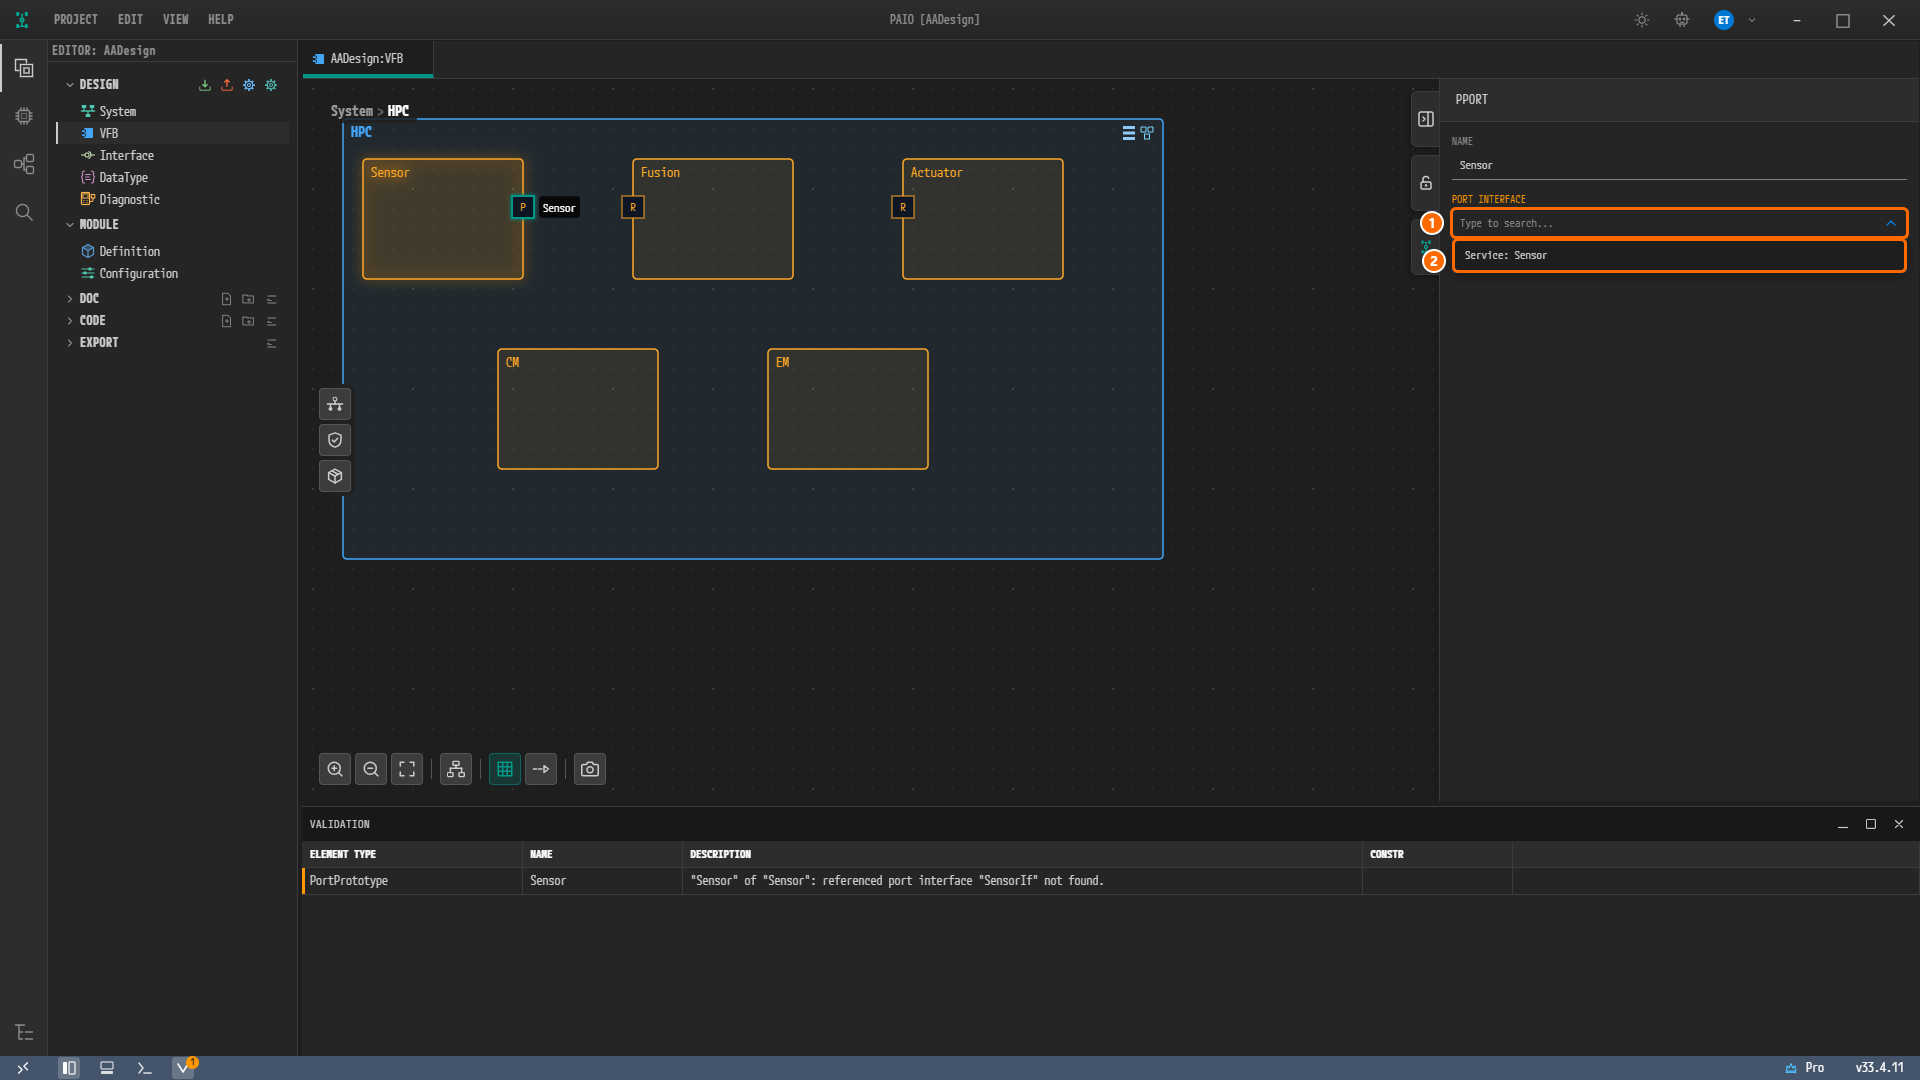
Figure 12-9. The open PORT INTERFACE drop-down. ① The input field (
Type to search...), ② the only itemService: Sensor. -
Click
Service: Sensor. The field becomesService: Sensor, and theAADesign:VFBtab gets the modified marker. -
Press
Ctrl+Sin the VFB tab. No tab has the modified marker any more. The VALIDATION panel showsNo validation issues., and the badges next to the panel title and on the footer V icon are gone.
ports[0].port-interface in Sensor.swc.io.model becomes Sensor.
Note. After you fix the port and save, the canvas does not draw the connector lines again, not even when you click
Systemin the breadcrumb and double-click the nodeHPC [Ecu]again. The filedesign/SWC/Composition/HPC.swc.io.modelstill holds the connectorsAssembly_Sensor_FusionandAssembly_Sensor_Actuator. A VFB tab that was open while the port named a missing interface leaves that port's lines undrawn until the tab is closed and opened again. Close theAADesign:VFBtab, click VFB under DESIGN in the EDITOR view to open it again and double-click the nodeHPC [Ecu], and the two lines are drawn. No prompt appears when you close the tab.
Validating Again
-
Look at the VALIDATION panel. PAIO validated the project again when you saved the VFB tab, so there is nothing to click. The body reads
No validation issues., and there is no badge next to the panel title or on the footer V icon.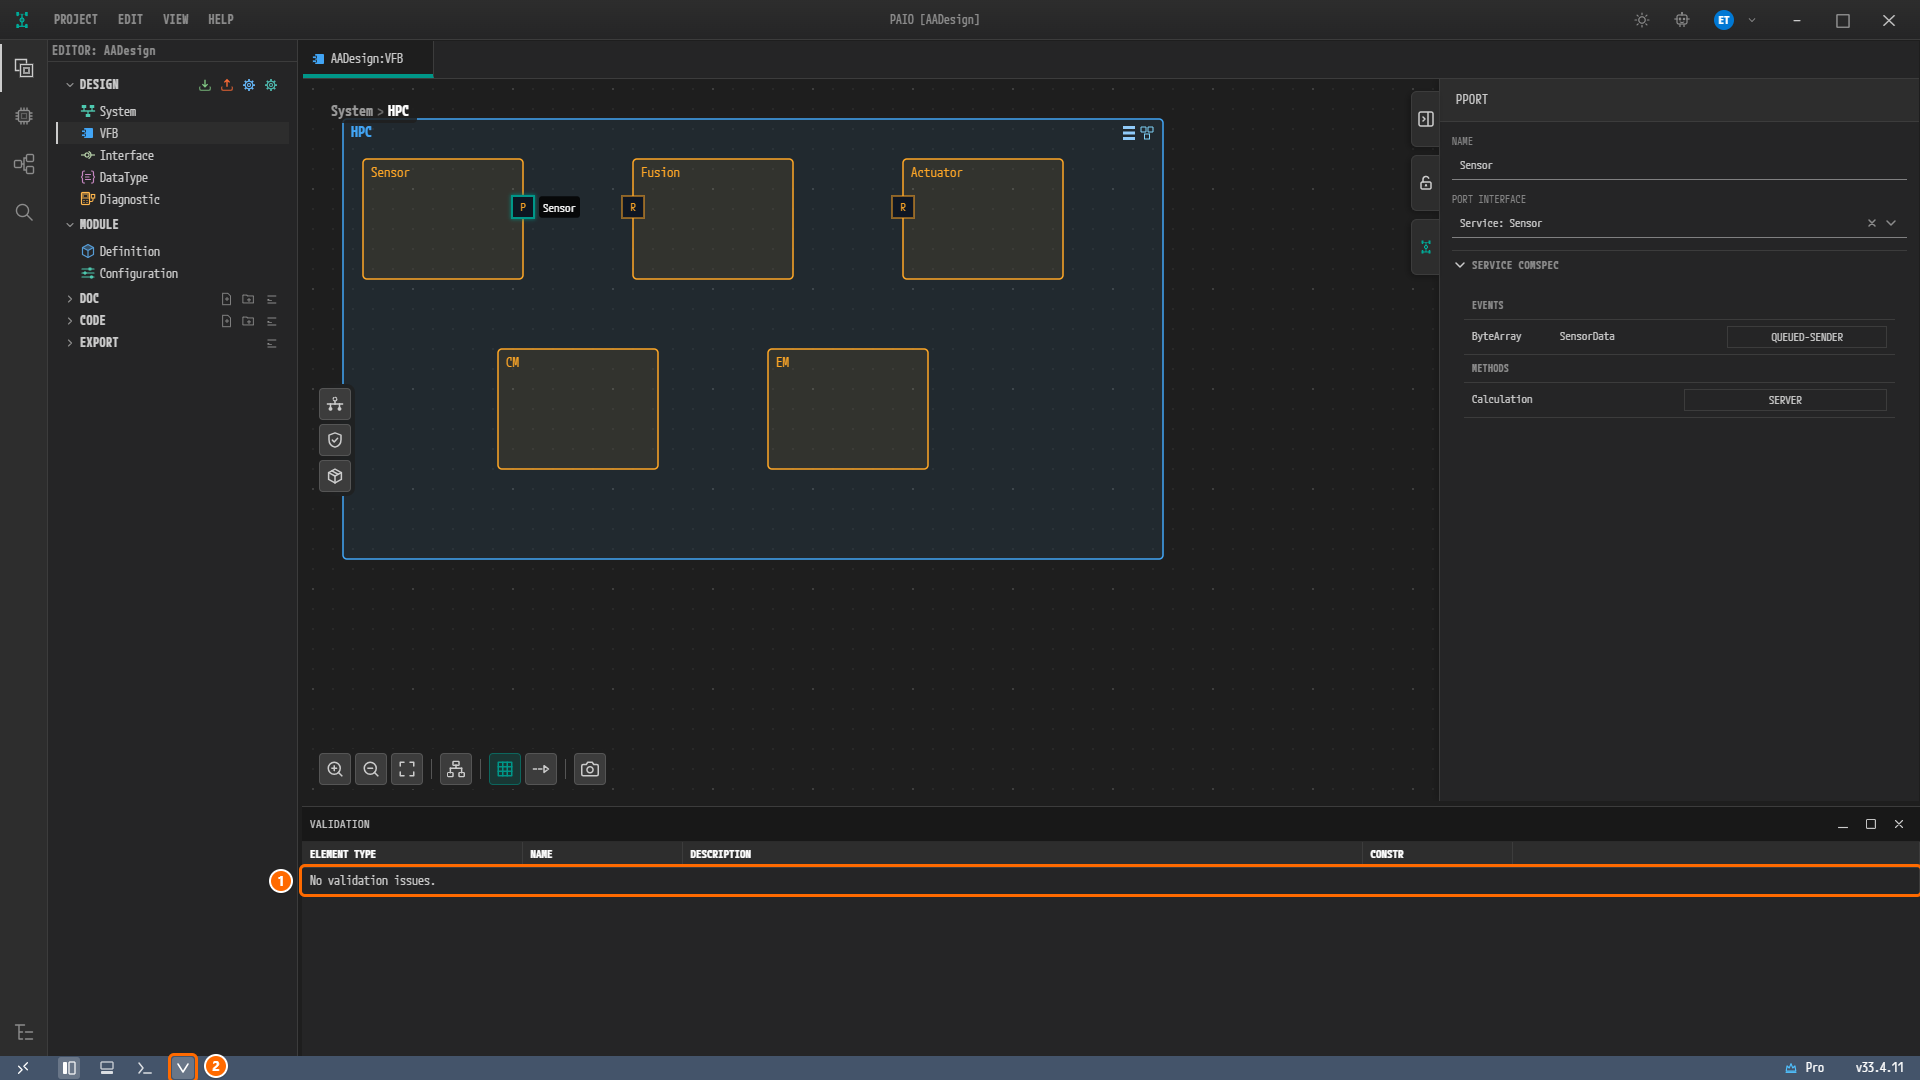
Figure 12-10. The screen right after saving the VFB tab. ① The
No validation issues.row, ② the footer V icon without a badge. The properties panel shows PORT INTERFACEService: Sensorand SERVICE COMSPEC (EVENTSByteArraySensorDataQUEUED-SENDER, METHODSCalculationSERVER). The connector lines are not drawn yet. See the note above.
Note. The badge on the V icon disappears when the count drops to zero, but the tooltip of the V icon keeps the last count,
Validation: 0 error(s), 1 warning(s), 0 info(s). The VALIDATION panel shows the current result.
The panel is recalculated on every save. The rows and badges go down with each fix as follows.
| After the fix | Rows left in the panel | Panel badge | Footer badge |
|---|---|---|---|
| Start | 4 (3 errors, 1 warning) | 3 | 4 (red) |
Fusion APPLICATION ID → FUSN saved | 2 (Process EM, PortPrototype Sensor) | 1 | 2 (red) |
EM → MachineFG : Startup saved | 1 (PortPrototype Sensor) | none | 1 (orange) |
Sensor port → Service: Sensor saved | 0, No validation issues. | none | none |
Why Is It Designed This Way?
- Binding
EMtoMachineFG : Startupis a deliberate departure from the reference design. TheEMprocess of the reference design has noFUNCTION-GROUP-STATE-IREF. The second defect of this chapter has exactly that shape, and PAIO validation rejects it withThe process "EM" declares no functionGroupState; at least one is required.. That is why this tutorial boundEMtoStartupin Executables and Processes, and this chapter restores the same value. - DLT application IDs must be unique within the machine. That is why Logging and DLT gave the five processes the separate IDs
SENS,FUSN,ACTA,CMandEM. The phrasetruncates to "SENS"means that the rule compares IDs by their first four characters, because a DLT message carries a four-character application ID.SENSalready has four characters, so cutting it changes nothing. - A port is tied to its interface by name. A port refers to its interface by name, so when no interface of that name exists the result is
referenced port interface "SensorIf" not found.. PAIO reports a reference that names nothing as a warning, and a required reference left empty as an error. The only service interface in this design isSensor, created in The Service Interface, so the drop-down also has only one item,Service: Sensor.
Checklist
- The VALIDATION panel shows
No validation issues.. - There is no badge next to the VALIDATION panel title or on the footer V icon.
- APPLICATION ID in AA Internal Behavior [Fusion] › EXECUTION › LOG CONFIG is
FUSN. - AA Internal Behavior [EM] › EXECUTION › FUNCTION GROUP STATE has exactly one row,
MachineFG : Startup. - When you select the P port of
Sensorin the VFB editorSystem > HPC, PORT INTERFACE in the properties panel PPORT isService: Sensorand there is noReferenced item not found. - Neither the dialog titles nor the tab
AADesign:VFBcarry the modified marker●.
Next Step
In ARXML Export you export the validated design to ARXML files and compare them with the reference design.