Data Types
What You Will Do
In this chapter you create two data types in the project AADesign that you finished in Topology — the Ethernet Connector and Endpoints.
You open the DataType editor, review the 13 built-in types that PAIO provides by default (11 primitives and 2 pointer types), then use the + button to add ByteArray (category DYNAMIC_ARRAY, element type uint8, max size 1, C++ namespace aa::type) and String (category STRING, max size 256, C++ namespace aa::type) and save.
When you finish this chapter, a new file design/DATATYPE.io.model exists and holds the two entries ByteArray and String. The 13 built-in types are not written to the file. The VALIDATION panel shows No validation issues. at the start and at the end of this chapter; in between, it shows one finding while ELEMENT TYPE of ByteArray or MAX SIZE of String is still empty. In the later chapter Service Interface you pick ByteArray as the type of the event SensorData.
Before You Begin
- Start from the state at the end of Topology — the Ethernet Connector and Endpoints. The title bar reads
PAIO [AADesign], the project'sdesign/folder holdsIVC.io.model,SYSTEM.io.model,VFB.io.modelplusModule/andSWC/, andDATATYPE.io.modeldoes not exist yet. The VALIDATION panel showsNo validation issues.. - You may close the tab
AADesign:Systemleft open from chapter 3. This chapter starts by opening DataType from DESIGN in the EDITOR view.
The values you type in this chapter are listed below. DESCRIPTION stays empty for both types.
| Type | CATEGORY | ELEMENT TYPE | MAX SIZE | C++ NAMESPACE |
|---|---|---|---|---|
ByteArray | Click DYNAMIC_ARRAY | Select uint8 from the list | 1 | aa::type |
String | Click STRING | (no field) | 256 | aa::type |
Note. An input field in the CONFIGURATION panel commits its value only when you leave the field. In this chapter you press the
Tabkey after typing to commit. A choice in the CATEGORY toggle or the ELEMENT TYPE dropdown commits as soon as you click it.
Opening the DataType Editor
Opening the Editor and Reviewing the Built-in Primitives
-
In the EDITOR view on the left, click DataType under DESIGN. The tab
AADesign:DataTypeopens with the four tabs DATA TYPE / UNIT / FUNCTION SIGNATURE / COMPU METHOD at the top, and DATA TYPE is active. -
Look at the DATATYPE list on the left. It holds 13 italic entries:
boolean,float32,float64,sint8,sint16,sint32,sint64,uint8,uint16,uint32,uint64, each with the badge[PRIMITIVE]at the right of its row, followed byVoidPtrandConstVoidPtrwith the badge[POINTER]. When the editor opens,booleanis selected. -
Click
uint8in the list. The CONFIGURATION panel in the middle shows NAMEuint8, PRIMITIVE selected (greyed) in the CATEGORY toggle, MIN0, MAX255and DESCRIPTIONUnsigned 8-bit integer (0 to 255). All four fields are read-only and cannot be changed.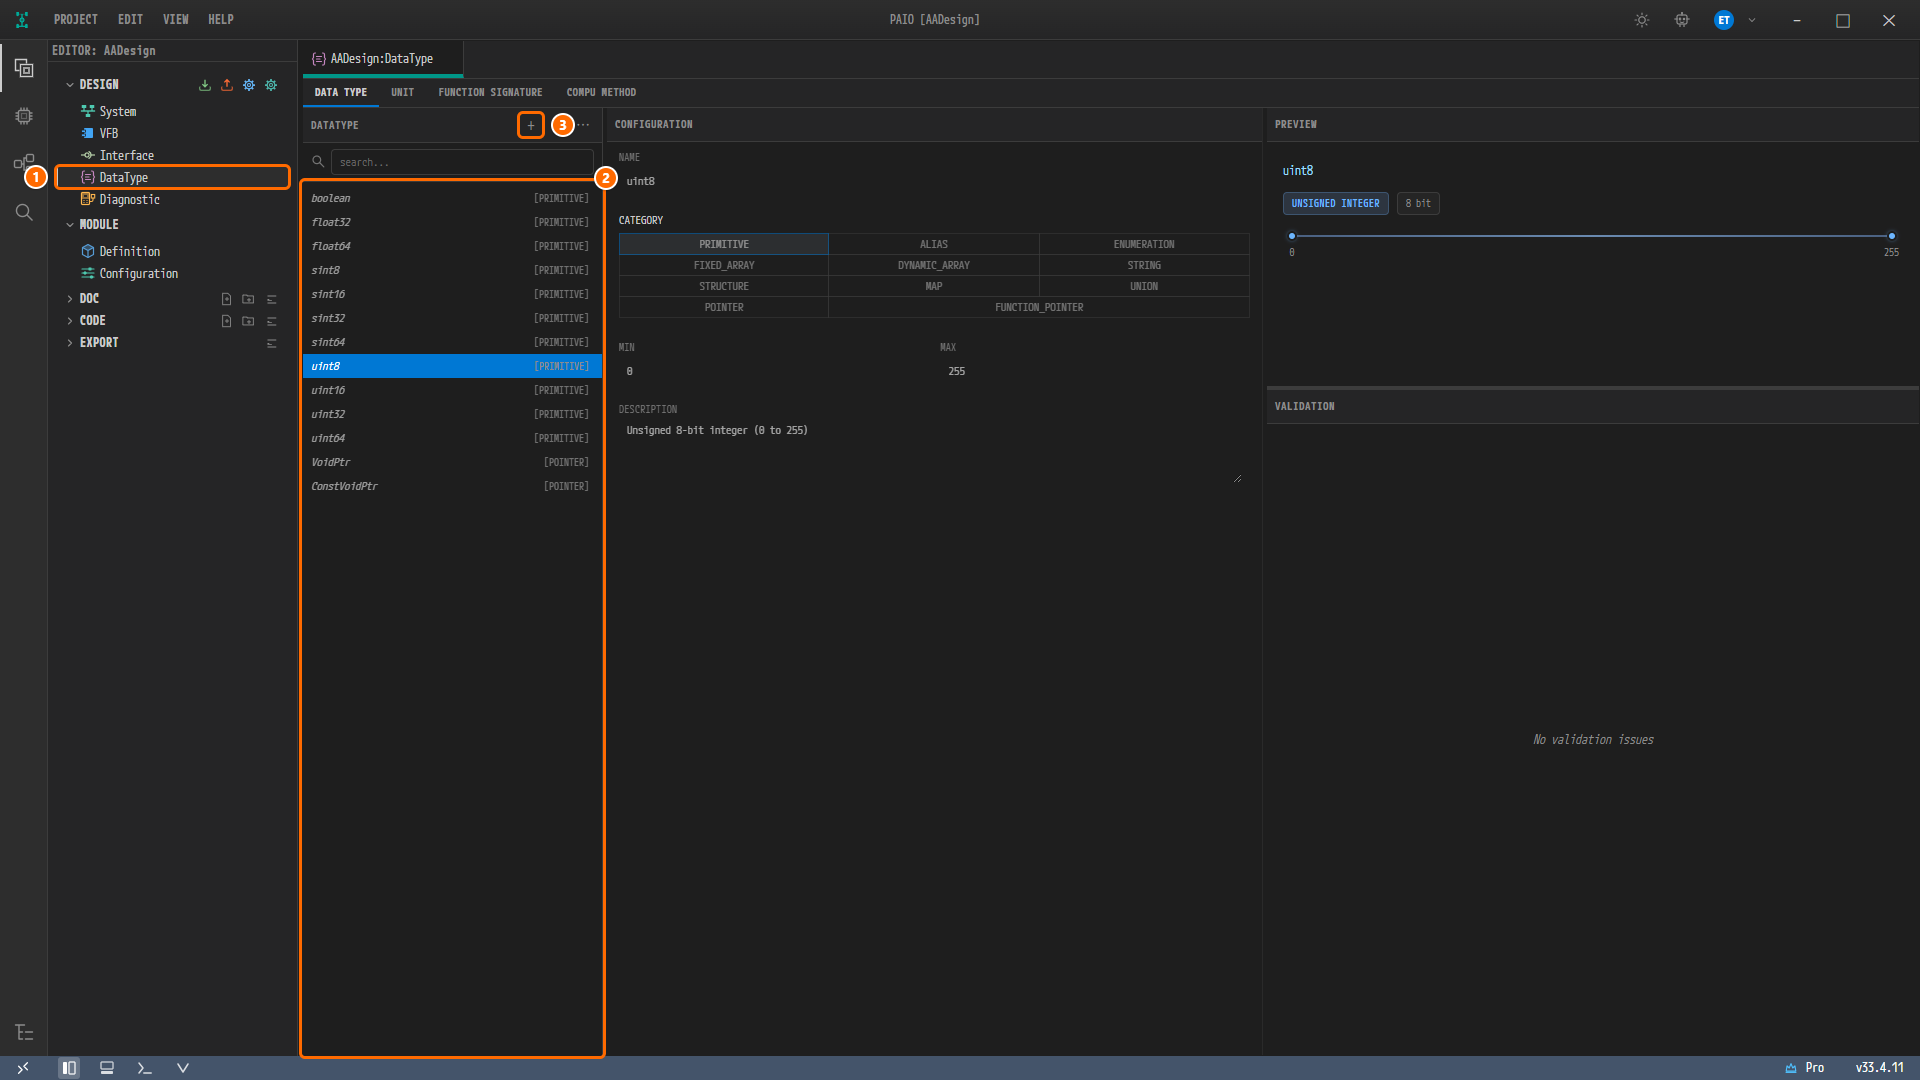
Figure 4-1. The DataType editor as first opened. ① The DataType row under DESIGN in the EDITOR view, ② the DATATYPE list with the 13 built-in types (
uint8selected), ③ the + button in the list header (tooltipAdd DataType). PREVIEW at the top right showsuint8with the badgesUNSIGNED INTEGERand8 bitand a range slider0to255; VALIDATION at the bottom right showsNo validation issues.
The editor has three areas. The DATATYPE list on the left has the buttons + (Add DataType), − (Delete selected DataType) and ⋯ (More actions) at the right of its header, and a search field (hint search...) below it. The middle is CONFIGURATION; on the right, PREVIEW is at the top and VALIDATION at the bottom. This chapter uses only the + button and the CONFIGURATION panel. The UNIT, FUNCTION SIGNATURE and COMPU METHOD tabs, −, ⋯ and the search field are not used.
Note. The 11 primitives are built-in types that PAIO keeps in memory only. They are not written to
DATATYPE.io.model, and the exporter always re-inserts them in ARXML Export.VoidPtrandConstVoidPtrare the two platform pointer types; like the primitives, they are built in, kept in memory only, not written to the file and re-inserted by the exporter. None of the 13 can be renamed or deleted, and the only types you create areByteArrayandStringbelow.
Creating ByteArray — DYNAMIC_ARRAY
The first type, ByteArray, is shown step by step. The order is: enter the name first, pick the category, then fill in the remaining fields. The C++ NAMESPACE, ELEMENT TYPE and MAX SIZE fields are not visible until a category is picked.
Adding the Entry
-
Click the + button in the header of the DATATYPE list. A new entry
DataType13appears at the bottom of the list and is selected immediately. It has no badge yet. -
Look at the CONFIGURATION panel. NAME is
DataType13, nothing is selected in the CATEGORY toggle, and the red hintCategory is requiredis shown below it. DESCRIPTION is empty.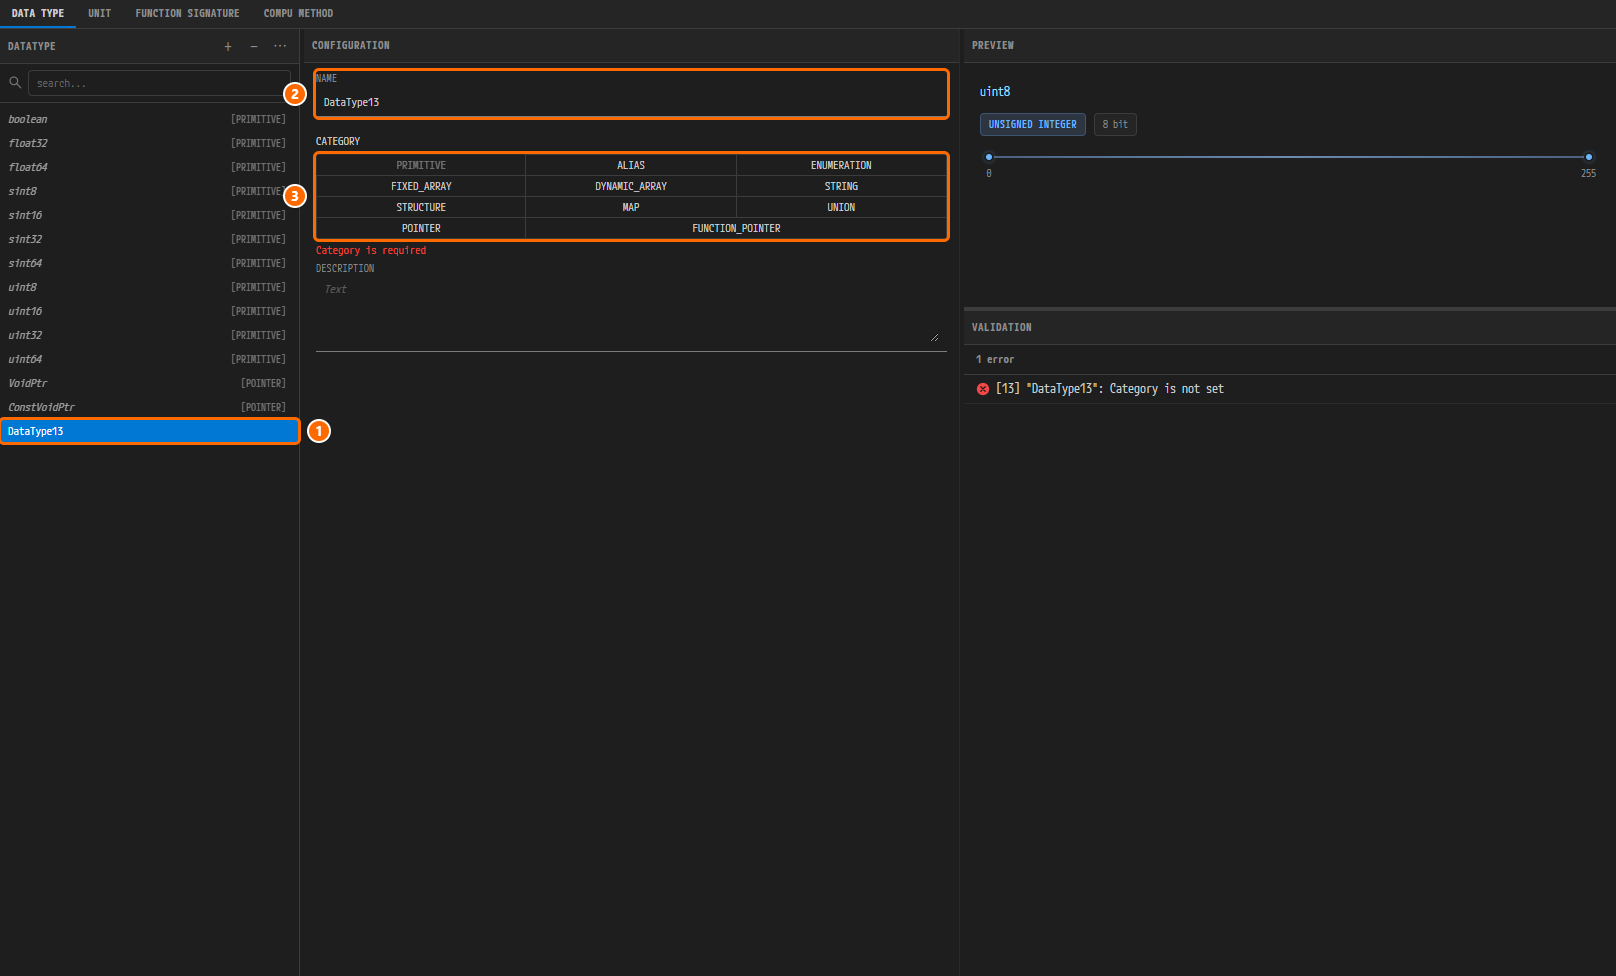
Figure 4-2. The editor right after adding the new entry. ① The
DataType13row at the bottom of the list, ② NAME =DataType13, ③ the CATEGORY toggle with nothing selected and the redCategory is requiredbelow it. VALIDATION shows1 errorand[13] "DataType13": Category is not set, and the tabAADesign:DataType, outside the figure, carries the modified mark ●. PREVIEW still shows the previously vieweduint8.
The name of a new entry is assigned automatically as DataType followed by the current list length, such as DataType13. The CATEGORY toggle has eleven cells, PRIMITIVE, ALIAS, ENUMERATION, FIXED_ARRAY, DYNAMIC_ARRAY, STRING, STRUCTURE, MAP, UNION, POINTER and FUNCTION_POINTER; PRIMITIVE is reserved for built-in types, so it is greyed and cannot be clicked. The [13] in the VALIDATION area is the entry's index in the list. PREVIEW switches to the new entry once a category is picked.
Entering the Name and Picking the Category
-
Change the value of the NAME field to
ByteArrayand press theTabkey. The row in the list changes toByteArrayas well. -
Click DYNAMIC_ARRAY in the CATEGORY toggle. The panel is redrawn: the C++ NAMESPACE field appears to the right of NAME, and the ELEMENT TYPE and MAX SIZE fields appear below CATEGORY. VALIDATION changes to
1 errorand[13] "ByteArray": Element Type is required. At the same time the V icon in the footer gets a red badge1: the project validation reports the errorconstr_1907(DYNAMIC_ARRAY datatype "ByteArray" has no element type.) until you pick the element type. -
Click the ELEMENT TYPE field. The field shows the hint
Type to search...and a dropdown with the 13 built-in types opens. About six rows are visible at a time, so scroll to finduint8. -
Click
uint8in the dropdown.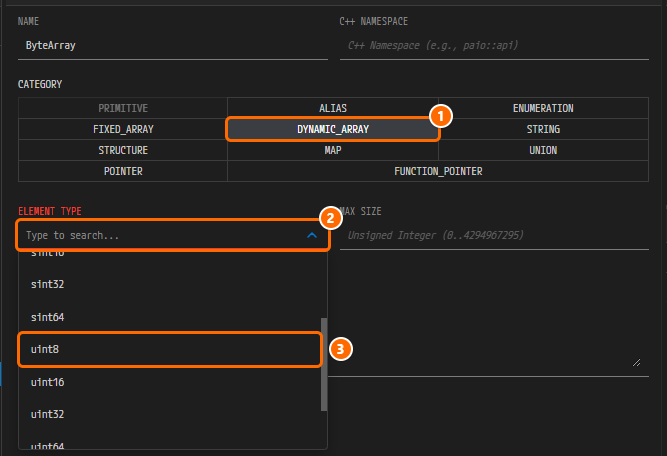
Figure 4-3. The CONFIGURATION panel with the ELEMENT TYPE dropdown open. ① DYNAMIC_ARRAY selected in CATEGORY, ② the ELEMENT TYPE field (hint
Type to search...), ③ theuint8row to click in the dropdown. The dropdown shows the rowssint32,sint64,uint8,uint16anduint32with a scrollbar on the right. NAME isByteArray; C++ NAMESPACE and MAX SIZE are still empty (hintsC++ Namespace (e.g., paio::api)andUnsigned Integer (0..4294967295)).
The dropdown lists every other type in this project. Right now that is only the 13 built-in types; String is not there because it has not been created yet. Once you pick uint8, the field shows uint8 with a clear × and an expand ⌄, VALIDATION returns to No validation issues, and the badge on the V icon disappears.
Entering the Max Size and the Namespace
-
Type
1in the MAX SIZE field (hintUnsigned Integer (0..4294967295)) and press theTabkey. -
Type
aa::typein the C++ NAMESPACE field (hintC++ Namespace (e.g., paio::api)) and press theTabkey.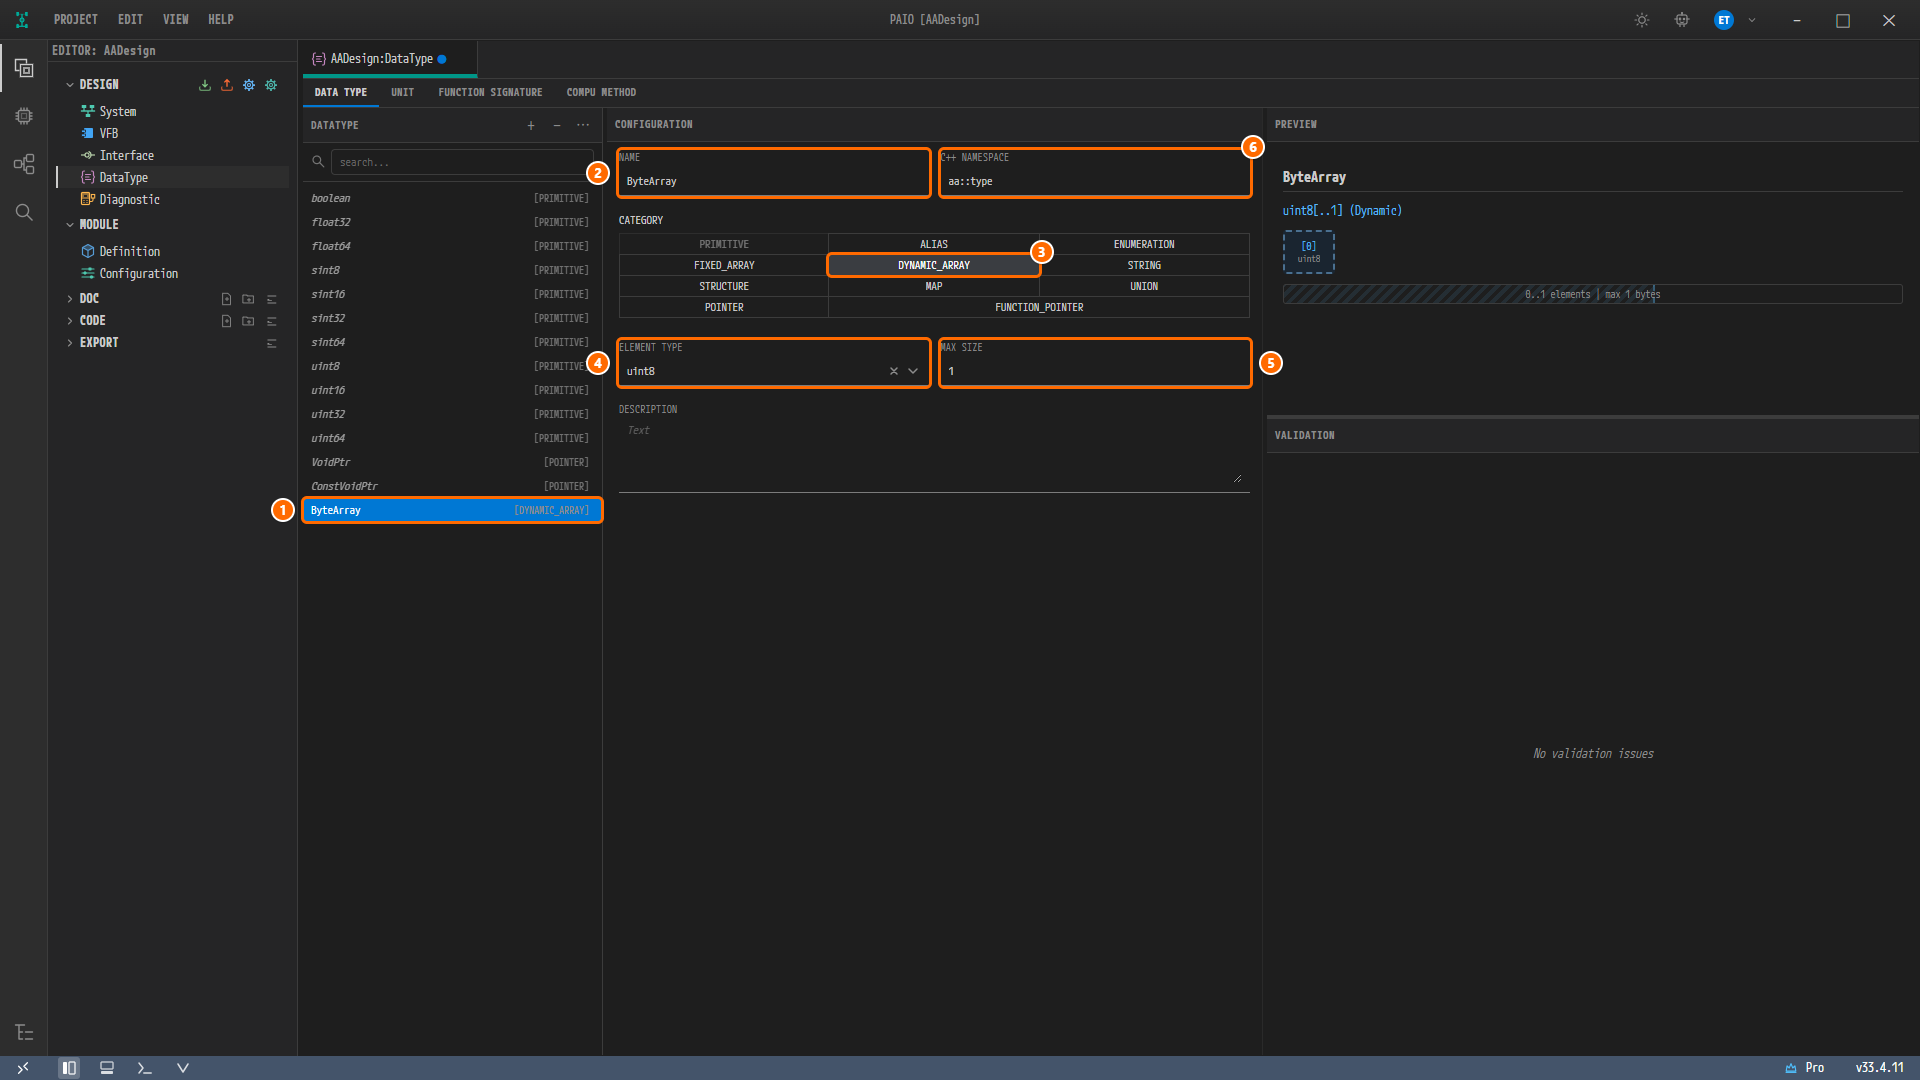
Figure 4-4. The editor with
ByteArraycomplete. ① TheByteArray [DYNAMIC_ARRAY]row in the list, ② NAME =ByteArray, ③ CATEGORY = DYNAMIC_ARRAY, ④ ELEMENT TYPE =uint8, ⑤ MAX SIZE =1, ⑥ C++ NAMESPACE =aa::type. PREVIEW showsByteArray, the blue textuint8[..1] (Dynamic), a single dashed box[0] uint8and the hatched bar0..1 elements | max 1 bytes; VALIDATION showsNo validation issues. The tab carries the modified mark ●.
Leave DESCRIPTION empty (hint Text). Confirm that the badge of the list row has changed to [DYNAMIC_ARRAY].
Creating String — STRING
Create the second type, String, the same way. When the category is STRING there is no ELEMENT TYPE field and MAX SIZE spans the whole row. The values are those in the table under "Before You Begin".
-
Click the + button in the header of the DATATYPE list. A new entry
DataType14appears at the bottom of the list and is selected. -
Change the value of the NAME field to
Stringand press theTabkey. -
Click STRING in the CATEGORY toggle. The fields become NAME, C++ NAMESPACE, CATEGORY, MAX SIZE and DESCRIPTION, and VALIDATION shows
1 warningand[14] "String": Max Size not set, default 255 will be applied. The V icon in the footer gets an orange badge1for the matching project validation warningconstr_1093(STRING datatype "String" has no maximum size (swMaxTextSize).). -
Type
256in the MAX SIZE field and press theTabkey. VALIDATION returns toNo validation issues, and the badge on the V icon disappears. -
Type
aa::typein the C++ NAMESPACE field and press theTabkey.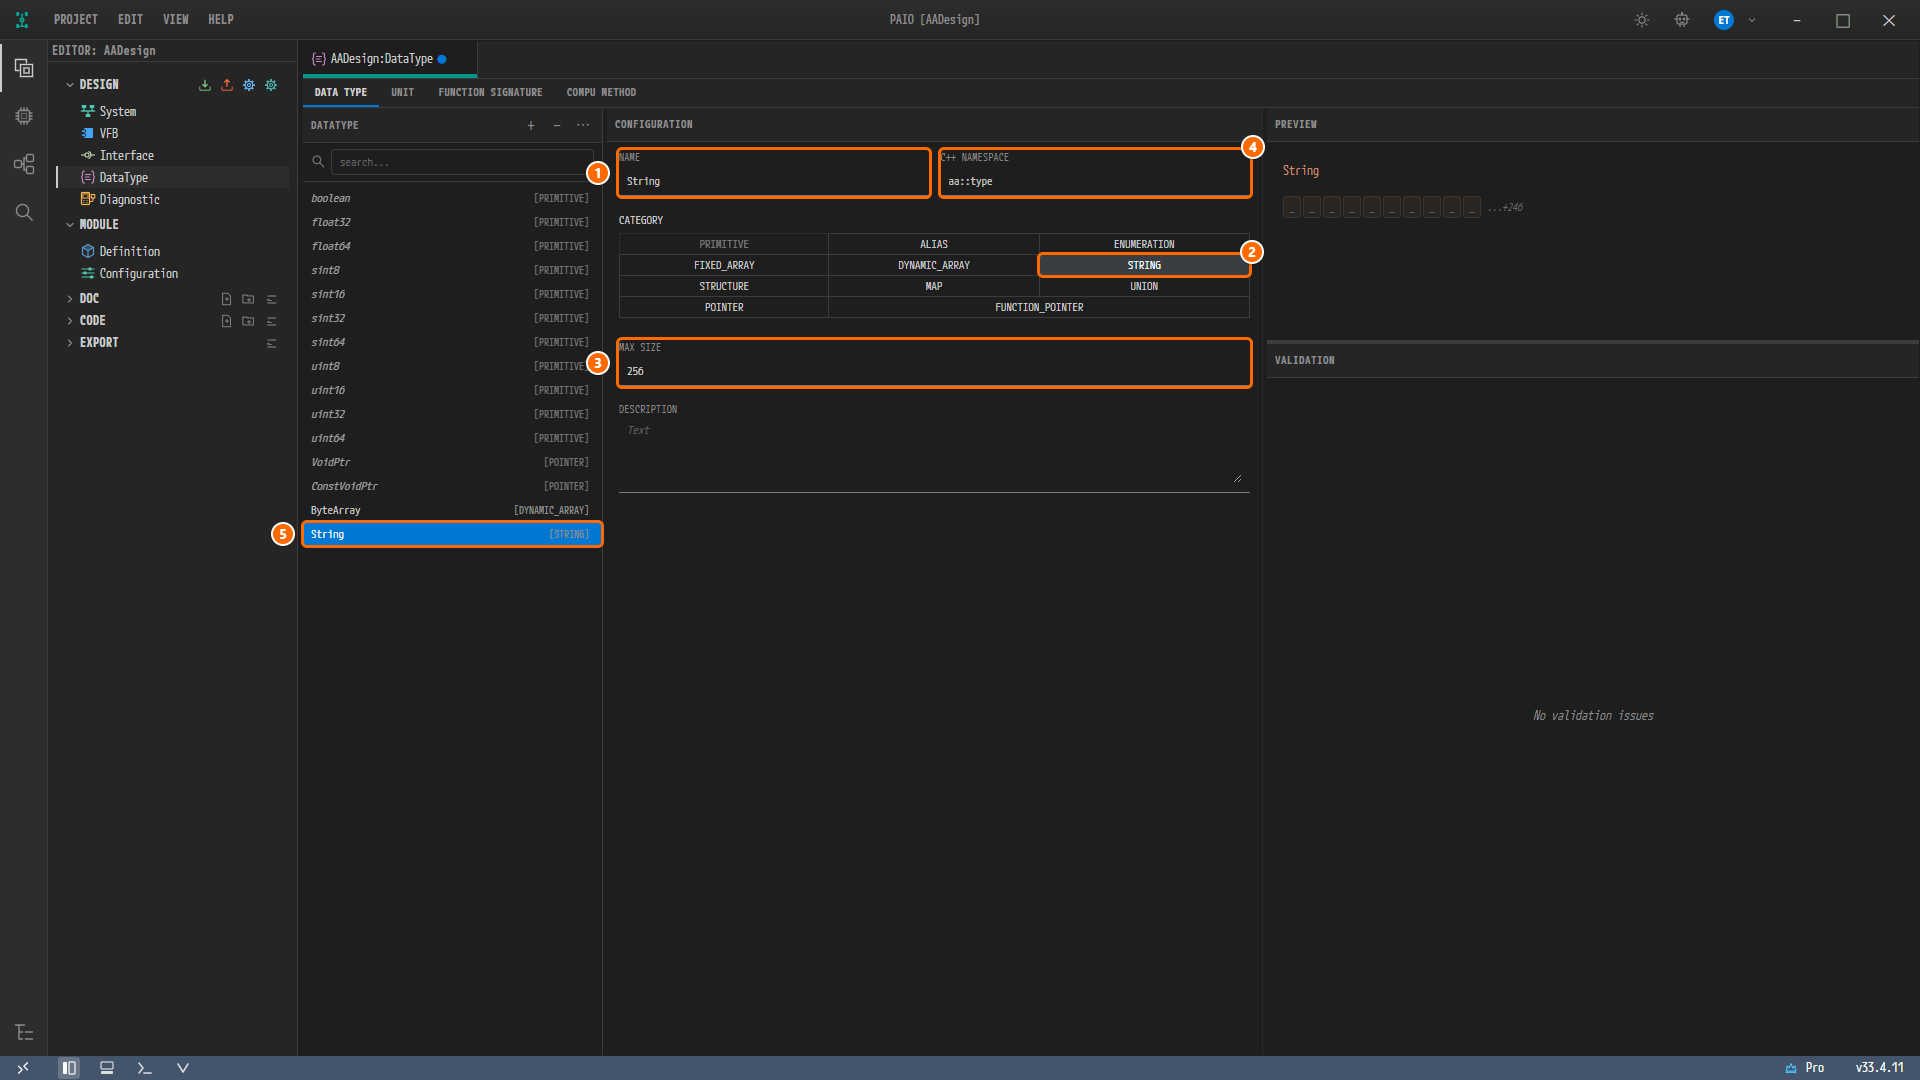
Figure 4-5. The editor with
Stringcomplete. ① NAME =String, ② CATEGORY = STRING, ③ MAX SIZE =256, ④ C++ NAMESPACE =aa::type, ⑤ theString [STRING]row in the list. TheByteArray [DYNAMIC_ARRAY]row is above it. PREVIEW showsStringwith 10 character cells_and...+246; VALIDATION showsNo validation issues.
Caution. If you leave MAX SIZE empty, you only get a warning, in the editor and as
constr_1093in the VALIDATION panel, and the entry is still saved. In that case, however, the default255is applied and the result differs from the reference design, so be sure to enter256.
Saving
-
Click an empty spot in the DATATYPE list, below the last row, to leave the input field. The last value you typed is committed, and
Stringstays selected. -
Press
Ctrl+S. The modified mark ● on the tabAADesign:DataTypedisappears anddesign/DATATYPE.io.modelis created. -
Look at the list. Below the 13 built-in types are
ByteArray [DYNAMIC_ARRAY]andString [STRING], 15 entries in all.Stringis still selected after the save. ClickByteArrayto check that its values were kept.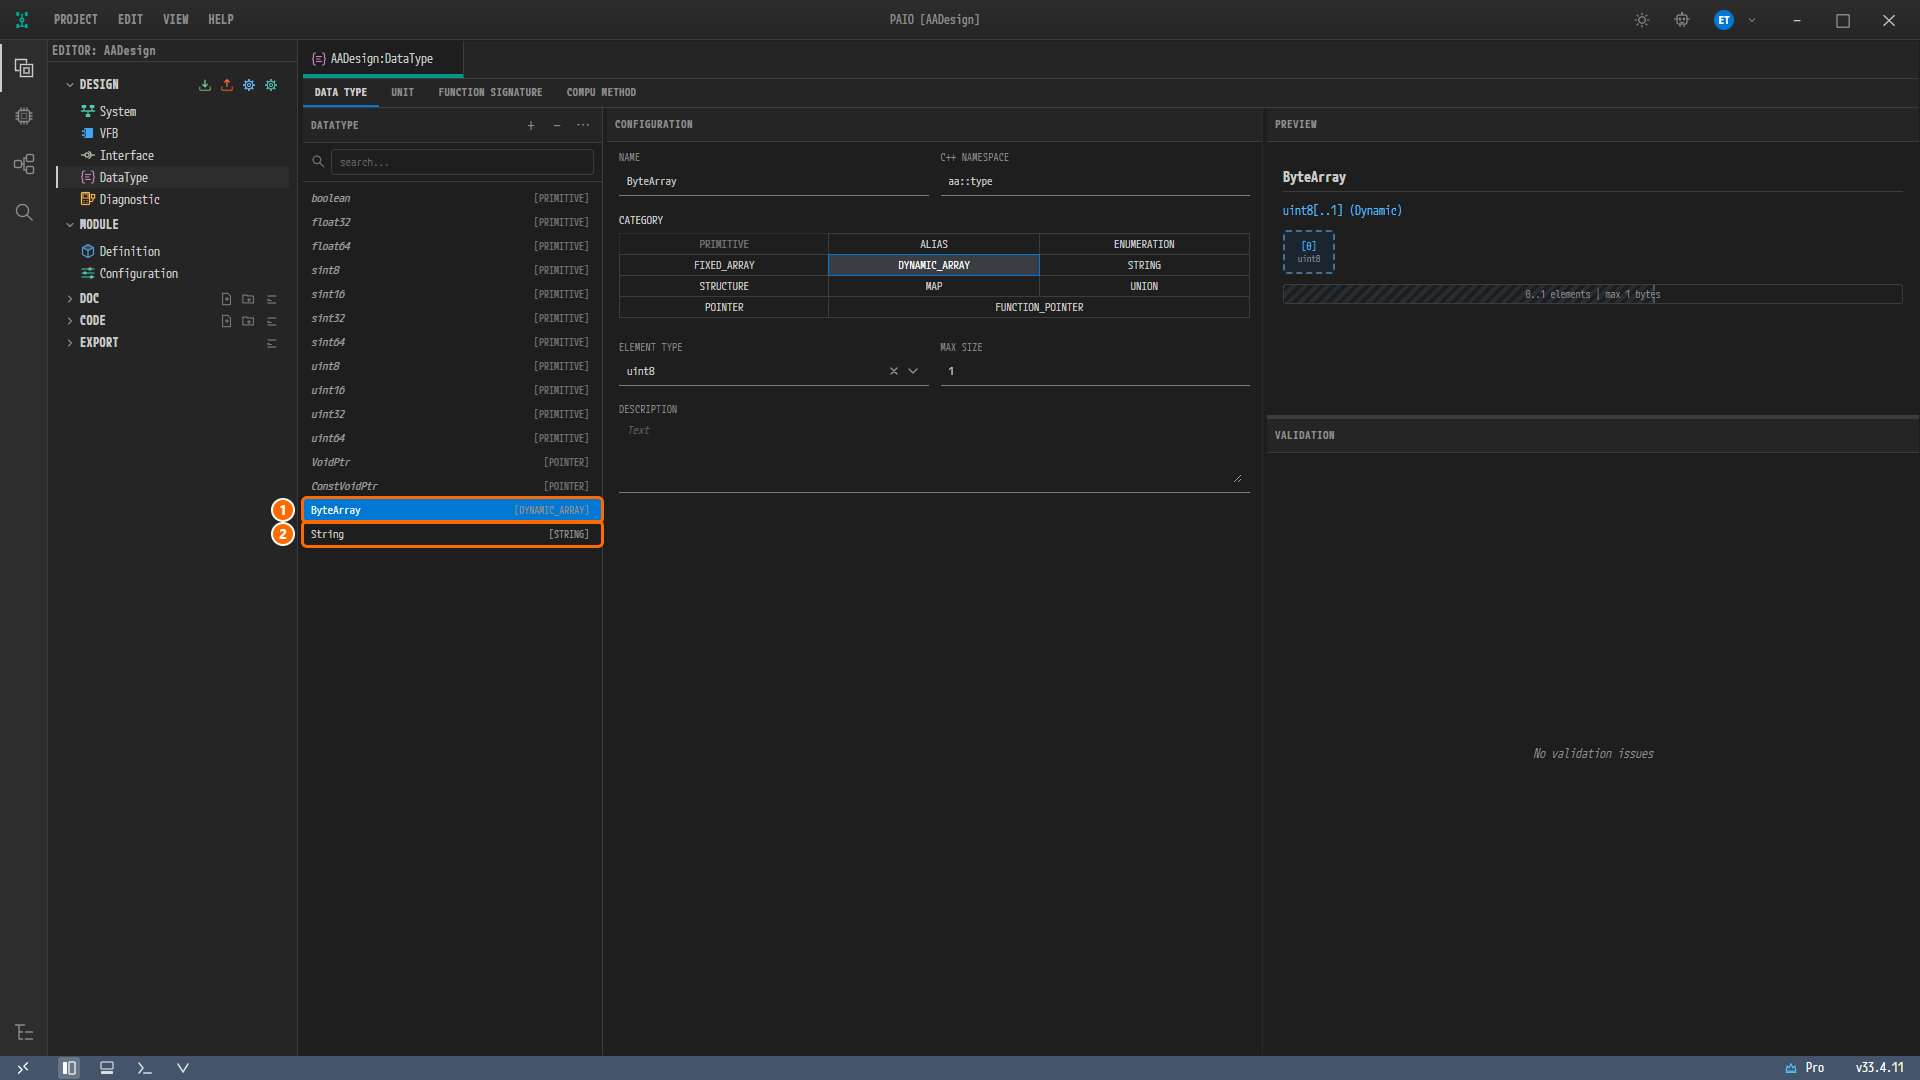
Figure 4-6. The editor after saving, with
ByteArrayclicked again. ① TheByteArray [DYNAMIC_ARRAY]row, ② theString [STRING]row. The tabAADesign:DataTypehas no modified mark ●, and CONFIGURATION and PREVIEW are the same as in Figure 4-4.
The EDITOR view does not change. The DataType row under DESIGN is always shown whether or not the file exists, so it does not tell you that the file was created. The saved design/DATATYPE.io.model looks like this (date fields omitted).
{
  "$schema": "https://autosar.io/schemas/datatype.schema.json",
  "version": "2.0.0",
  "type": "PAIO-datatype",
  "metadata": {},
  "data-types": {
    "data-type": [
      { "short-name": "ByteArray", "category": "DYNAMIC_ARRAY", "type-reference-ref": "uint8", "array-size": 1, "name-space": "aa::type" },
      { "short-name": "String", "category": "STRING", "max-size": 256, "name-space": "aa::type" }
    ],
    "units": []
  }
}
data-type holds only the two entries; the 13 built-in types are absent. An empty DESCRIPTION is not written at all, not even as a key.
Viewing the Validation Result
-
Look at the V icon in the footer at the bottom of the window, the fifth icon from the left. It carries no badge, but its tooltip still reads
Validation: 0 error(s), 1 warning(s), 0 info(s), the last non-zero count; the VALIDATION panel shows the current result. -
Look at the VALIDATION panel. If it is closed, click the V icon in the footer.

Figure 4-7. The VALIDATION panel after saving the data types. The header has no badge, and below the column headers ELEMENT TYPE, NAME, DESCRIPTION and CONSTR there is the single line
No validation issues..
As at the end of chapter 3, the project validation has no findings. The VALIDATION area at the bottom right of the editor is the DataType editor's own check, while this panel is the project-wide validation; they are two different things. The project validation also re-runs while you edit, before you save, which is why constr_1907 and constr_1093 appeared while ELEMENT TYPE of ByteArray and MAX SIZE of String were still empty.
Why Is It Designed This Way?
ByteArrayis a variable-length array ofuint8, and it is created before the Service Interface. In the reference design,ByteArrayis aVECTORofuint8_t(ARRAY-SIZE1) in the namespaceaa::type, and the eventSensorDataof the service interfaceSensoruses this type. The type dropdown of the Interface editor lists only the types that exist in the DataType editor, which is why this chapter comes before chapter 5. The editor'suint8comes out under its C++ nameuint8_tin ARXML Export.- The 11 primitives are not entered. Of the 13
STD-CPP-IMPLEMENTATION-DATA-TYPEelements in the reference design, 11 (bool,float,double,int8_t…uint64_t) correspond to the editor's built-in primitivesboolean,float32,float64,sint8…uint64. Their names, descriptions andTYPE-EMITTER/HEADER-FILEare rules applied by the exporter, not something you enter. The CP-side elements such asSW-BASE-TYPE,IMPLEMENTATION-DATA-TYPE,APPLICATION-*-DATA-TYPEandDATA-TYPE-MAPPING-SETare also generated automatically by the exporter. Stringis created although no interface uses it. This keeps the 13 types of the reference design exactly. Without it, the export would contain 12 C++ implementation types.MAX SIZEofStringis256. TheStringof the reference design has noARRAY-SIZE, but leaving the field empty applies the default255.256equals the string size of the CP-side mirror in the reference design. In return, your export carriesARRAY-SIZE 256onSTD-CPP-IMPLEMENTATION-DATA-TYPE StringandSW-TEXT-PROPSonAPPLICATION-PRIMITIVE-DATA-TYPE String, which the reference design does not have. This is a normal difference and is explained again in ARXML Export. TheSTD-CPP-IMPLEMENTATION-DATA-TYPEByteArraymatches the reference design. TheIMPLEMENTATION-DATA-TYPEelements of both types and theAPPLICATION-ARRAY-DATA-TYPEByteArraycome out in PAIO's variable-size array form, with the same sizes1and256; that chapter explains this too.- The C++ namespace
aa::typeis entered on both types. This value becomes theNAMESPACESof the export (twoSYMBOL-PROPS,aaandtype). If you leave it empty, no namespace appears in the export.
Checklist
- The DATATYPE list of the tab
AADesign:DataTypeholds 15 entries: below the 11 italic[PRIMITIVE]entries and the 2 italic[POINTER]entries areByteArray [DYNAMIC_ARRAY]andString [STRING]. - Clicking
ByteArrayshows NAMEByteArray, C++ NAMESPACEaa::type, CATEGORY DYNAMIC_ARRAY, ELEMENT TYPEuint8, MAX SIZE1, and PREVIEW showsuint8[..1] (Dynamic). - Clicking
Stringshows NAMEString, C++ NAMESPACEaa::type, CATEGORY STRING, MAX SIZE256, and there is no ELEMENT TYPE field. - DESCRIPTION is empty for both types and the editor's VALIDATION area shows
No validation issues. - The tab
AADesign:DataTypehas no modified mark ● and the filedesign/DATATYPE.io.modelexists. - The VALIDATION panel shows
No validation issues.and the header has no badge.
Next Step
In Service Interface you use the Interface editor to create the service interface Sensor and pick the ByteArray created in this chapter as the type of the event SensorData.