Installation, Login and License
What This Chapter Covers
This chapter explains how to install PAIO and run it for the first time, how to sign in with your account, and which features open or close depending on the license state. It also covers update notifications, how to check the app version, and where to report issues. It is written for users who are installing PAIO for the first time and for users who need to check a license state. You need the installer package you received and the Google account or email address you want to use. There is no separate account request to file: the first time you sign in, the account is created automatically and starts on a trial.
The installer package names and the list of supported platforms are in 02. Specifications. This chapter covers the procedure for installing that package and starting to use it.
3.1 Installation
3.1.1 Windows — Installer (NSIS)
-
Run
PAIO-win-x64.exe. The installer is per-user, so it does not ask for administrator elevation (UAC) and it does not show a screen such as "all users of this computer". -
If PAIO is already installed, the Program Maintenance screen appears first. Choose one of three options.
Option What the screen says What actually happens Modify (selected by default) Reinstalls with the current settings. User data and settings are kept Continues with the normal installation procedure Repair Repairs missing or damaged files. User data and settings are kept Continues with the normal installation procedure Remove Removes PAIO from this computer Runs the existing uninstaller and, once removal finishes, exits the installer as well (no installation is performed) PAIO has no optional components, so Modify and Repair perform the same procedure. Only the wording differs; the result is identical.
-
On the License Agreement screen, read the terms and select I agree to the License Agreement. Both radio buttons are cleared at first, and the button for the next step stays disabled until you select I agree to the License Agreement.
-
Specify the installation folder. The default is
%LOCALAPPDATA%\Programs\PAIO, and you can change it. -
On the last screen, the Create a desktop icon checkbox is selected by default.
Note that the installer UI language is fixed to English (it appears in English even when the Windows display language is Korean). Uninstalling does not delete user data.
3.1.2 Windows — Portable Use (ZIP)
To use PAIO without installing it, extract PAIO-win-x64.zip to any location and run
PAIO.exe. This method creates no shortcut and no Start menu entry.
3.1.3 macOS
- Open
PAIO-mac-x64.dmg(Intel) orPAIO-mac-arm64.dmg(Apple Silicon) and drag PAIO into the Applications folder. - A Gatekeeper warning appears on first launch, because the macOS build is neither code-signed
nor notarized. Allow it to run in System Settings ▸ Privacy & Security.
If the message says the app cannot be opened because it is damaged, run
xattr -dr com.apple.quarantine /Applications/PAIO.appin the terminal and open it again.
3.1.4 Linux
- Debian/Ubuntu: install with
sudo dpkg -i PAIO-linux-x64.deborsudo apt install ./PAIO-linux-x64.deb. The icon and the.desktopentry are registered system-wide at the same time. - tar.gz: extract
PAIO-linux-x64.tar.gzto any location and run the executable. This method registers nothing with the system, so the app registers itself on first launch.- It creates
~/.local/share/applications/paio.desktop. - It copies icons in eight sizes (16, 24, 32, 48, 64, 128, 256, 512) to
~/.local/share/icons/hicolor/<size>/apps/paio.png.
- It creates
3.1.5 Installation Integrity Check (Windows Only)
Right after launch, PAIO checks the code signature (Authenticode) of PAIO.exe itself in the
background. This check runs only on Windows installations. It takes about a second, so if a
lock is applied, the notice appears after the window is already open. The behavior for each
result is as follows.
| Check result | Behavior |
|---|---|
Valid signature with signer POPCORNSAR Co.,Ltd. | Runs normally |
| No signature | Runs normally |
| Undecidable, such as an expired certificate or an unreachable revocation server | Enforces nothing and runs normally |
| Hash mismatch (the executable was modified after signing) | Feature lock |
| Re-signed by a different signer | Feature lock |
The notice shown when the lock is applied, and the location of the diagnostic file, are in 20. Troubleshooting and FAQ 20.1.
A lock does not shut the app down. Instead, editing features are fixed to read-only for the session, and the following message appears once.
PAIO could not verify the integrity of its installation.Please reinstall PAIO. Editing is disabled for this session.
A valid license does not release this lock. Export is also refused in this state (see 3.4.5). Reinstalling an official build is the only remedy.
3.2 First Launch — Sign In
PAIO does not build the main screen (the editor layout) until authentication is confirmed. The
login screen appears as a full-screen overlay; at that point the top of the window holds only
the logo, the centered PAIO title, and the window controls (minimize / maximize / close). The
working screen with the sidebar, editors, and status bar is built only after you sign in.
PAIO does not use passwords (passwordless). There are two sign-in methods: a Google account and an email one-time code (OTP).
3.2.1 The Login Screen
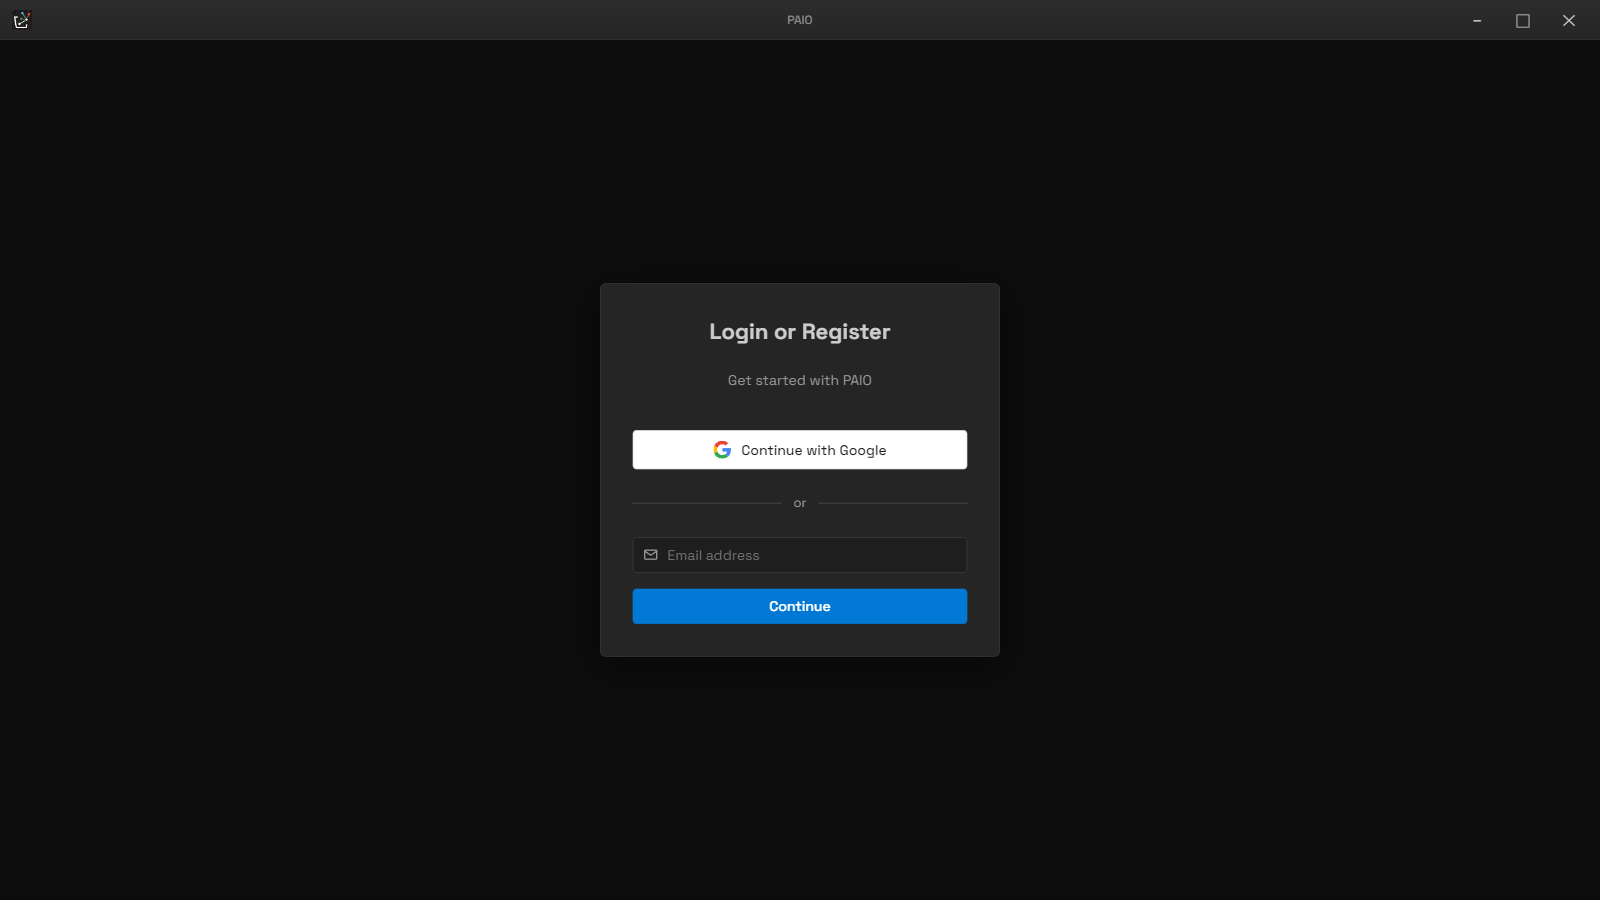
The login screen. Until authentication finishes, this screen covers the whole window and the working screen behind it is not built.
The screen title is Login or Register and the subtitle is Get started with PAIO. A
Continue with Google button, a divider, an email field, and a Continue button are laid
out in that order. If the value is empty or has no @, Please enter a valid email address.
appears and no request is sent. The error message disappears once you correct the input.
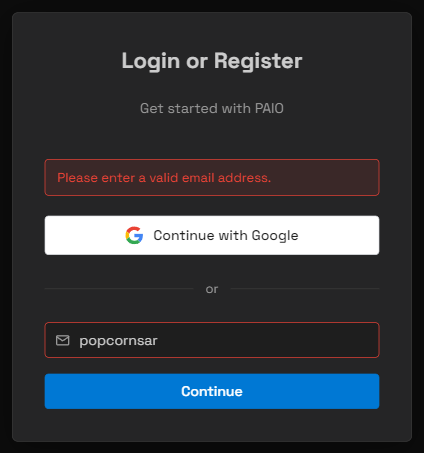
Clicking Continue with a value that has no @. The error message stays at the top of the card and the field border turns red.
3.2.2 Method 1 — Google Account
- Click Continue with Google. The system browser opens and shows the Google sign-in screen brokered by the PopcornSAR authentication server. The Google authentication keys are not bundled in the app.
- Finish authenticating in the browser.
- The app waits and checks for approval on its own, and signs you in automatically once approval is confirmed. You do not need to paste anything from the browser into the app. While the app waits, the buttons and the field on the login screen stay disabled.
- If you do not finish authenticating within 10 minutes, the wait ends and the login screen simply remains. No error message appears in this case. Click Continue with Google again.
3.2.3 Method 2 — Email One-Time Code (OTP)
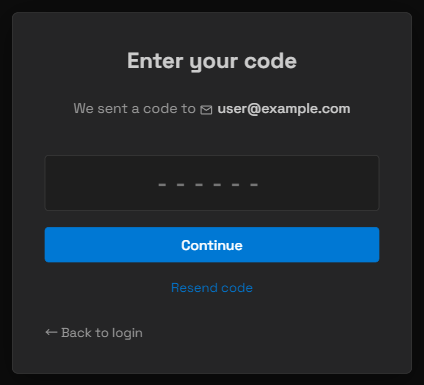
The Enter your code screen. The subtitle shows the address the code was sent to (the figure uses an example address).
- Enter your email address and click Continue. If sending fails, the reason returned by the server appears.
- Once sending succeeds, the Enter your code screen opens. The subtitle shows the address the code was sent to.
- Enter the 6-digit number you received by email and click Continue. The field accepts
digits only and is limited to 6 characters. If the value is not 6 digits,
Please enter a valid 6-digit code.appears and nothing is sent. The code is valid for 10 minutes after it is sent, and it cannot be reused once it has been used. - If the code is wrong or the validity period has passed,
Invalid or expired codeappears. - If the code does not arrive, click Resend code. This button is disabled for 60 seconds
from the moment you reach the screen, and the remaining time appears in seconds on the button
label, as in
Resend code (59s). - Click Back to login to return to the first screen.
When authentication succeeds, the login screen disappears and the working screen appears immediately. Check the account and the license state under the user icon on the right of the top bar ▸ Profile (see 3.3).
3.3 User Menu and Profile
Click the user icon on the right of the top bar to open a menu made up of Profile, a divider, and Sign Out. The icon shows the initials taken from the user name (up to two characters).

The user menu on the right of the top bar. The avatar shows the initials taken from the name.
Select Profile to open the profile screen. It shows the following items.
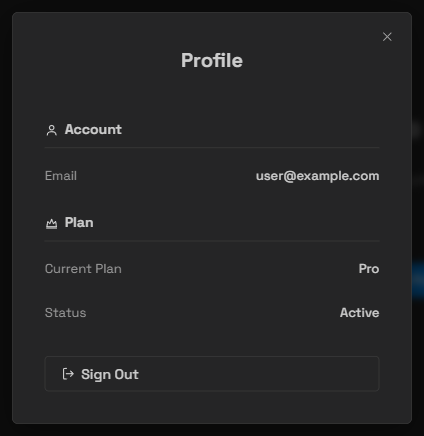
The Profile screen. No value here can be edited (the figure uses an example address).
| Section | Item | Content |
|---|---|---|
| Account | The email of the signed-in account (read-only) | |
| Plan | Current Plan | Trial / Pro / Enterprise |
| Plan | Status | Active / Expired / Read-only, with (n days left) appended when the days remaining are known |
A Sign Out button sits at the bottom of the screen. Close the profile screen with the close button at the top right. No value on the profile screen can be edited.
If any tab has unsaved changes when you click Sign Out, a confirmation dialog appears. Its title is Sign Out and its buttons are Save & Sign Out / Sign Out / Cancel. If there is nothing to save, PAIO signs out immediately without asking.
3.4 License and Feature Restrictions
3.4.1 Plans and States
Permissions turn on and off according to the
license state. There are four plans — none,
trial, pro, enterprise — and four states — trial, active, expired, readonly.
Permissions are decided by the state, not the plan. Only expired and readonly are
restricted states; all the others carry full permissions.
readonlyis used when the integrity check in 3.1.5 has locked the feature gate. A license response does not overwrite this state.- The trial period runs for 30 days from the first sign-in in the app. The reference point is the first sign-in time, not the day you downloaded or installed PAIO. The days remaining are calculated from the trial expiry date returned by the server.
3.4.2 Permission Table
The actions allowed in each state are as follows.
| State | Read | Modify | Create | Delete | Export | Import |
|---|---|---|---|---|---|---|
trial / active | O | O | O | O | O | O |
expired / readonly | O | X | X | X | X | O |
- Import is allowed in every state. Even in an expired state you can read in ARXML or DBC files and view their content.
- The AI assistant is also unavailable in a restricted state. The chatbot can modify project
files, so it passes the same gate as editing. It is blocked differently from the other
features, though: instead of the upgrade dialog, the chatbot button on the top bar turns
disabled and its tooltip becomes
Plan expired. The chat field is disabled as well, with the noticePlan expired — upgrade to continue.
3.4.3 What You See Without Permission
If you attempt an action without permission, the license lock blocks it and the Upgrade Required dialog appears.
The dialog shows three plan cards.
| Card | Price shown | Badge | Button at the bottom of the card |
|---|---|---|---|
| Trial | Free | Recommended | None |
| Pro | Contact | None | Coming Soon |
| Enterprise | Custom | OEM / Tier 1 | Contact Sales |
The card for the plan you are on now carries a Current badge instead of the badge above, and its border is emphasized.
Clicking the button at the bottom of a card opens the support Q&A page
(https://autosar.io/support/qna) in the system browser. The Later button below closes the
dialog.
Items whose display and behavior differ: There is no path inside the app that leads to a payment, and no screen for entering a license key. Purchase and renewal are handled by inquiry through the link above.
When a license changes from active to expired, the same dialog covers the screen in a form you cannot close. The close button and Later disappear, and the dialog covers the screen except for the title bar at the top. The dialog closes automatically once the license becomes active again.
3.4.4 Checking the License State
The current license is shown at all times on the right of the status bar. The tooltip is Click to manage license. The display for each state is as follows.

The license indicator on the right of the status bar. Clicking it opens a different window depending on the plan.
| State | Status bar display |
|---|---|
expired / readonly | License Expired |
| 7 days or fewer until expiry | The plan name and the days remaining (for example Pro - 3 days, Trial - 3 days) |
| Trial (more than 7 days remaining) | Trial — <n>d; Trial when the days remaining are unknown |
| Anything else | The plan name (Pro, Enterprise) |
Clicking the indicator opens a different screen depending on the current plan.
| Current plan | On click |
|---|---|
trial | The Upgrade Required dialog (3.4.3) |
| Anything else | The License Info dialog |
The title and the contents of the License Info dialog change with the state.
| State | Title | Additional elements |
|---|---|---|
| Active | License Info | None |
| 7 days or fewer until expiry | License Expiring Soon | A warning message and a Renew Pro button |
| Expired | License Expired | An error message and a Renew Pro button |
The items shown are Plan, Expires (Expired when the license has expired), and
Remaining (the days remaining), which appears only when the license has not expired. At
7 days or fewer until expiry, Remaining appears in the warning color. Click Renew Pro to
open the upgrade dialog from 3.4.3. Close the dialog with the close button, a click outside it,
or Esc.
3.4.5 Offline Behavior and Export
License information is cached locally in encrypted form, and the cache is valid for 4 hours.
- Even without a server connection, you can keep working with the permissions last confirmed for as long as the cache is valid.
- If the server explicitly responds that the license is not valid, PAIO discards the cache immediately and switches to the locked state. In this case the offline cache cannot bring the permissions back.
- The app re-checks the license right after startup, when the window regains focus, and when you sign in again after signing out. It does not check periodically.
Unlike the other actions, export checks the license once more every time it runs. Project Export (full ARXML), Extract ECU, Extract Machine, and DataType export all pass this check. The cases that are refused and their messages are as follows.
| Situation | Message |
|---|---|
| An installation caught by the integrity check | INTEGRITY_EXPORT_DENIED: Installation integrity check failed |
| The server is unreachable and no usable cache exists | OFFLINE_EXPORT_DENIED: A server connection is required |
| The server judges the signed-in state invalid (for example, the session was cut by a sign-in on another device) | PLAN_EXPIRED: Export is not permitted on this plan |
In an expired state the export menu itself is blocked first by the upgrade dialog from 3.4.3, so the three messages above are results you see after passing the menu.
The messages are shown in the error list of the export result. The export procedure itself is covered in 13. Import and Export.
3.4.6 Session Invalidation
One account can be used on one device at a time. Signing in with the same account on another device invalidates the session on this device. Signing in again on the same device continues the existing session, so it is not invalidated. The app has no registered-device list and no remote release function; a device that has been pushed out simply signs in again on that device.
This device notices the invalidation at the next license re-check (3.4.5). The notification window therefore appears not right after the sign-in on the other device, but when you click this device's window to activate it again or restart the app.
- If no tab has unsaved changes, the Signed in on Another Device notification window appears.
Its body is
You've been signed out because your account was used on another device., and clicking OK signs you out and returns you to the login screen. - If a tab has unsaved changes, a save confirmation window with the same title appears first. Its buttons are Save & Sign Out and Sign Out, and there is no cancel. If saving fails, a Save Failed window asks whether to retry.
3.5 Update Notifications
PAIO's update notifications only tell you that a new version is available. The app neither downloads nor installs it on its own.
- The app reads only the latest version string from the distribution feed and compares it with the current version.
- The first check runs once after you finish signing in and the working screen appears. No check runs while you stay on the login screen. After that it repeats at 6-hour intervals.
- When a new version exists, a download icon appears on the right of the status bar. Its
tooltip is
Update available · <version>. The icon disappears when you are up to date or the check fails. - The first time a background check finds a new version, a Software Update toast appears once
at the bottom right. Its body is
PAIO <version> is now available.and its buttons are Later and Download. Later background checks leave only the indicator and do not raise the toast again. Background checks do not report an up-to-date result or a failed check. - The once-per-session limit applies only to this background toast. The manual check below does not consume the limit, and a result toast appears every time you check, however many times you check.
- To check manually, select
Help ▸ Check for Updatesor click the download icon on the status bar. Clicking the indicator re-runs the check rather than opening the download page. A manual check always shows the result as a toast, including an up-to-date result and a failure.
| Manual check result | Toast body | Buttons |
|---|---|---|
| A new version exists | PAIO <version> is now available. | Later, Download |
| Up to date | PAIO is up to date. | OK (disappears automatically after 5 seconds) |
| Check failed | Update check failed: <reason> | Dismiss (disappears automatically after 10 seconds) |
Clicking Download opens the download page (https://autosar.io/support) in the system
browser. Install it yourself by following the procedure in 3.1. The strings that appear in place
of <reason> in the failure toast, and what they mean, are listed in
20.12.
3.6 Checking App Information
Select Help ▸ About PAIO to open the information dialog. Its title is PopcornSAR PAIO, and
it shows Version: <version>, the product description, contact guidance with the address
contact@popcornsar.com, and the copyright notice. You can close it with the OK button, the
close button at the top right, a click outside it, or Esc.
The current version is also shown at all times at the far right of the status bar, in the form
v0.5.0.
3.7 Support and Issue Reports
To ask a question or report an issue, select Help ▸ Report Issue at the top of the app. The
support Q&A page (https://autosar.io/support/qna) opens in the system browser.
3.8 Where Account and License Data Are Stored
PAIO stores application data separately for each working directory it is run in. Account-related data, however, is stored in one place globally for the device, because the signed-in user is independent of the working directory. The storage scope and the file for each kind of data are as follows.
| Data | Storage scope | File |
|---|---|---|
| Authentication tokens | Device-global | auth-tokens.enc (encrypted) |
| License cache | Device-global | license-cache.enc (encrypted, valid for 4 hours) |
| Machine identifier | Device-global | machine-id.json |
| AI API key | Device-global | glm-api-key.enc (encrypted) |
| Other app data (terminal state, chatbot sessions, and so on) | Per working directory | Under workspace-<hash>/ |
Both the authentication tokens and the license cache are encrypted with the OS secure storage.
In an environment where encryption is unavailable, PAIO leaves no license cache at all, so the
license cannot be checked while offline. In the same environment the authentication tokens are
not stored either. A Secure Storage Unavailable warning window appears on every successful
sign-in, and you have to sign in again every time you restart the app. On Linux, libsecret
must be installed.