CAN Bus
What You Will Do
In this chapter you join the nodes ECU and ZONE, finished in ECU Properties, with a CAN bus.
You create one CAN controller (CanController, CanCommController) and one CAN connector (CanConnector) on each of the two nodes, create the CAN cluster CanCluster from the + badge of a connector, and connect both connectors to the physical channel PhysicalChannel.
Network management (NM) and the transport protocol (TP) are off for a new cluster and are turned on per cluster in the Communication Cluster Configuration window. The reference design has neither, so you only check in that window that both are off.
When you finish this chapter, the design in which CanCluster joins ECU and ZONE is saved in the System editor, and the VALIDATION panel shows No validation issues..
Before You Begin
- Start after finishing ECU Properties. The four nodes (
ECU,ZONE,SLAVE_ECU,HPC) have no controllers, connectors or clusters yet, and the VALIDATION panel showsNo validation issues.. - If the tab
TopologyDesign:Systemis not open, click System under DESIGN in the EDITOR view. - If the VALIDATION panel is open, close it with the V icon in the footer. The figures show the screen with the panel closed.
The values you enter in this chapter are listed below. The channel name PhysicalChannel is a default that is filled in automatically when the cluster is created, so you do not type it.
| Where | Item | Value |
|---|---|---|
CAN CONTROLLER panel (node ECU) | NAME | CanController |
CAN CONTROLLER panel (node ECU) | SYNC JUMP WIDTH, PROPAGATION SEGMENT, TIME SEGMENT 1, TIME SEGMENT 2 | 0 in all four fields |
CAN CONTROLLER panel (node ZONE) | NAME | CanCommController |
CAN CONNECTOR panel (node ECU) | NAME / CONTROLLER | CanConnector / select CanController |
CAN CONNECTOR panel (node ZONE) | NAME / CONTROLLER | CanConnector / select CanCommController |
| CAN CLUSTER panel | NAME | CanCluster |
| CAN CLUSTER panel | PHYSICAL CHANNELS › CHANNEL NAME | PhysicalChannel (default, leave as is) |
| Communication Cluster Configuration window | NM CLUSTER, TRANSPORT PROTOCOL, TIME DOMAIN tabs | Disabled (default, leave as is) |
Note. A field in the property panel commits its value only when you leave the field. In this chapter you press the
Tabkey after entering a value in the property panel.
Creating the CAN Controllers
Adding a Controller
-
On the canvas, right-click an empty spot inside the node
ECU. The menu shows Add Connector, Add Controller, Add Ethernet Switch, Add Gateway, SW Mapping, Extract ECU and Delete. -
Hover over Add Controller and click CAN in the submenu.
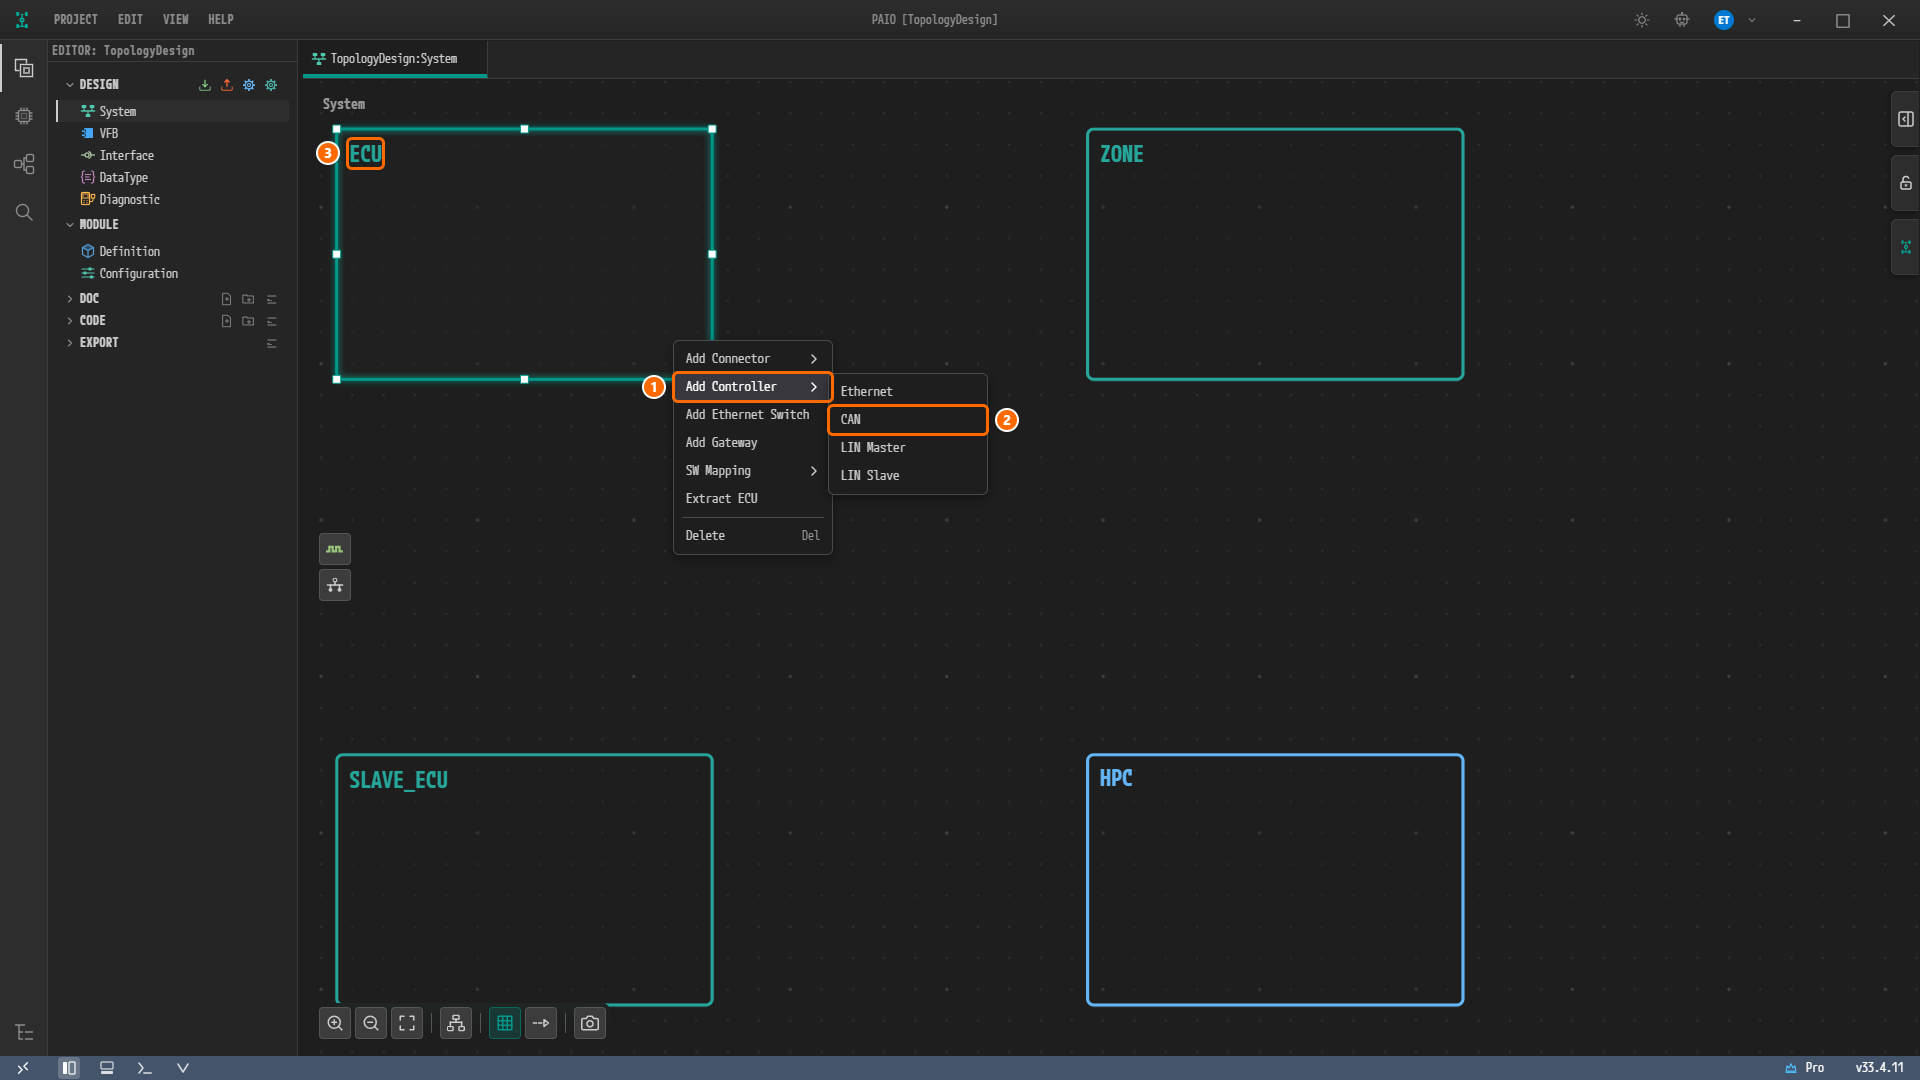
Figure 3-1. The context menu of the node
ECU. ① Add Controller, ② CAN in the submenu, ③ the right-clicked nodeECU. The submenu of Add Controller holds Ethernet, CAN, LIN Master and LIN Slave. -
A small square appears inside the node. This is the CAN controller. The new controller is not selected automatically, so click the square. The property panel on the right is titled CAN CONTROLLER, and NAME holds the default name
ECU_Can_Controller_0.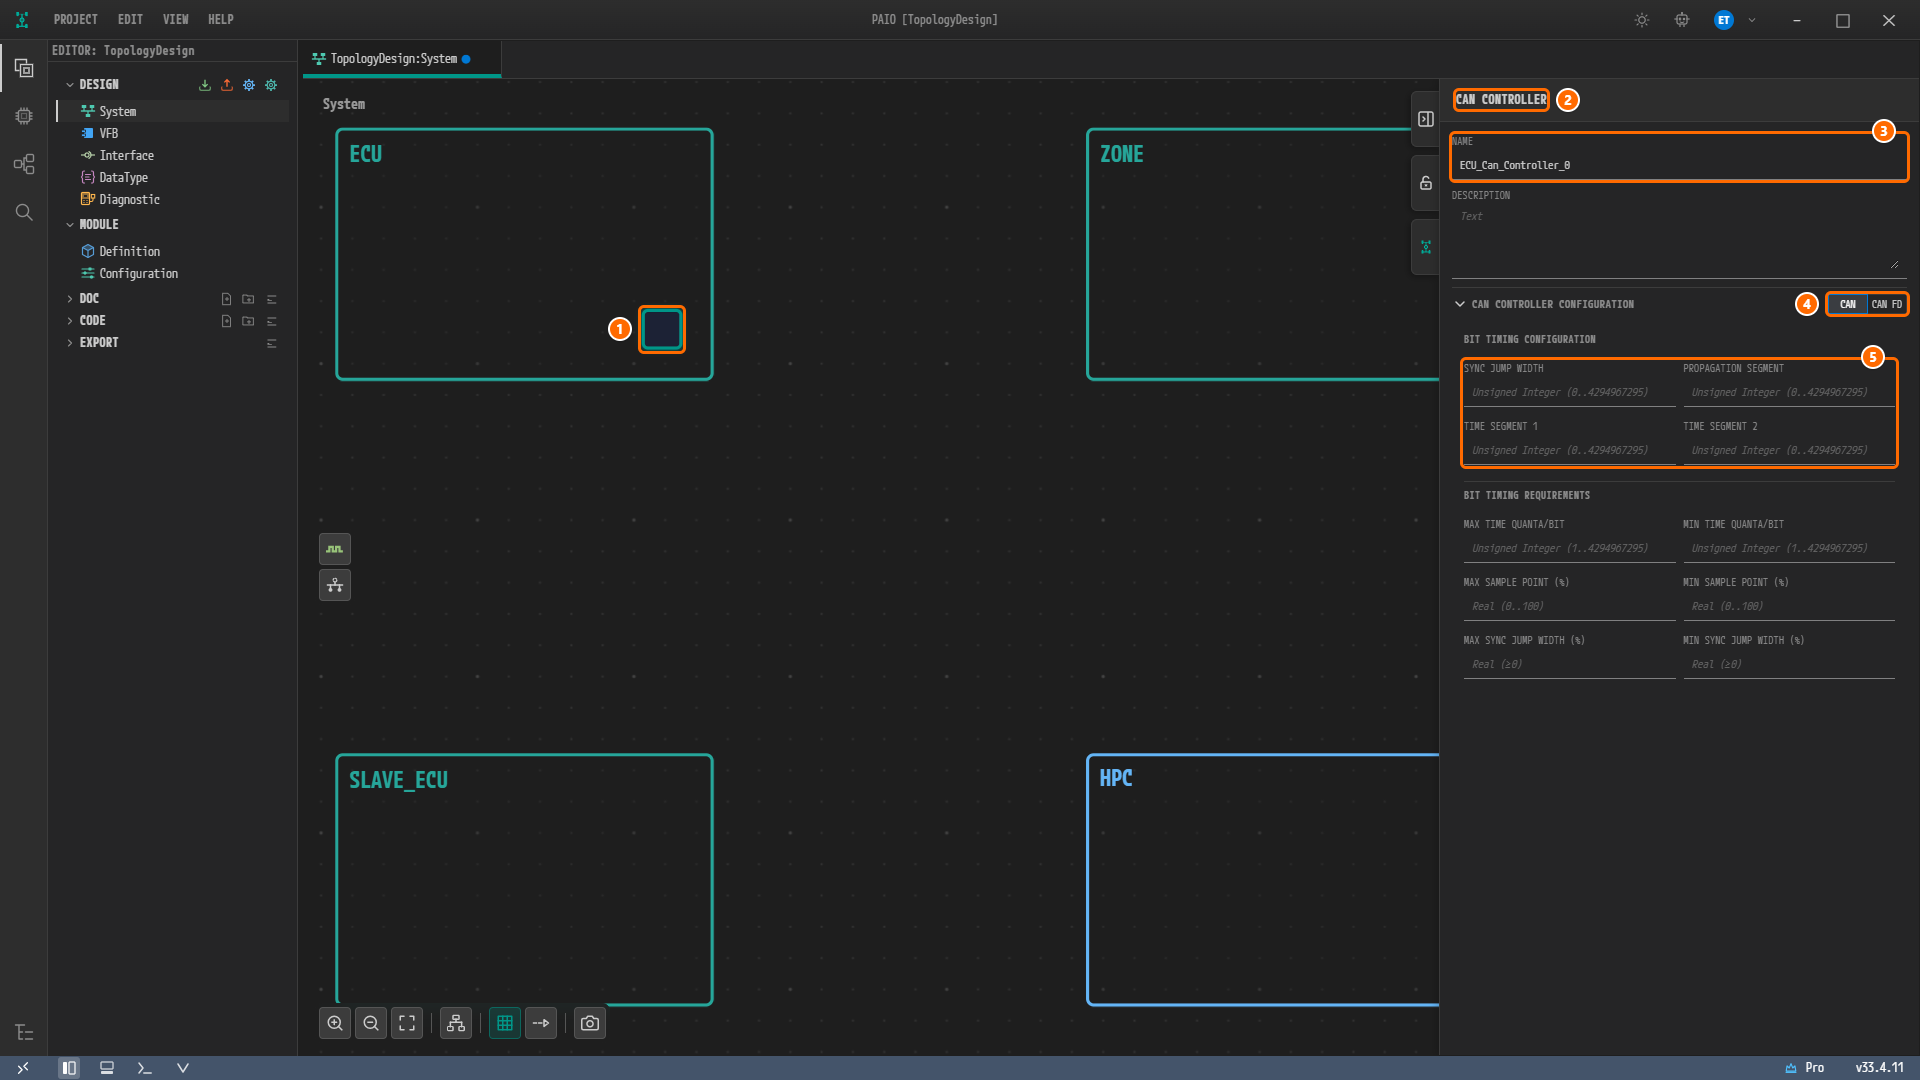
Figure 3-2. The new CAN controller. ① The controller inside the node, ② the panel title CAN CONTROLLER, ③ NAME =
ECU_Can_Controller_0, ④ the CAN / CAN FD toggle with CAN on, ⑤ the four empty fields of BIT TIMING CONFIGURATION.
Note. The controller square on the canvas does not show its name. Check the panel title and the NAME field to see which controller you are editing.
Caution. Right-click an empty spot inside the node. Right-clicking the node name or a controller or connector already placed may open a different menu.
Entering the Name and Bit Timing
-
In the NAME field, delete
ECU_Can_Controller_0, typeCanControllerand press theTabkey. -
Leave the toggle to the right of the CAN CONTROLLER CONFIGURATION header with CAN on. Do not click CAN FD.
-
Type
0into SYNC JUMP WIDTH, PROPAGATION SEGMENT, TIME SEGMENT 1 and TIME SEGMENT 2 of BIT TIMING CONFIGURATION in turn, pressing theTabkey after each field. An empty field shows the hintUnsigned Integer (0..4294967295).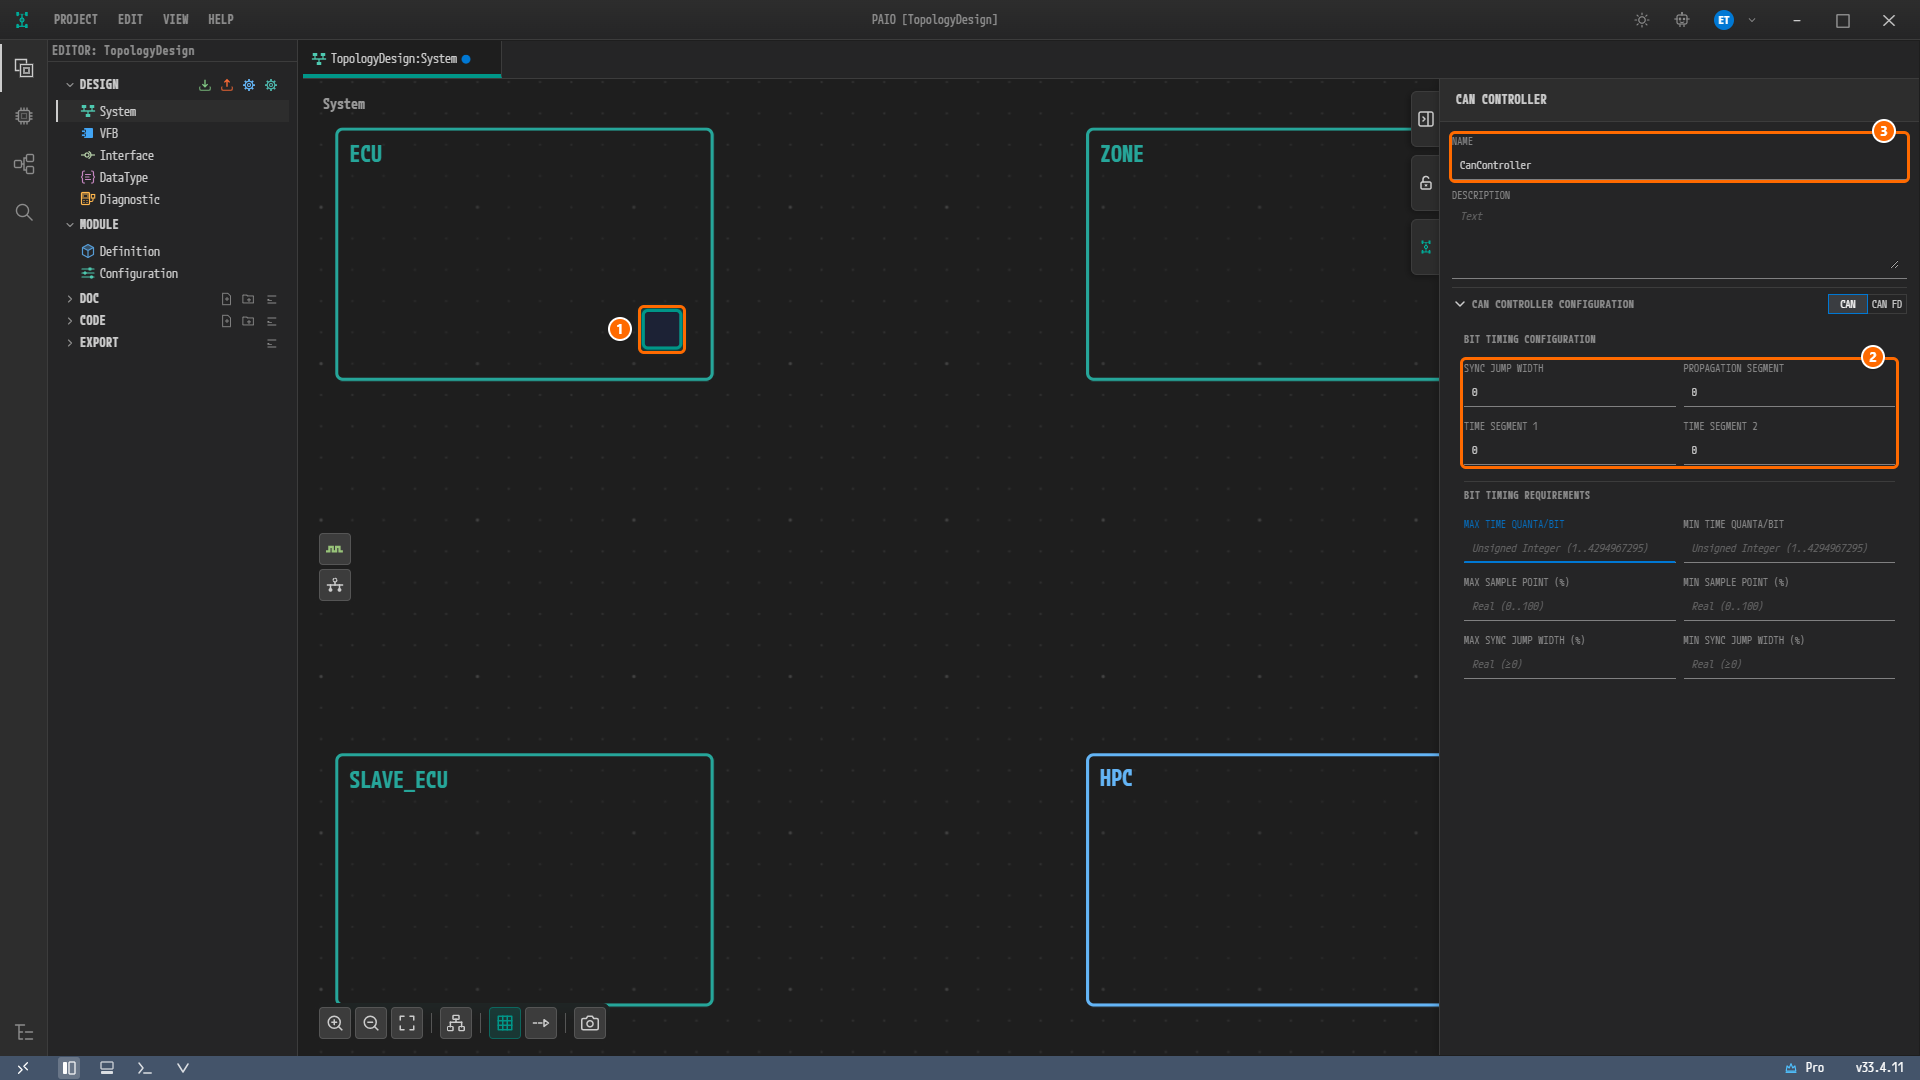
Figure 3-3. After entering the values. ① The controller, ② BIT TIMING CONFIGURATION with
0in all four fields, ③ NAME =CanController. The MAX TIME QUANTA/BIT label, which now has the focus, appears blue.
Leave the six fields of BIT TIMING REQUIREMENTS (MAX TIME QUANTA/BIT and so on) empty. While CAN is on, the panel shows no CAN FD fields.
Creating a Controller on ZONE
-
Right-click an empty spot inside the node
ZONEand click Add Controller › CAN. A controller square appears insideZONE. Click it; the CAN CONTROLLER panel shows NAMEZONE_Can_Controller_0. -
Type
CanCommControllerinto NAME and press theTabkey. Leave the four bit timing fields empty.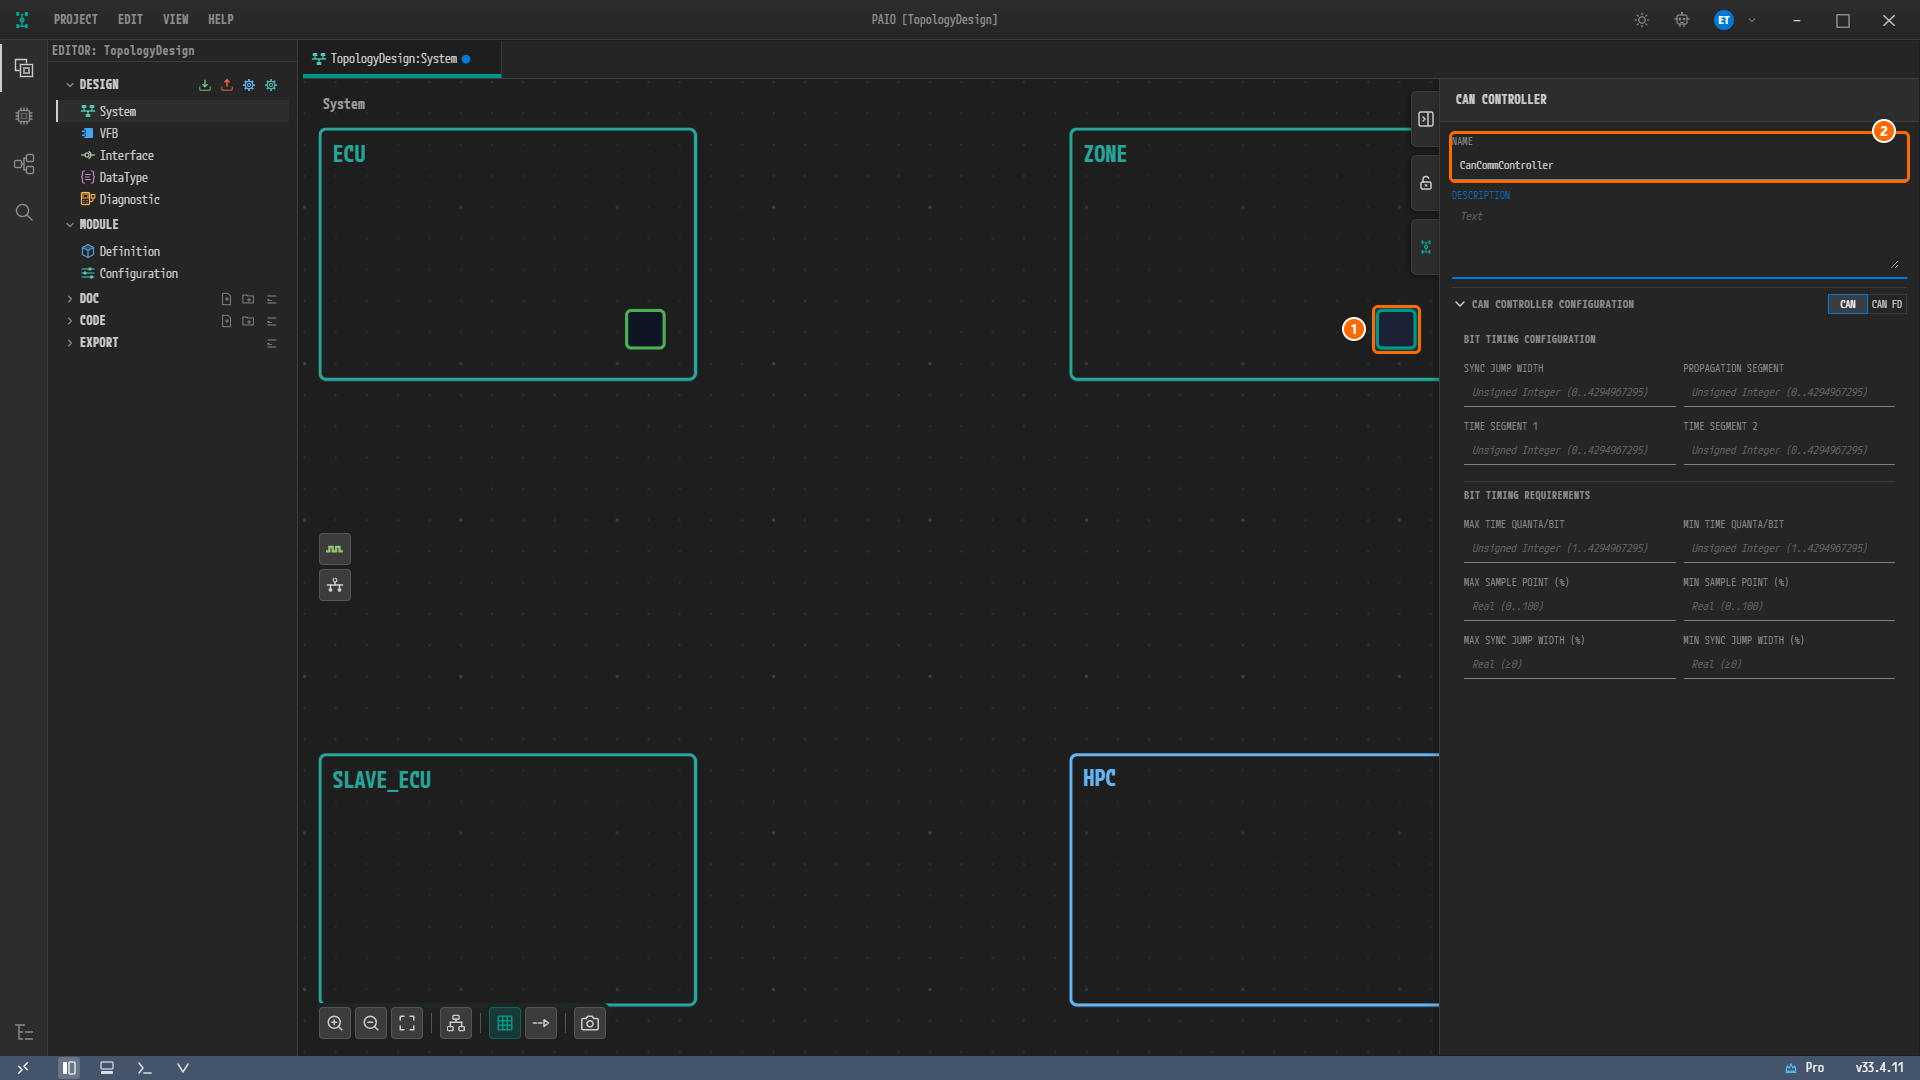
Figure 3-4. The CAN controller of the node
ZONE. ① The controller insideZONE, ② NAME =CanCommController. The controller ofECU, no longer selected, appears with a green border.
The values of the two controllers are collected below.
| Node | Default name | NAME | CAN / CAN FD | Four bit timing fields |
|---|---|---|---|---|
ECU | ECU_Can_Controller_0 | CanController | CAN | 0, 0, 0, 0 |
ZONE | ZONE_Can_Controller_0 | CanCommController | CAN | Leave empty |
Creating the CAN Connectors
Adding a Connector
-
Right-click an empty spot inside the node
ECU. -
Hover over Add Connector and click CAN in the submenu. The submenu holds Ethernet, CAN and LIN.
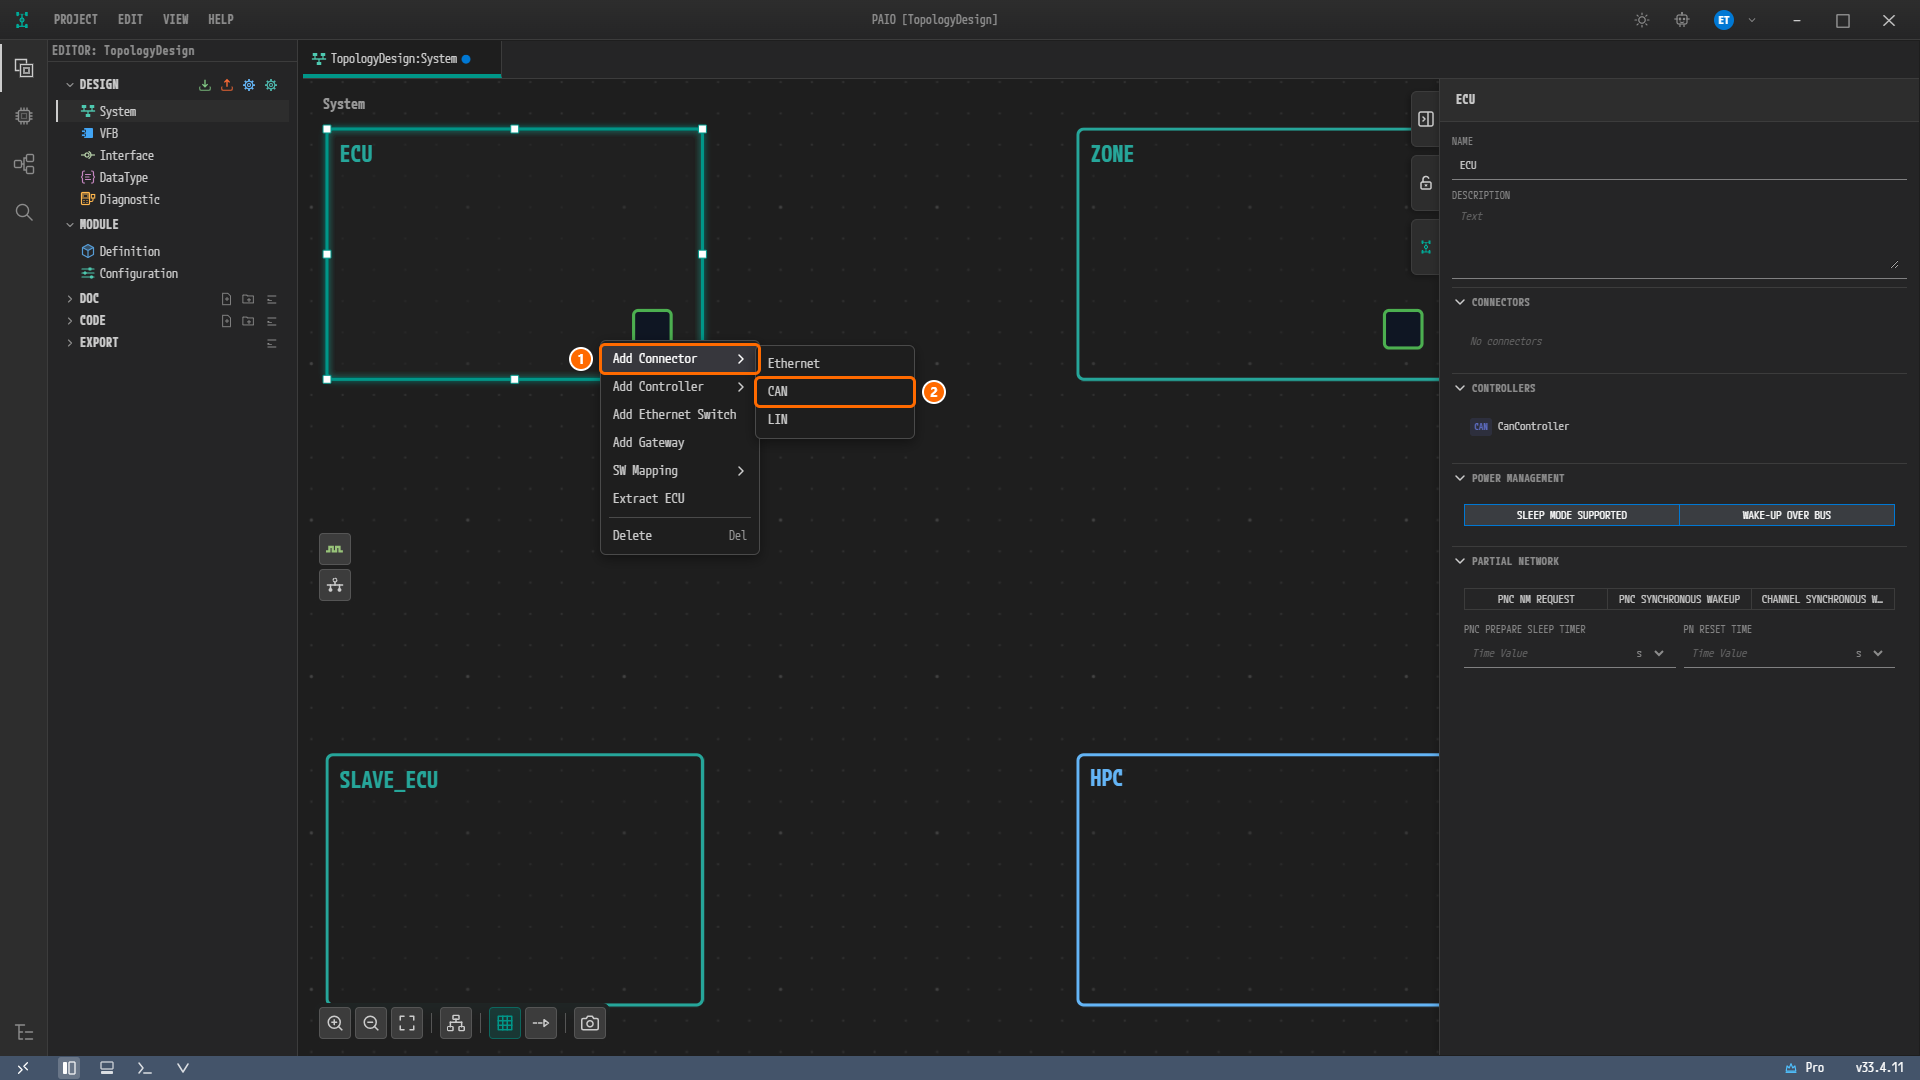
Figure 3-5. The context menu of the node
ECU. ① Add Connector, ② CAN in the submenu. Right-clicking selects the nodeECU, so the panel now shows the ECU panel: CONNECTORS isNo connectorsand CONTROLLERS listsCanController. -
A connector square appears on the bottom edge of the node
ECU, with a green + badge below it. The connector is not selected automatically either, so click the connector square. The panel is titled CAN CONNECTOR; NAME isECU_Can_Connector_0, CONTROLLER isSelect controller...and CONNECTED CHANNEL is(None). CONTROLLER is a required field: while it is empty, its label is red with the hintController is required, and the V icon in the footer shows the red badge1.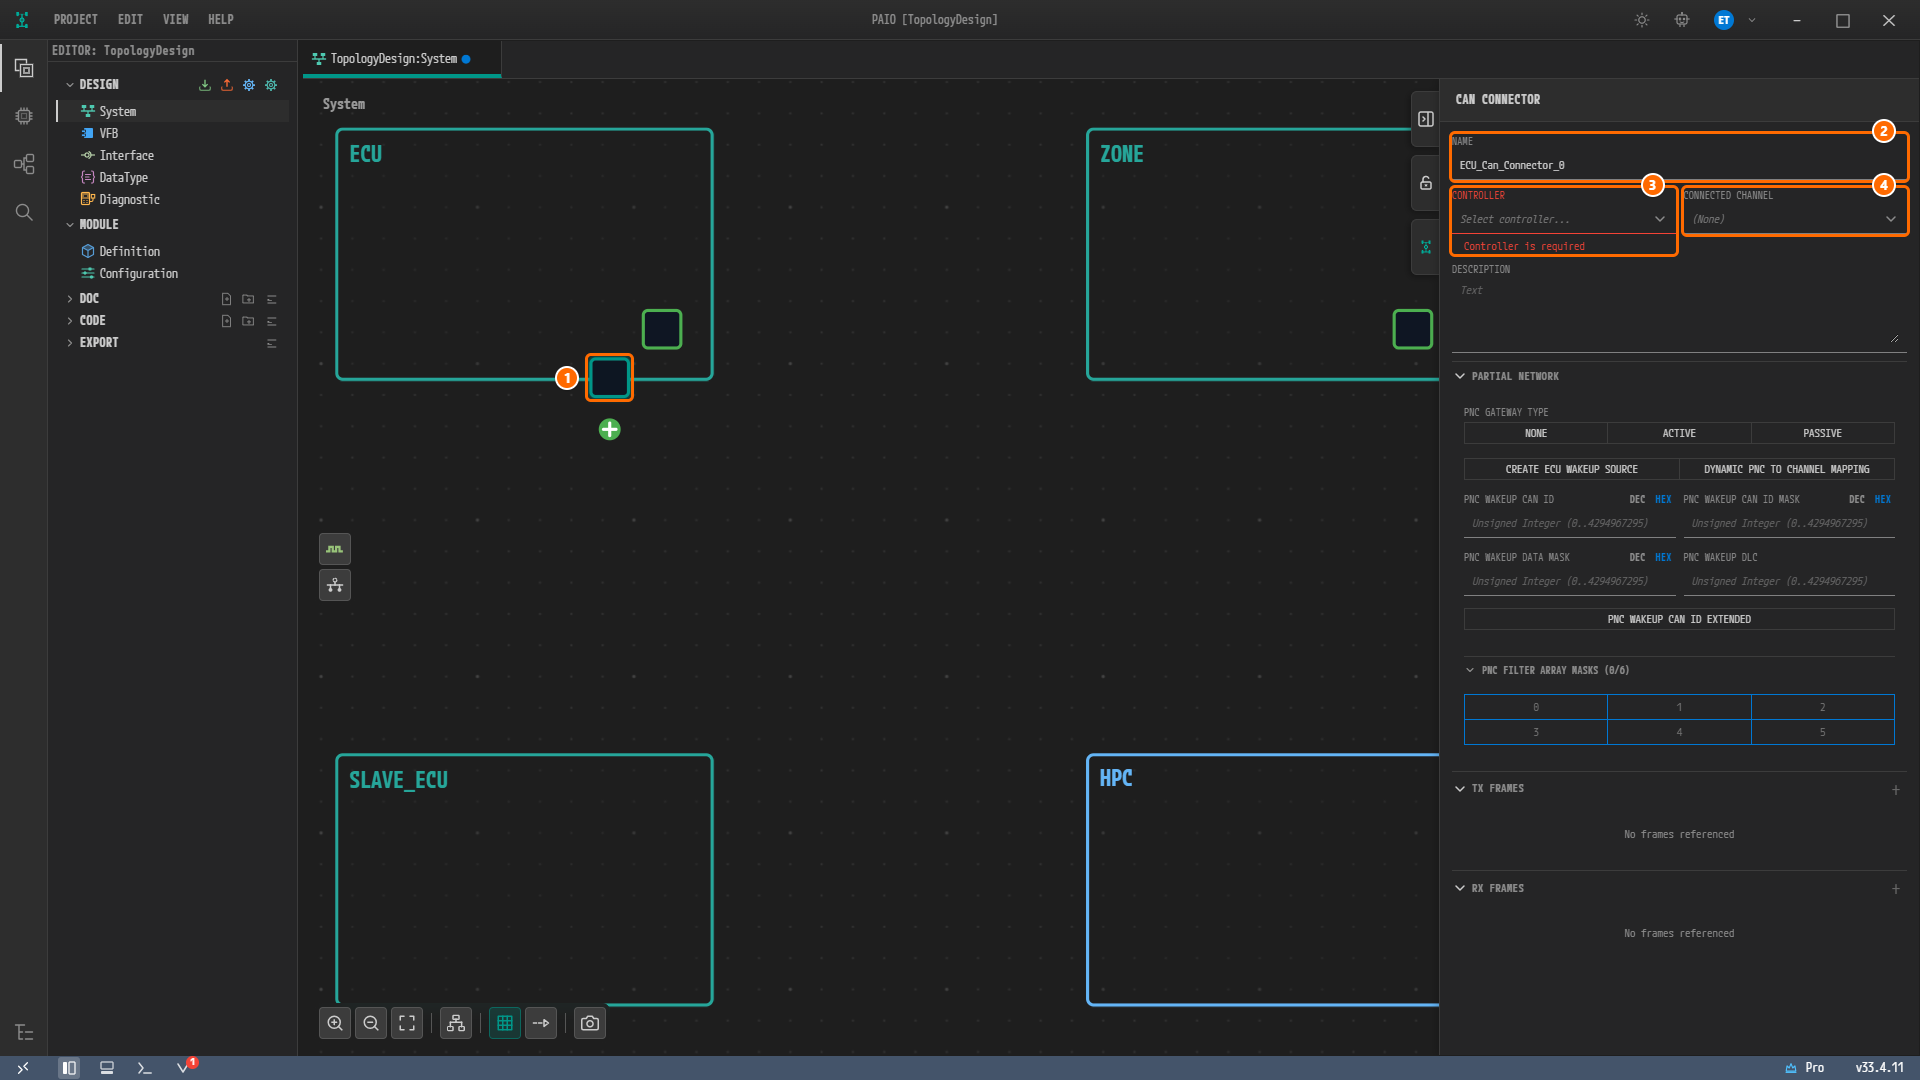
Figure 3-6. The new CAN connector. ① The connector on the bottom edge of the node, ② NAME =
ECU_Can_Connector_0, ③ CONTROLLER =Select controller..., red withController is required, ④ CONNECTED CHANNEL =(None). A green + badge is visible below the connector, and the V icon in the footer shows the badge1.
The CAN CONNECTOR panel also holds DESCRIPTION, PARTIAL NETWORK, TX FRAMES and RX FRAMES. This chapter uses only NAME and CONTROLLER.
Setting the Name and Controller
-
Type
CanConnectorinto NAME and press theTabkey. -
Click the CONTROLLER field. A search box
Type to search...and a list open. The list holds only one item,CanController, the CAN controller of the same node. -
Click
CanController. An orange line joining the connector and the controller appears on the canvas. The red mark of CONTROLLER and the badge on the V icon disappear.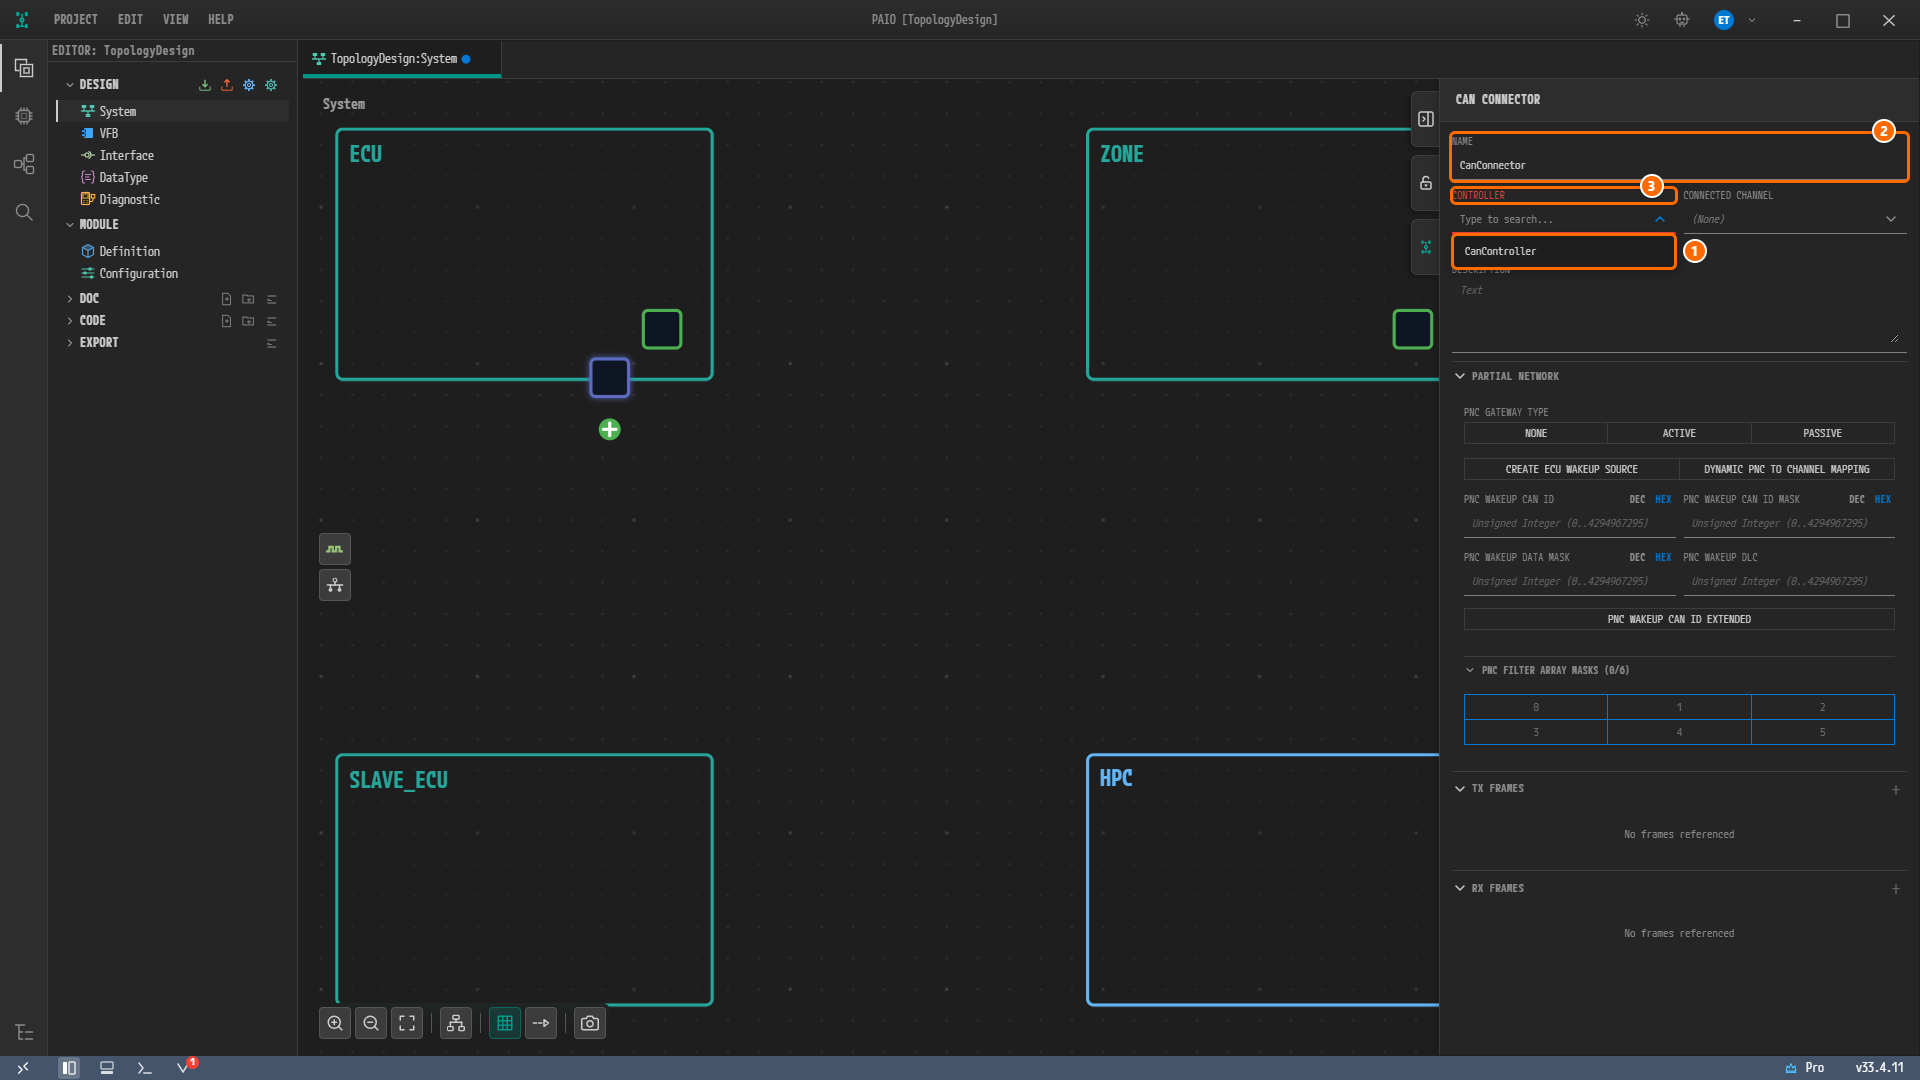
Figure 3-7. The CONTROLLER list open. ① The list item
CanController, ② NAME =CanConnector, ③ the CONTROLLER label, still red because no controller is selected yet.
Creating a Connector on ZONE
-
Right-click an empty spot inside the node
ZONEand click Add Connector › CAN. A connector square appears on the bottom edge ofZONE. Click it; the CAN CONNECTOR panel shows NAMEZONE_Can_Connector_0. -
Type
CanConnectorinto NAME and press theTabkey. -
Click
CanCommControllerin the CONTROLLER list. It is the only item in the list.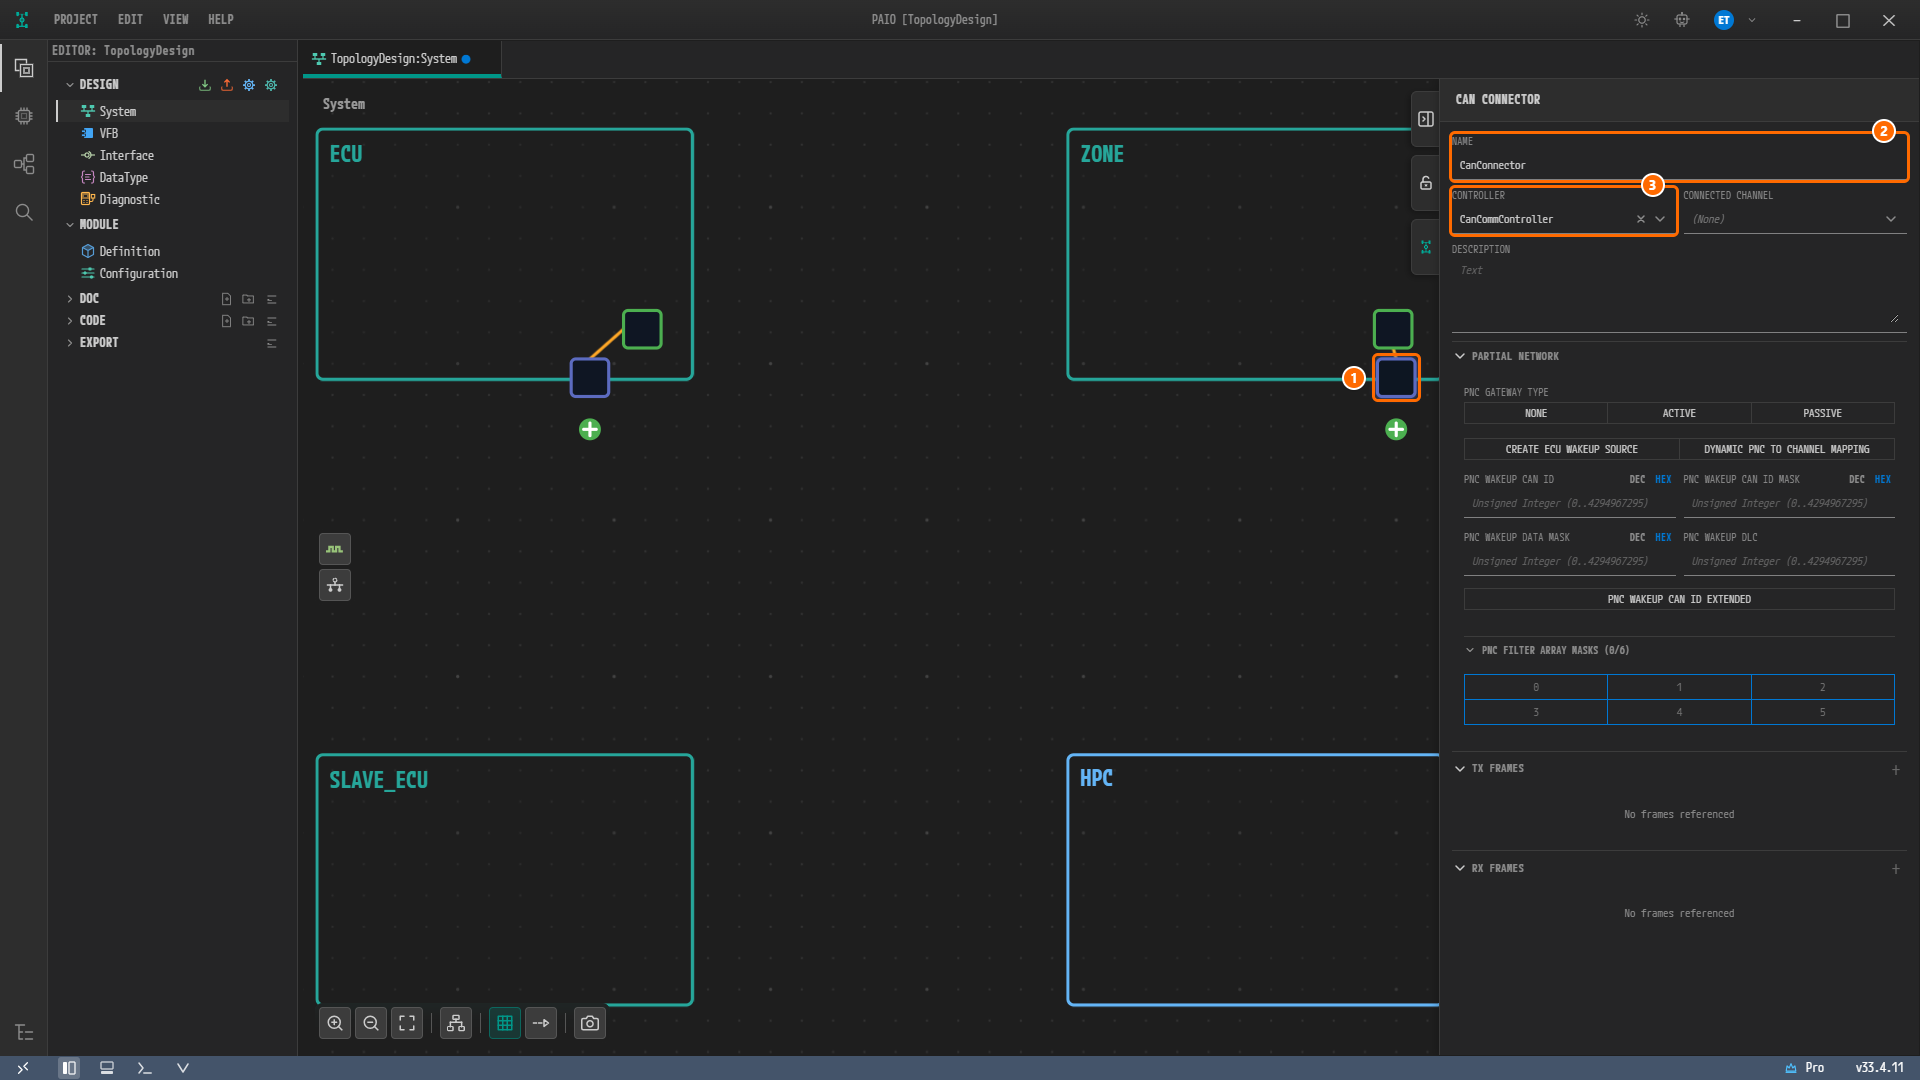
Figure 3-8. The CAN connector of the node
ZONE. ① The connector ofZONE, ② NAME =CanConnector, ③ CONTROLLER =CanCommController. On both nodes the connector and the controller are joined by an orange line. In the figure, the controller ofZONEsits right above its connector, so the line between them is very short.
The values of the two connectors are collected below.
| Node | Default name | NAME | CONTROLLER |
|---|---|---|---|
ECU | ECU_Can_Connector_0 | CanConnector | CanController |
ZONE | ZONE_Can_Connector_0 | CanConnector | CanCommController |
Note. Both connectors have the same name,
CanConnector. A connector belongs to its node, so two connectors on different nodes may share a name. The cluster panel tells them apart by prefixing the node name, as inZONE/CanConnectorandECU/CanConnector.
Creating the CAN Cluster
Creating the Cluster from the ZONE Connector
The connector from which you create the cluster becomes the first connector of the channel. To match the order of the reference design (ZONE, ECU), you create the cluster from the connector of ZONE.
-
Click the green + badge below
CanConnectorof the nodeZONE. -
Click Create CommunicationCluster [Can] in the menu that opens. It is the only item in the menu.
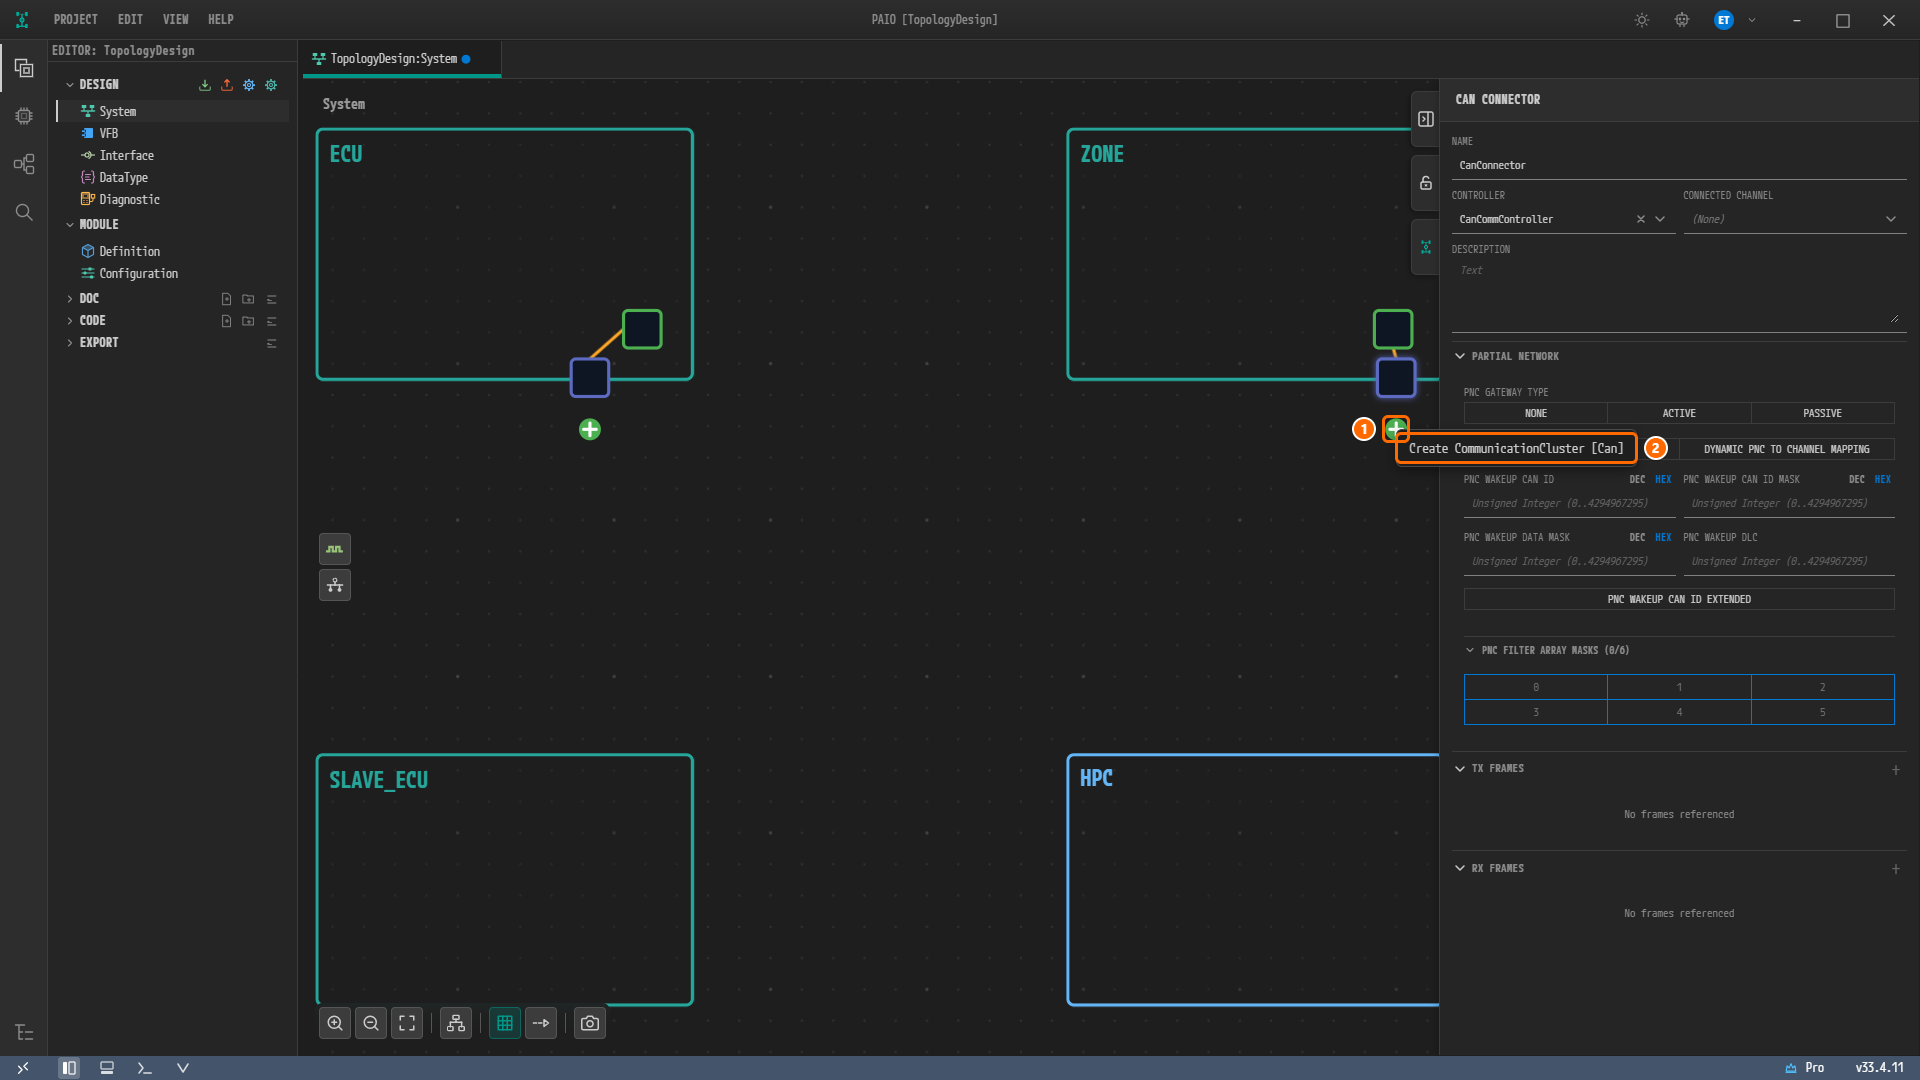
Figure 3-9. The + badge menu of the
ZONEconnector. ① The + badge, ② Create CommunicationCluster [Can]. -
A cluster square appears below
ZONE, with its nameCanCluster_0written under it. If you cannot see it, click Fit to View in the toolbar below the canvas. -
Click the cluster square. The panel is titled CAN CLUSTER, and NAME is
CanCluster_0.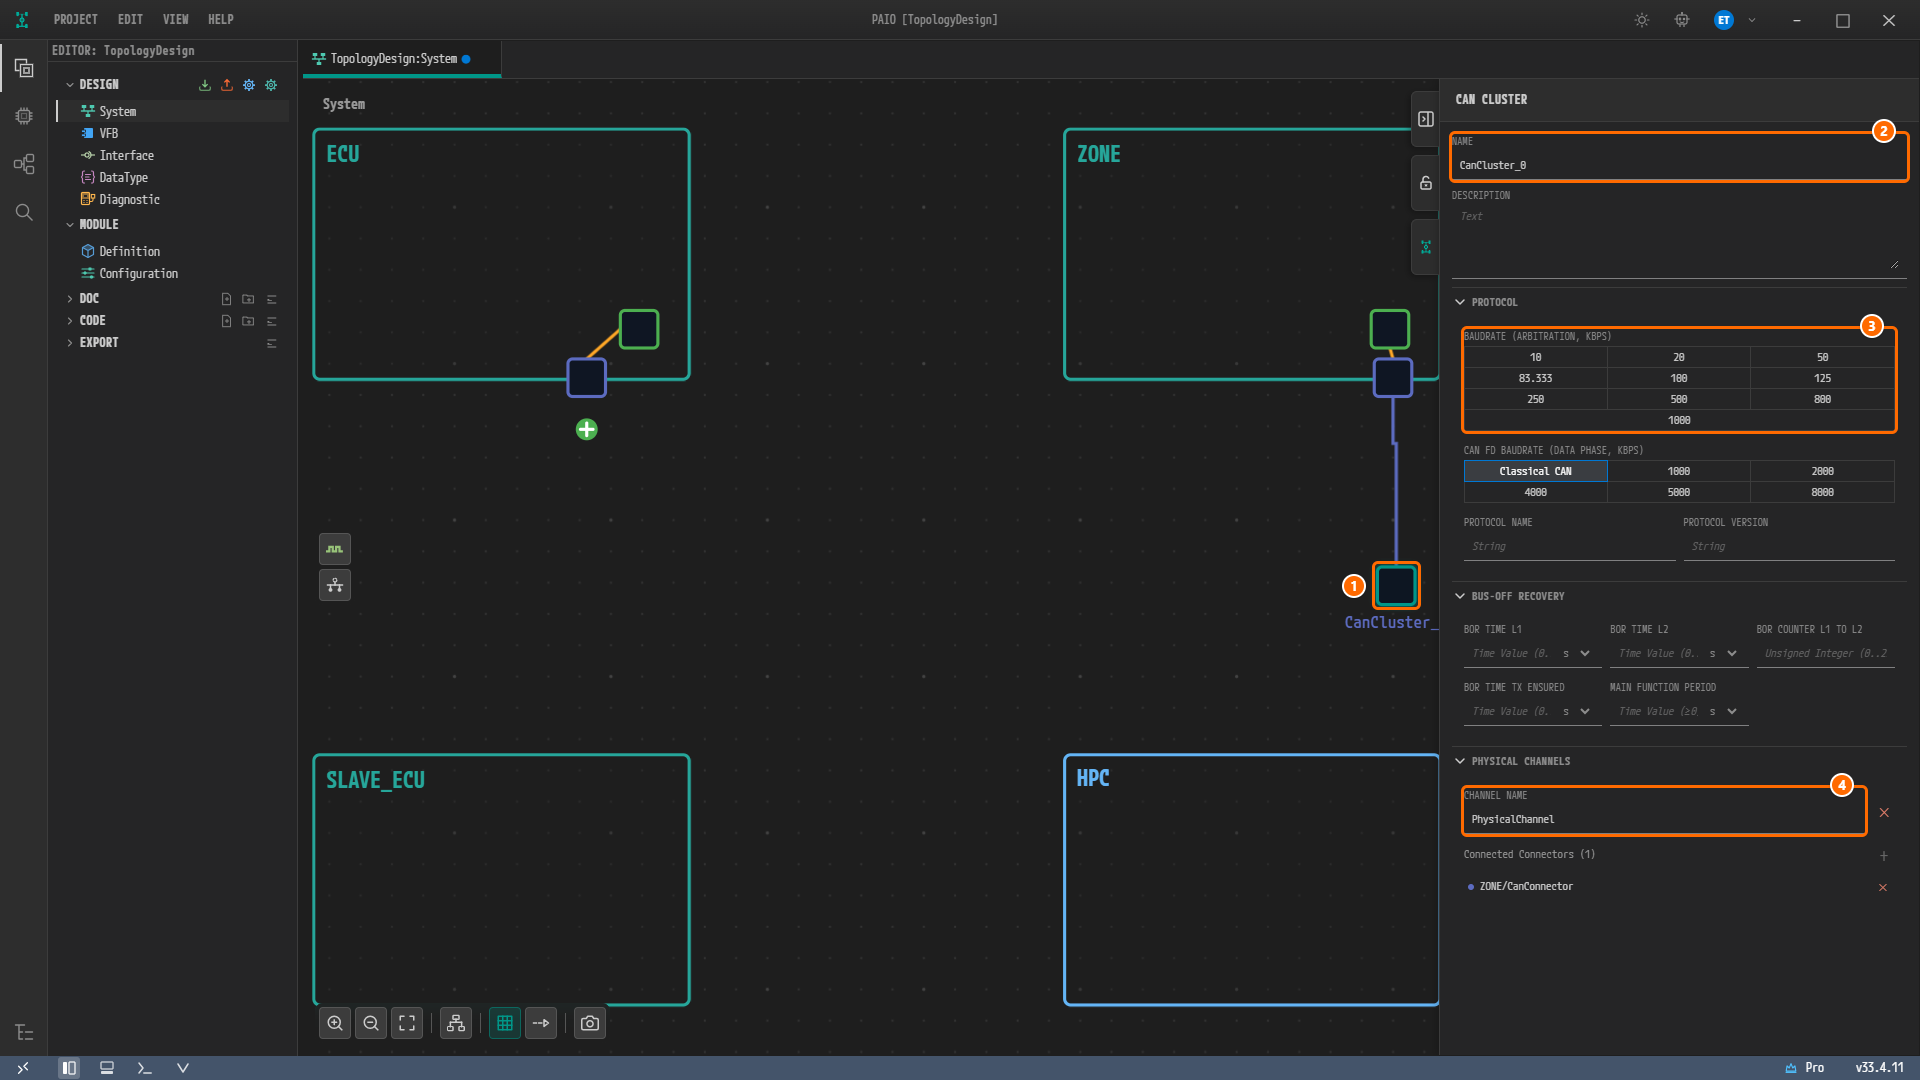
Figure 3-10. The new CAN cluster. ① The cluster square, ② NAME =
CanCluster_0, ③ PROTOCOL › BAUDRATE (ARBITRATION, KBPS), where none of the ten buttons is on, ④ CHANNEL NAME holding the defaultPhysicalChannel.ZONE/CanConnectoris listed under Connected Connectors (1). The property panel covers the end of the name under the square. -
Type
CanClusterinto NAME and press theTabkey. The name under the square changes toCanCluster. Leave PROTOCOL, BUS-OFF RECOVERY and CHANNEL NAME as they are.
Note. None of the buttons of BAUDRATE (ARBITRATION, KBPS) is on, even after you save and select the cluster again, but the saved cluster holds the baud rate
500000. The cluster of the reference design has no baud rate. The difference in the export result is covered in ARXML Export.
Note. The
CanClusterof the reference design has the protocol namePROTOCOL-NAME=CAN-FD. The PROTOCOL section of the CAN CLUSTER panel has a PROTOCOL NAME field, but this tutorial leaves it empty, so this value is not created. The CAN / CAN FD toggle of the controller panel is a different thing. The toggle is the CAN FD setting of the controller, and theCanControllerof the reference design has no CAN FD setting, so you leave it at CAN.
Connecting the ECU Connector to the Channel
-
Click the green + badge below
CanConnectorof the nodeECU. This time the menu holds Create CommunicationCluster [Can] and Connect to Channel.... -
Hover over Connect to Channel..., hover over CanCluster in its submenu, and click PhysicalChannel in the next submenu.
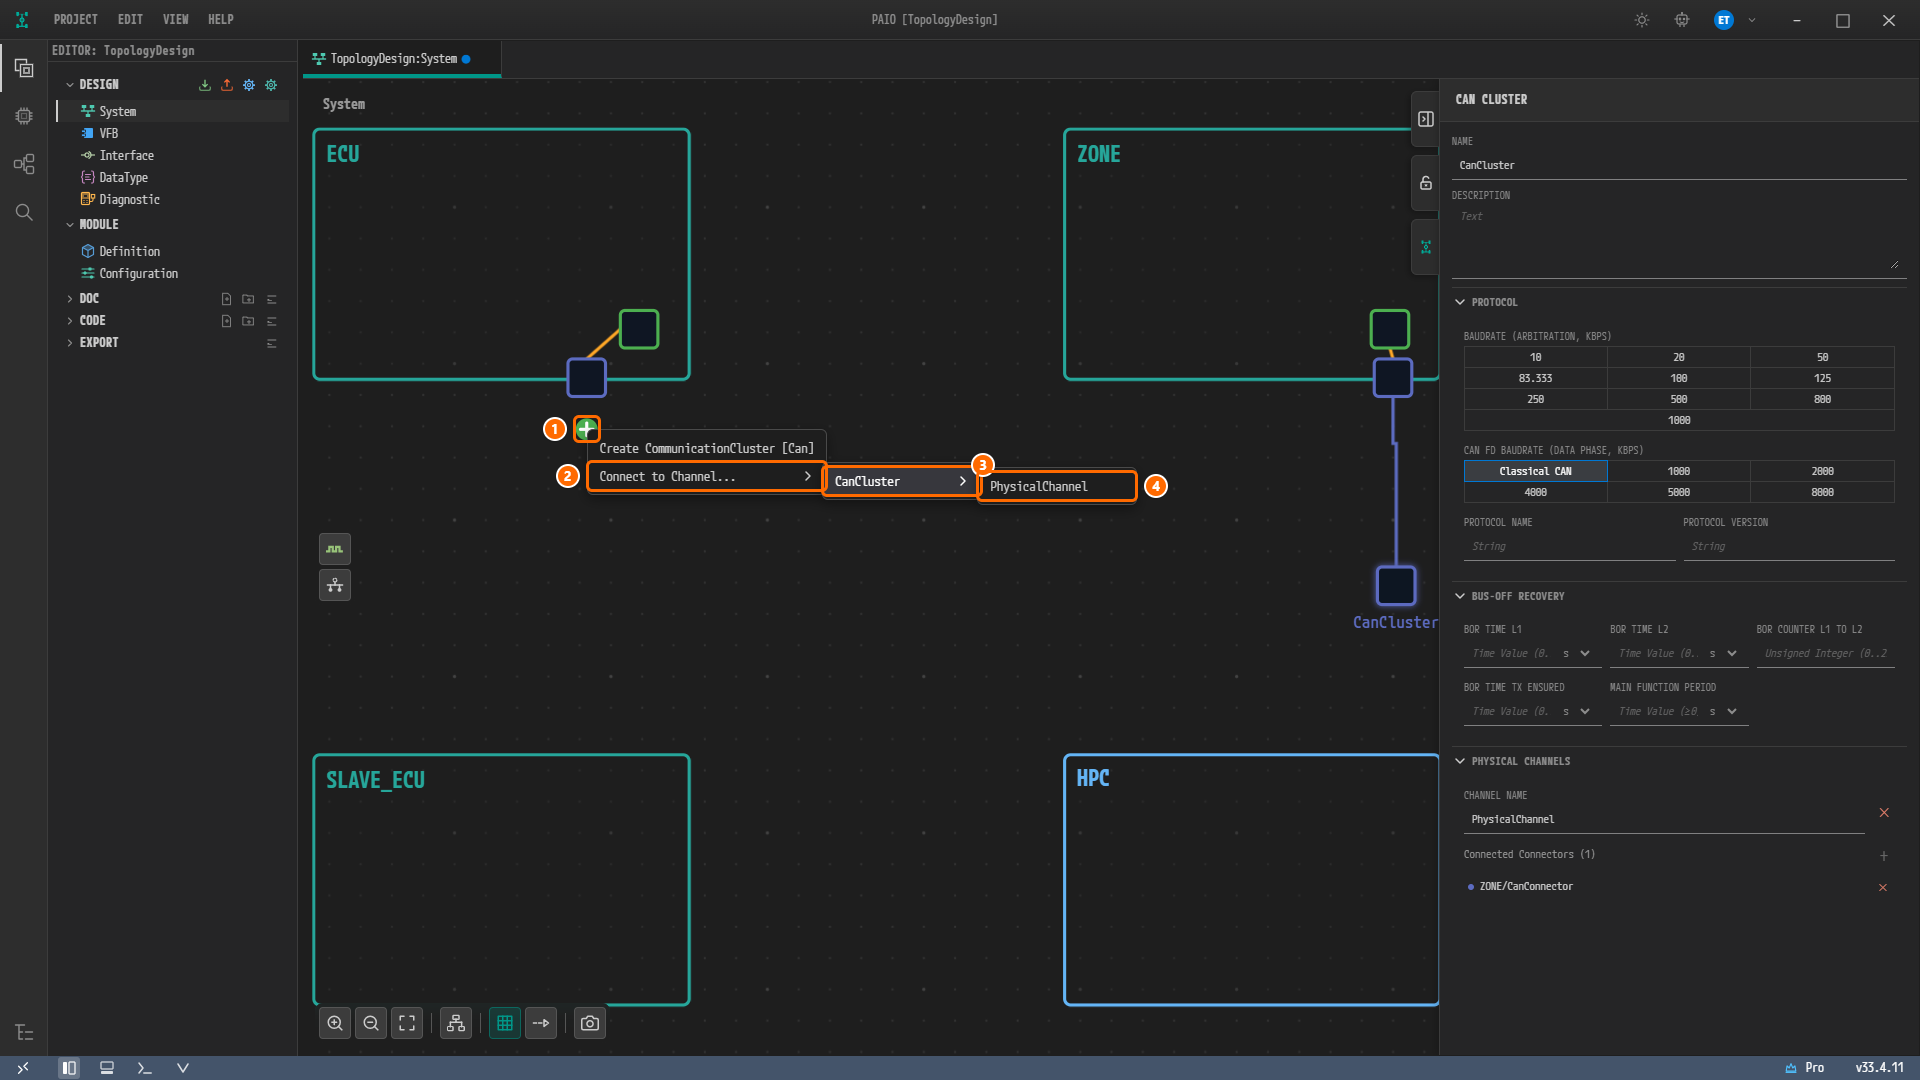
Figure 3-11. The + badge menu of the
ECUconnector. ① The + badge, ② Connect to Channel..., ③ CanCluster, ④ PhysicalChannel.
Caution. Create CommunicationCluster [Can] in this menu creates a new cluster. Connect the connector of
ECUto the channel created earlier with Connect to Channel....
Tidying the Layout and Saving
-
Click Auto Layout in the toolbar below the canvas, then click Fit to View. The nodes are rearranged.
-
Click the cluster square and confirm that
ZONE/CanConnectorandECU/CanConnectorare listed under Connected Connectors (2).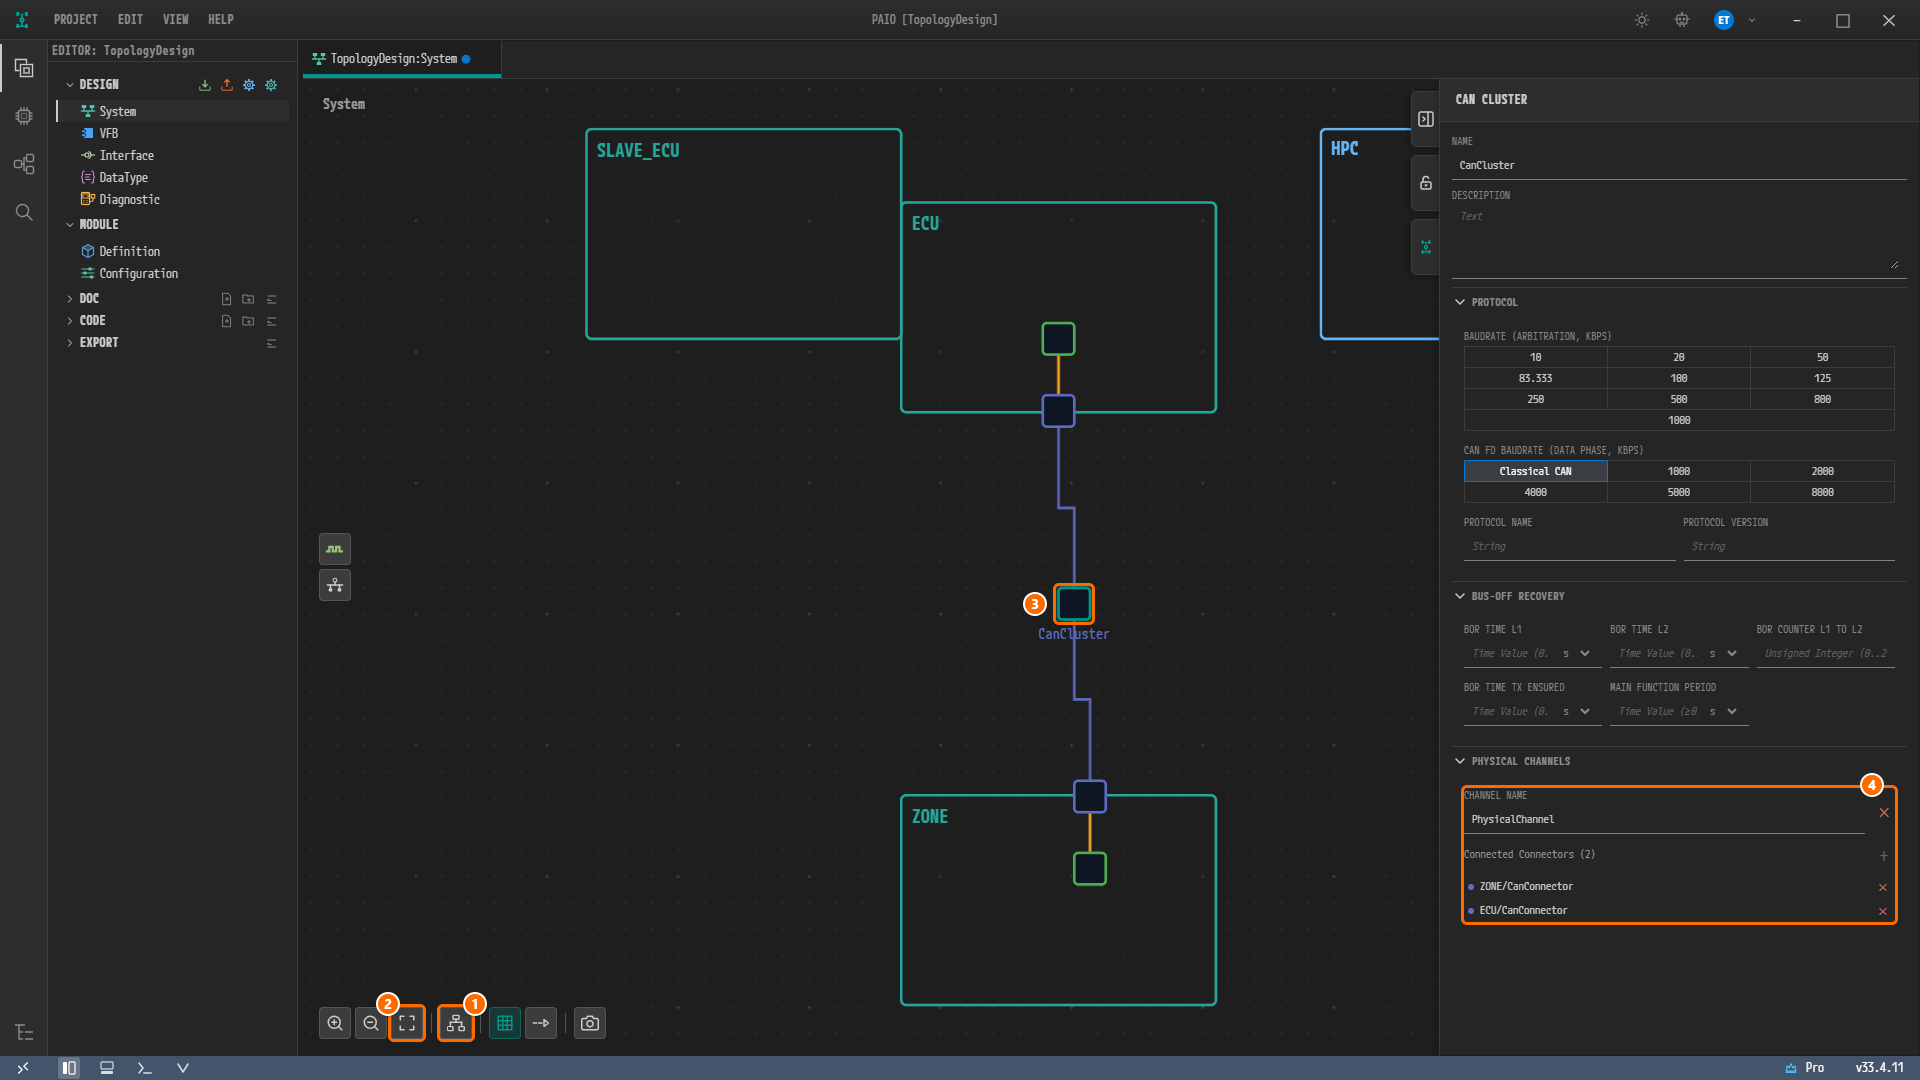
Figure 3-12. The canvas after Auto Layout. ① Auto Layout, ② Fit to View, ③ the cluster square, ④ CHANNEL NAME
PhysicalChannelandZONE/CanConnector,ECU/CanConnectorunder Connected Connectors (2). Both connectors are joined to the cluster by blue lines. -
Click the empty canvas where there is no node, then press
Ctrl+Sto save. The blue dot on the tabTopologyDesign:Systemdisappears.
The layout after Auto Layout may differ slightly from the figure, and the borders of SLAVE_ECU and ECU may appear to touch. This is the result of the layout, not an error, so you do not need to move the nodes.
Viewing the Validation Result
-
Click the V icon in the footer to open the VALIDATION panel.
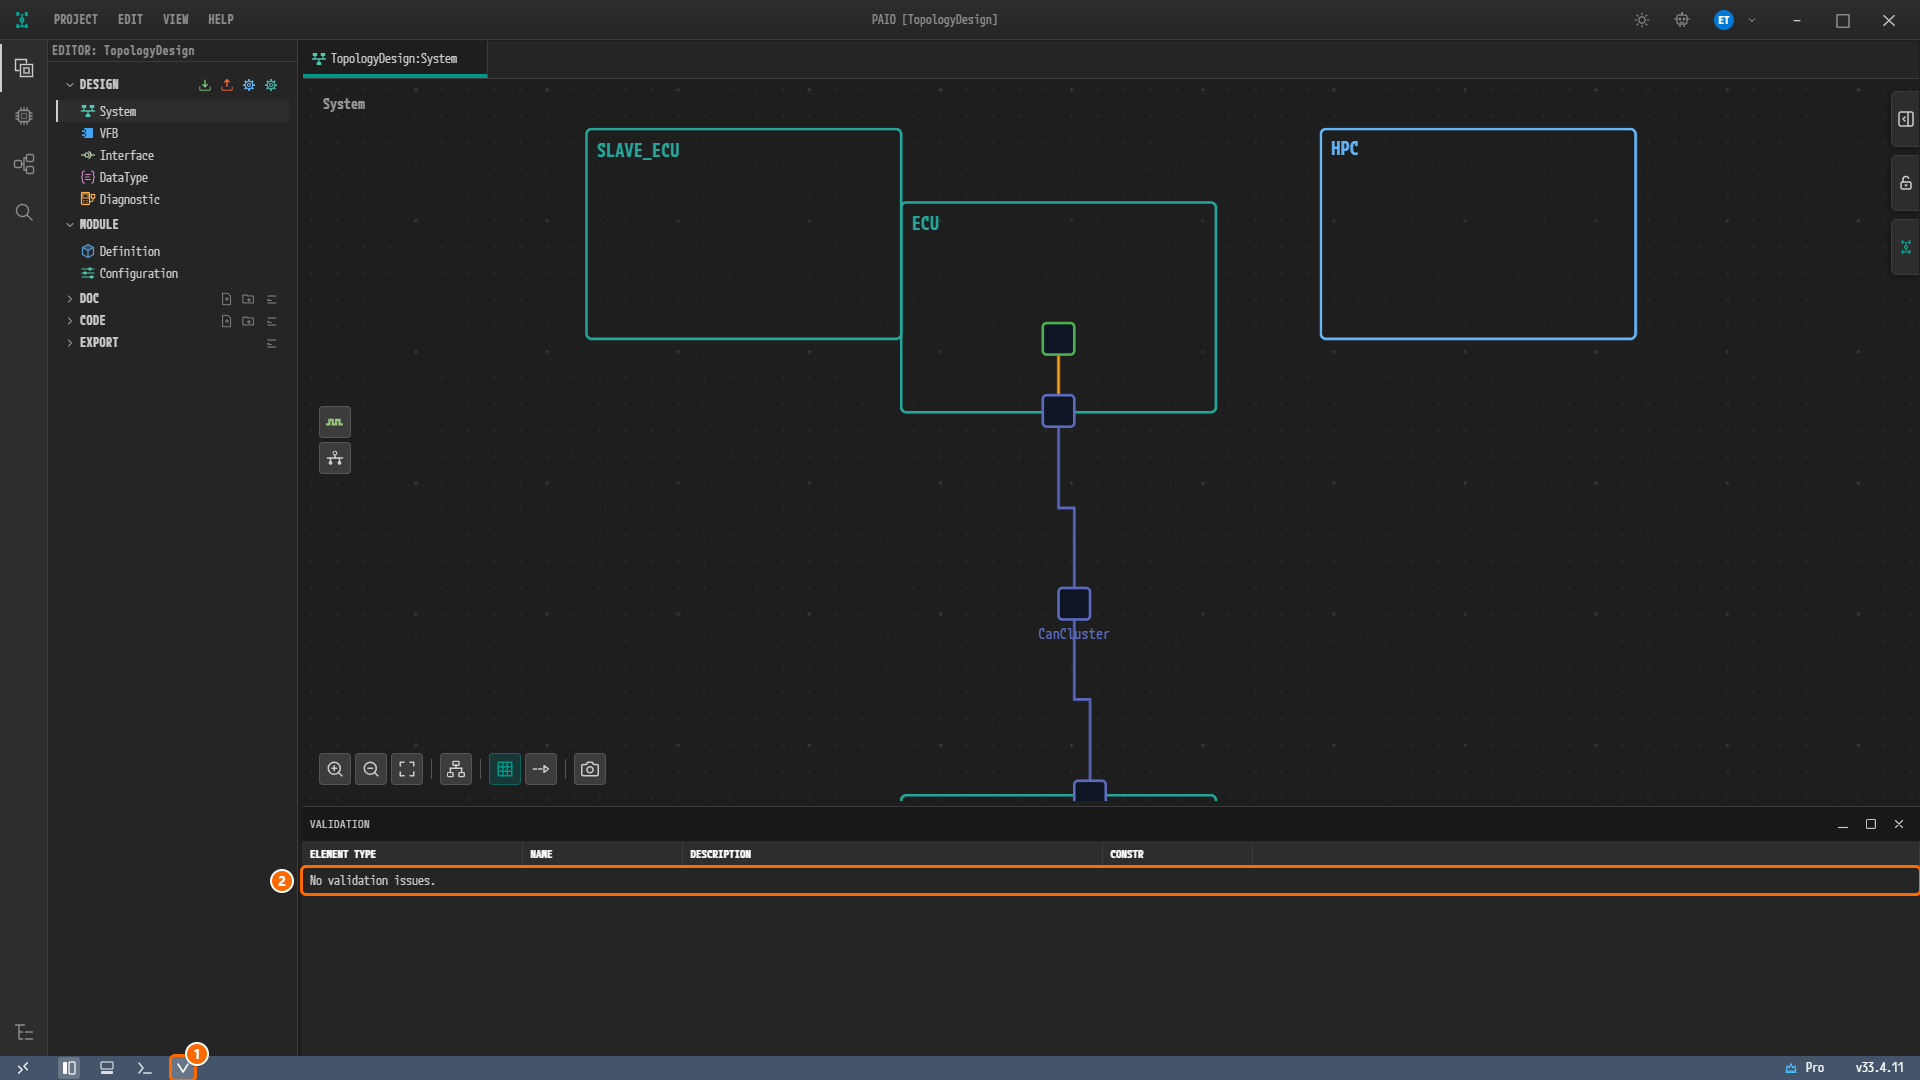
Figure 3-13. The VALIDATION panel after saving. ① The V icon in the footer, ② the row
No validation issues..
The validation result is zero findings, the same as at the end of ECU Properties. Creating CanCluster adds no NM (network management) cluster and no TP (transport protocol) configuration to the design, because both are off for a new cluster. The next two sections show the tabs where they are turned on.
Note. While CONTROLLER of a connector was empty, the V icon showed the red badge
1. The badge disappears when the count drops back to zero, but the tooltip of the V icon keeps the last count,Validation: 1 error(s), 0 warning(s), 0 info(s). The VALIDATION panel shows the current result.
Checking the Network Management Tab
Opening the Cluster Configuration Window
-
Click the V icon in the footer again to close the VALIDATION panel.
-
Double-click the
CanClustersquare on the canvas. The window Communication Cluster Configuration [CanCluster] opens. Its tabs are CLUSTER, NM CLUSTER, TRANSPORT PROTOCOL and TIME DOMAIN, and it first shows the CLUSTER tab: the table FRAME TRIGGERINGS [PHYSICALCHANNEL] readsNo frame triggering. [+] adds a frame of the Signal model., and SIGNAL LAYOUT readsSelect a frame or PDU triggering to see where it is sent and its signal layout.. -
Click the NM CLUSTER tab.
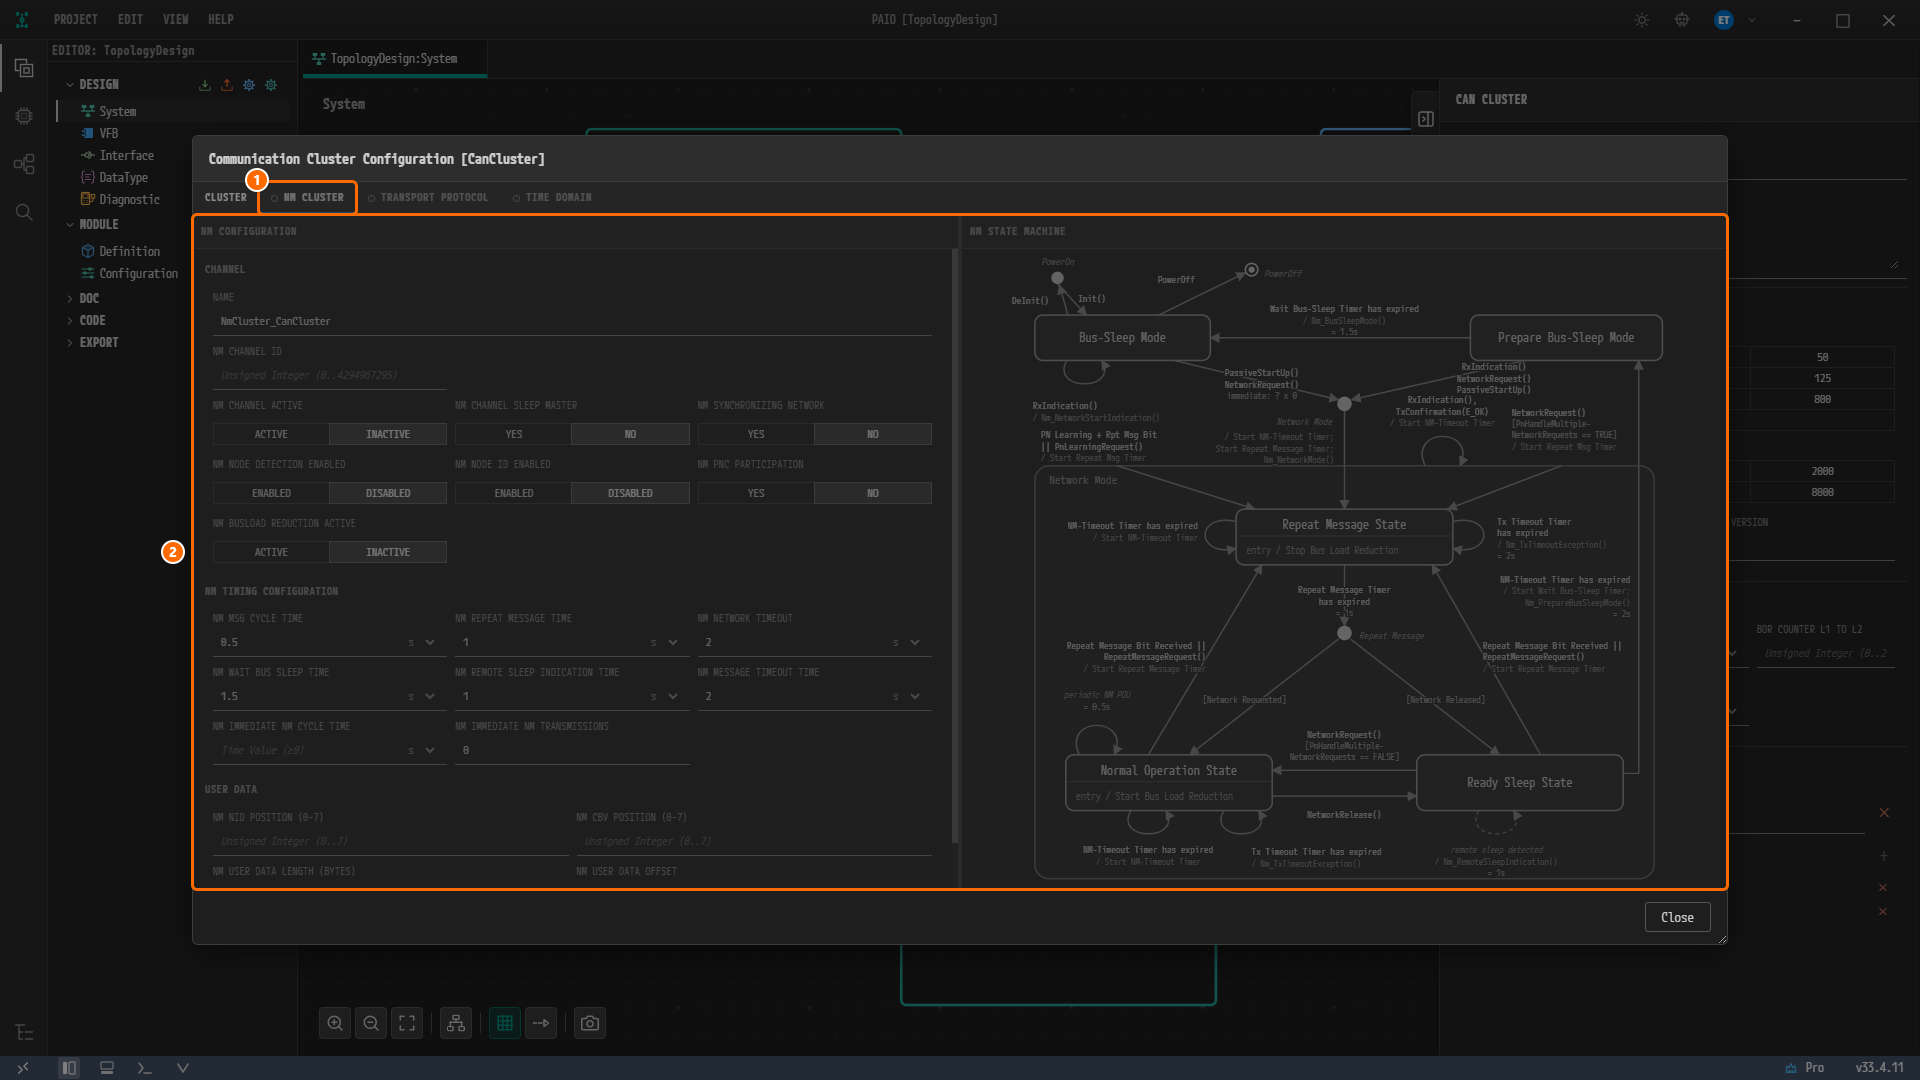
Figure 3-14. The NM CLUSTER tab. ① The tab NM CLUSTER with a hollow dot in front of its name, ② the dimmed editing area, which takes no input.
A hollow dot in front of a tab name means that the feature is off for this cluster. NM CLUSTER, TRANSPORT PROTOCOL and TIME DOMAIN all carry it, and their names appear dimmed. Hovering over such a tab shows the tooltip Disabled. Right-click to enable., and right-clicking it opens a menu with one item, Enable.
While NM is off, the tab shows the NM editor only as a dimmed preview, and nothing in the preview is stored in the design. CHANNEL in NM CONFIGURATION on the left shows NAME NmCluster_CanCluster, NM TIMING CONFIGURATION shows NM MSG CYCLE TIME 0.5, NM REPEAT MESSAGE TIME 1, NM NETWORK TIMEOUT 2, NM WAIT BUS SLEEP TIME 1.5, NM REMOTE SLEEP INDICATION TIME 1 and NM MESSAGE TIMEOUT TIME 2 (all in s), and NM IMMEDIATE NM TRANSMISSIONS is 0. NM STATE MACHINE on the right is the NM state diagram.
Caution. Do not choose Enable. The reference design has no NM settings, so this tutorial leaves NM off for
CanCluster.
Checking the Transport Protocol Configuration
You do not change any value in this section.
-
Click the TRANSPORT PROTOCOL tab.
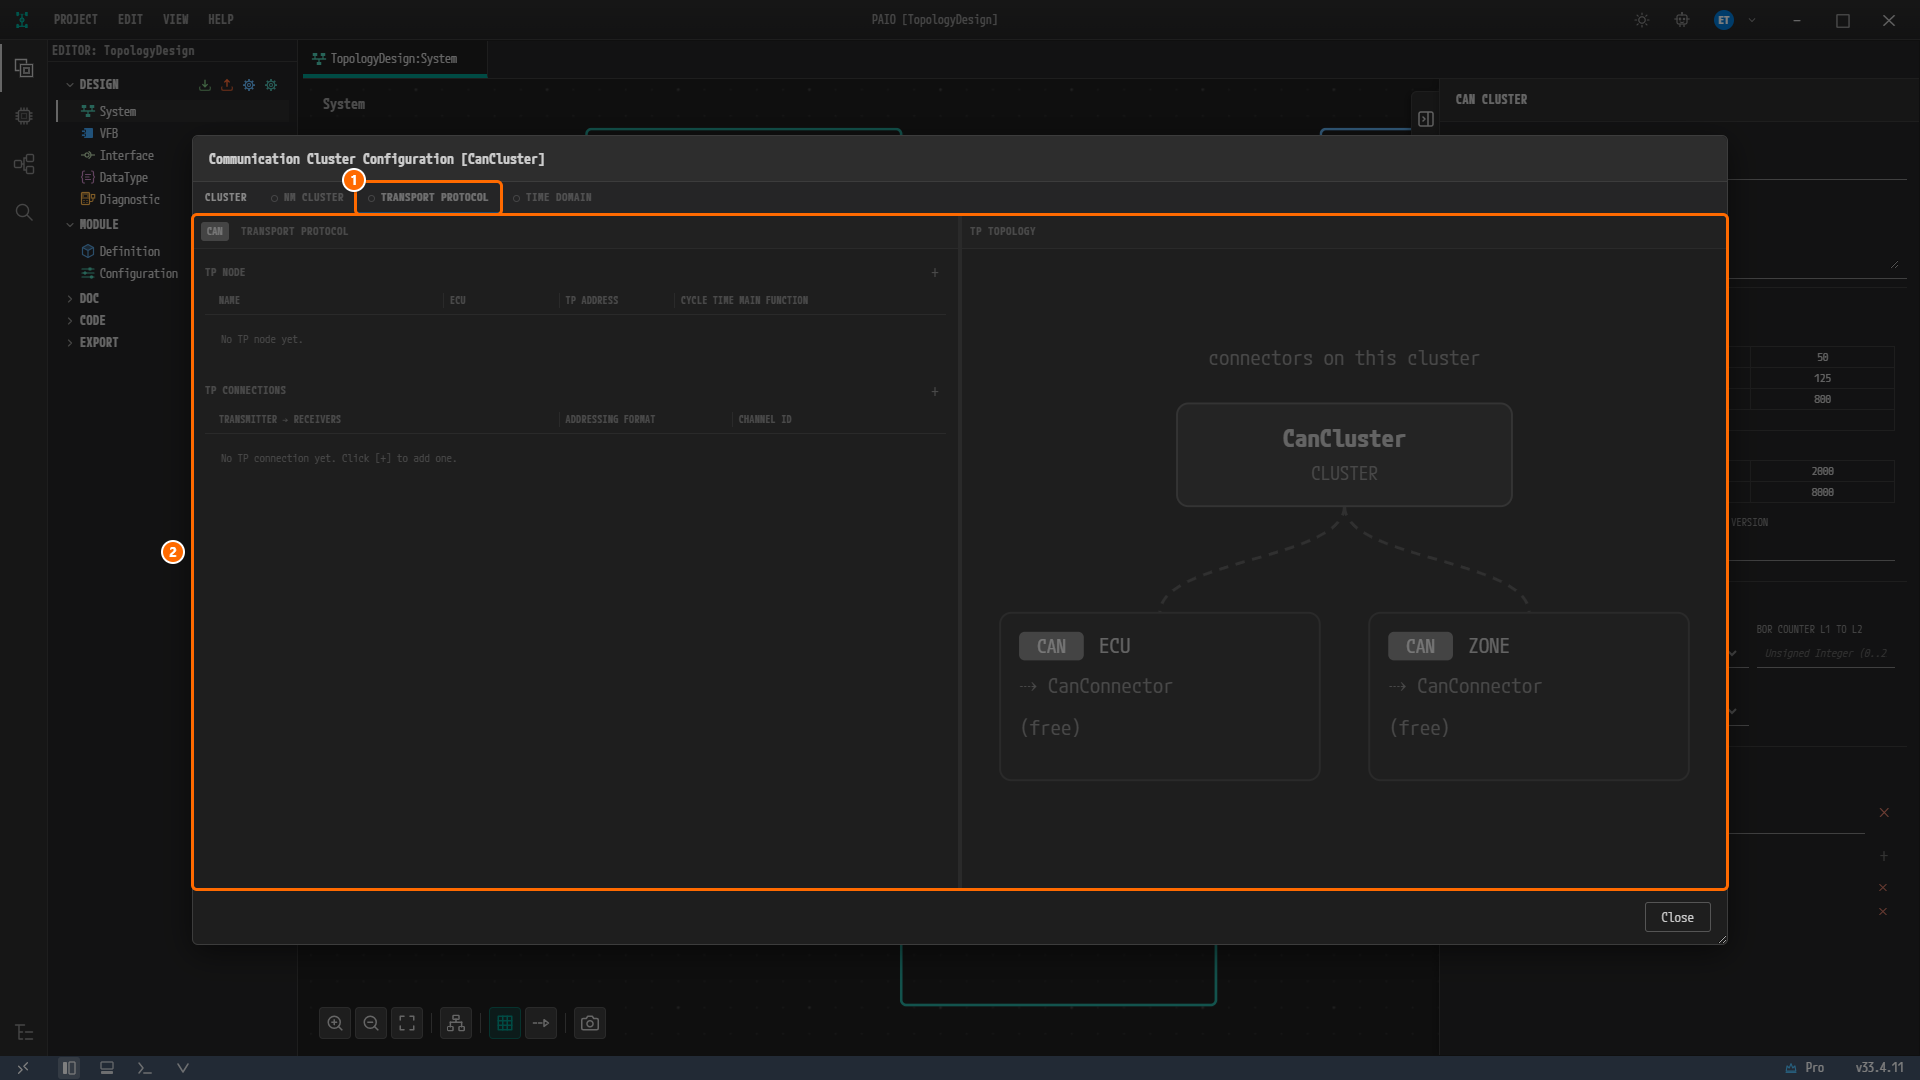
Figure 3-16. The TRANSPORT PROTOCOL tab. ① The tab TRANSPORT PROTOCOL with a hollow dot, ② the dimmed editing area. TP NODE reads
No TP node yet., and TP CONNECTIONS readsNo TP connection yet. Click [+] to add one.. In TP TOPOLOGY on the right, theCanConnectorof bothECUandZONEis(free). -
Click Close at the bottom right of the window. The window closes without a save prompt.
The transport protocol (TP) is off for CanCluster as well, so this tab is also a dimmed preview, and the design holds no CAN TP configuration. The TIME DOMAIN tab is off in the same way.
The reference design has no TP configuration. This tutorial leaves TP off and moves on to the next chapter.
Validating Again
- Click the V icon in the footer to open the VALIDATION panel. It still shows
No validation issues., and the tabTopologyDesign:Systemcarries no modified mark.
Closing the window without choosing Enable leaves the design as it was, and this result is expected.
Why Is It Designed This Way?
- The CAN bus joins
ECUandZONE. In the reference design, the channelPhysicalChannelofCanClusterholds the connectorsCanConnectorofZONEandECU, in that order. You create the cluster from theZONEside to match this order. - The controller names differ per node, while the connector names are the same. The reference design calls the controller of
ECUCanControllerand the controller ofZONECanCommController, and calls both connectorsCanConnector. - Bit timing goes only into the controller of
ECU. In the reference design,CanControllerholds all four bit timing values as0, andCanCommControllerhas no bit timing. - NM stays off. The reference design has no NM settings. NM is turned on per cluster with Enable on the NM CLUSTER tab, and a new cluster has it off, so you leave it off and
CanClustergets no NM cluster. - TP stays off. The reference design has no TP configuration either. TP is turned on per cluster in the same way on the TRANSPORT PROTOCOL tab, and since you leave it off, no TP configuration is created.
Checklist
- The node
ECUhas the CAN controllerCanController(four bit timing fields0, CAN on) and the CAN connectorCanConnector(CONTROLLER =CanController). - The node
ZONEhas the CAN controllerCanCommControllerand the CAN connectorCanConnector(CONTROLLER =CanCommController). - Selecting the cluster
CanClustershows CHANNEL NAMEPhysicalChanneland listsZONE/CanConnectorandECU/CanConnector, in that order, under Connected Connectors (2). - In Communication Cluster Configuration [CanCluster], the tabs NM CLUSTER, TRANSPORT PROTOCOL and TIME DOMAIN have a hollow dot in front of their names.
- The tab
TopologyDesign:Systemcarries no modified mark. - The VALIDATION panel shows
No validation issues..
Next Step
In Ethernet Bus you create Ethernet controllers and connectors on the nodes ZONE and HPC and join them with the Ethernet cluster EthernetCluster.